Key Management
 Key Management enables you to manage the OneStream Azure Key Vault and create keys, certificates, and secrets.
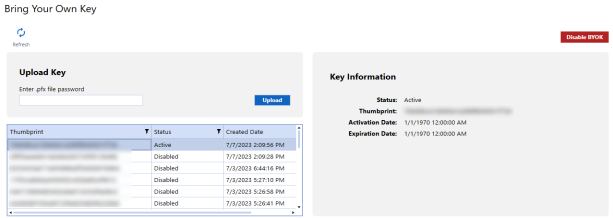
Bring Your Own Key
Our SaaS offering includes a robust key management service, ensuring the highest level of security for your data. Each client's key vault is uniquely deployed within our cloud infrastructure, enabling the Bring Your Own Key (BYOK) feature as part of our Cloud Administration Tools suite. This design guarantees that the lifecycle of your key vault is intrinsically linked to your specific instance, maintaining exclusivity and preventing access by other tenants.
You retain complete control over your keys through the Cloud Administration Tools interface, with keys securely stored in your private key vault, which is associated with a managed identity. Access to the key vault is stringently regulated; only the managed identity assigned to your OneStream instance's compute nodes and database server has the operational capability to manage keys, secrets, and certificates. This managed identity is granted specific roles—Certificates Officer, Crypto Officer, Service Encryption User, and Secrets Officer—to facilitate secure operations.
Network security measures are rigorously enforced to ensure that the key vault is accessible solely from your OneStream instance's network. Complementing these measures, we employ Azure policies and proactive alerting systems to safeguard against unauthorized changes to access policies. These policies are consistently reviewed in alignment with our SOC controls, further reinforcing our commitment to your data's security.
Enable Key Management
To enable BYOK:
-
Click Upload.
-
Select a .pfx file.
NOTE: Users on Platform 8.0 or above can choose to upload .pem files.
-
Click Open.
-
Your key is uploaded directly to the Azure Key Vault and the uploaded file is automatically deleted.
Key Information
Select a key to view its:
-
Name
-
Status
-
Azure thumbprint ID
-
Activation Date
-
Expiration Date
Disable Key Management
Disable key management by clicking the Disable BYOK button. BYOK will be disabled and your data will be managed by the service.
Refresh

|
This refreshes information in the grid. |
Certificates (Available Only with Platform 8.x)
Certificates and their corresponding keys can be used for more secure authentication to APIs, FTP servers, and other integrations. Each certificate contains a thumbprint ID that can be used in the Azure configuration tiles to identify which key is in use. The certificate interface enables system administrators to securely store these for later use in business rules.

Upload Certificates
To create a new certificate:
-
Enter a certificate name.
NOTE: Certificate names should be 127 characters or less.
-
Under Key Type, select HSM or Non-HSM.
NOTE: HSM is a physical device providing extra protection for sensitive keys. Using an HSM will permanently prevent exporting the private key in the future.
-
Enter a password.
-
Click the Upload button.
-
Select a .pfx file.
-
Click Open.
Certificate Versions
Select a certificate to view its status, creation and expiration dates, current version number, and previous versions.
Refresh
|
|
This refreshes information in the grid. |
Export Certificates
Exporting certificates out of Cloud Administration Tools is a bulk process and will export all certificates.
To export certificates:
-
Click Export.
-
Enter a password.
NOTE: This password will be required when the file is imported back into Cloud Administration Tools.
-
Click Okay. An encrypted file containing all certificates is downloaded to the OneStream file share.
Import Certificates
To import certificates:
-
Click Import.
-
Your local File Explorer will open. Select a file.
-
Fill in the password you chose when exporting the file.
-
The certificates will load in Cloud Administration Tools.
The import process does not overwrite existing certificates. However, if existing certificates share the same name as those contained in the file you are importing, it will need to be removed for the bulk import to process successfully.
View Snippet
Click the View Snippet button to retrieve a sample BRAPI code of the certificate, which can be copied and used in your business rules.
Certificate X509Certificate2
BRApi.Utilities.GetCertificate(SessionInfo si, string certificateName)This BRApi is used to access a certificate or key from within a business rule to load it into memory. It cannot be used with HSM backed keys.
Certificate Signature String
BRApi.Utilities.Sign(SessionInfo si, string keyName, string algorithm, byte[] digest)This BRApi is used to generate a signature using a key stored in the key vault without extracting the key. This can be used with both HSM and non-HSM backed keys.
Remove Certificates
The Delete Certificate button enables you to delete a certificate.
NOTE: After you delete a certificate, you cannot reuse the same certificate name for 90 days.
Secrets (Available Only with Platform 8.0)
Secrets enable system administrators to securely store sensitive information like passwords, API keys, or connection strings for later use in business rules.
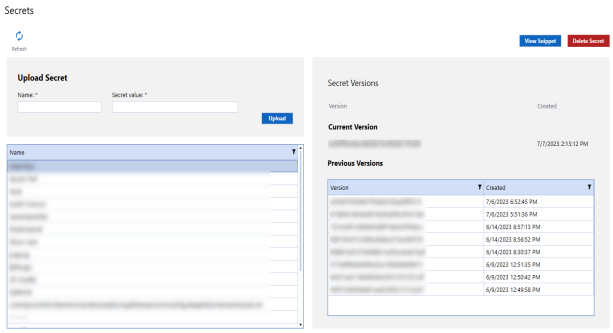
Upload Secrets
To create a new secret:
-
Enter a secret name.
NOTE: After you delete the name of a secret, you cannot reuse the same name for 90 days.
-
Enter a secret value.
-
Click the Upload button.
Secret Versions
Select a secret to view the current version number, previous version number, and creation dates.
Refresh
|
|
This refreshes information in the grid. |
Export Secrets
Exporting secrets out of Cloud Administration Tools is a bulk process and will export all secrets.
To export secrets:
-
Click Export.
-
Enter a password.
NOTE: This password will be required when the file is imported back into Cloud Administration Tools.
-
Click Okay. An encrypted file containing all secrets is downloaded to the OneStream file share.
Import Secrets
To import secrets:
-
Click Import.
-
Your local File Explorer will open. Select a file.
-
Fill in the password you chose when exporting the file.
-
The secrets will load in Cloud Administration Tools.
The import process does not overwrite existing secrets. However, if existing secrets share the same name as those contained in the file you are importing, it will need to be removed for the bulk import to process successfully.
View Snippet
Click the View Snippet button to retrieve a sample BRAPI code of the secret, which can be copied and used in business rules.
Secret Value String
BRApi.Utilities.GetSecretValue(SessionInfo si, string secretName)Remove Secrets
Click the Delete Secret button to delete a secret that is no longer in use.


