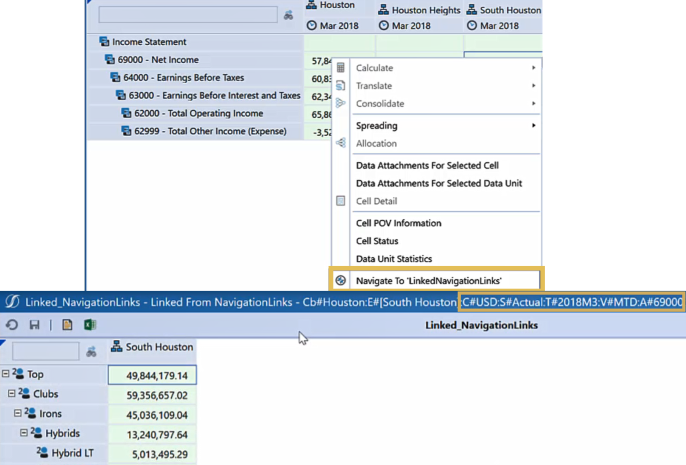
You can create NavLink parameters to be used in the rows, columns, or Cube View POV of the linked Cube View. You can use the Cube View POV to pass in multiple dimensions from the source Cube View. This ensures users are looking at the same dimensions between Cube Views. Point of view selections specified in the source Cube View can be passed to the linked Cube View, enabling a refined, focused analysis.
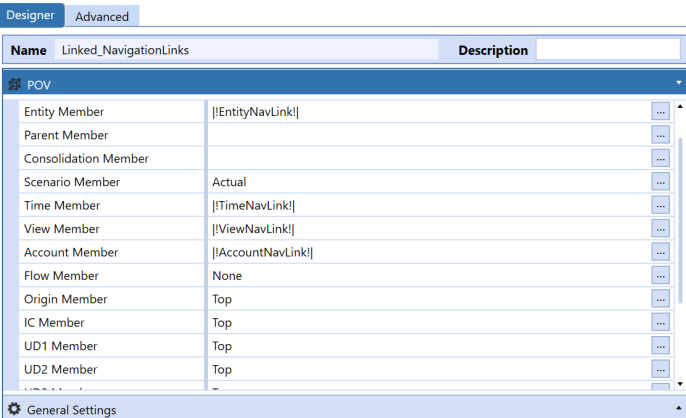
You can use the standard syntax for the parameters or you can create your own. To use the standard syntax, the Include Default NavLink Parameters property must be set to True. Use the following syntax: |!<dimension>NavLink!|
Example: To pass the Time dimension from a source Cube View to a linked Cube View, specify |!TimeNavLink!| in the linked Cube View POV. The data in the cell point of view in the source Cube View passes to the linked Cube View point of view at runtime.
 Watch Using Default NavLink Parameters for more information (3:32).
To use passed point of view selections in a linked Cube View, complete the following steps:
-
Go to Application > Cube Views and select the base Cube View containing the source data you want to access and analyze further in a linked Cube View.
-
Go to General Settings > Navigation Links and set the Include Default NavLink Parameters property to True. Click the Save icon.
-
Click the POV slider and specify |!dimensionNavLink!| for each dimension to analyze. Click the Save icon.
-
Return to the source Cube View and click the Open Data Explorer icon.
-
Right-click cells to navigate to the linked Cube View, retrieving data for the specified point of view parameters. These are also identified in the header.