Assemblies work similarly to Visual Studio Code, where there is a project with folders, each containing dependencies, such as assemblies and business rules. Assemblies let developers add references to known packages that are part of the standard server install, such as OpenXML. In the OneStream application, assemblies are located within Maintenance Units.
NOTE: If you need to reference an assembly from a business rule, use the following syntax: WS\ followed by the long workspace assembly name. For example, WS\Workspace.wsName.wsAssemblyName.
Follow these steps to create an assembly. In this example, you will use VB.Net.
-
On the Application tab, click Workspaces.
-
Expand Workspaces and locate the workspace.
-
Expand the workspace, then expand Maintenance Units.
-
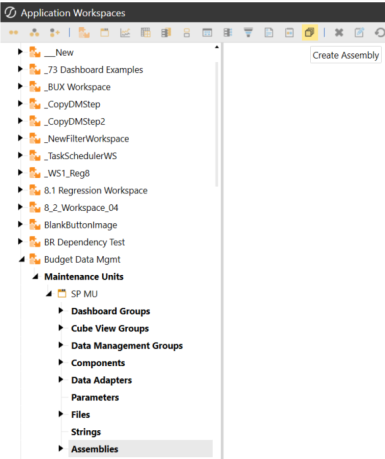
Expand the appropriate maintenance unit and click the Assemblies label.
You will not see this in the default maintenance unit, which is located in the Default workspace. This maintenance unit only stores cube view groups.
-
Click Create Assembly on the toolbar. Assemblies can be C# or VB.Net.
-
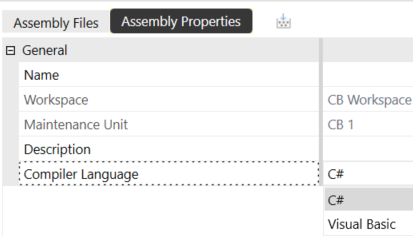
On the Assembly Properties page, click the drop-down arrow in the Compiler Language field and select the type of assembly. It can be either C# or VB.Net.
-
Give the assembly a name.
-
Optional. If you need to delete an assembly, while on the Assembly Properties page, click Delete.
-
Click Save.
You have now created an assembly.
Create an Assembly File
The assembly file is where you write the logic. You can choose to write a Business Rule type or a rule of your own (Not Used). The Not Used option provides great flexibility and is a good choice for most developers. Additionally, some performance gains may be realized with this choice.
-
Choose an assembly and click the Assembly Files tab.
-
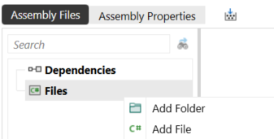
Right-click on Files and select Add File.
-
In the Add File dialog box:
-
Type a file name.
-
Select a Source Code type. You can choose either Business Rule or Service Type.
-
Select a Compiler Action. You can choose to compile the file when the assembly is compiled. Use Default is the same as Compile.
-
-
Click OK then Save. Your workspace will look similar to the following.
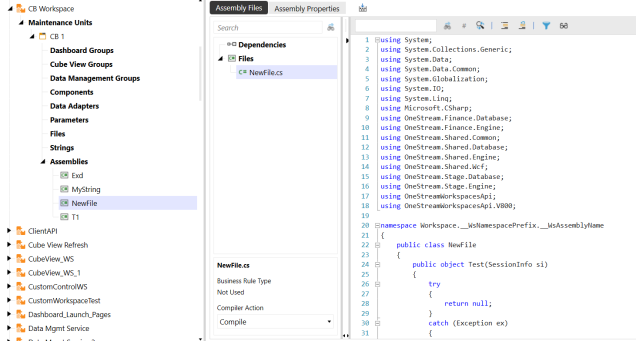
NOTE: You can change Compile Action inside this window but you cannot change the rule type. To do so, you need to delete the file.
Delete an Assembly File
-
Click on the file you would like to delete.
-
On the Assembly Properties tab, click Delete.
Encrypt an Assembly File
You may want others to have access to your Assembly Files. Encryption protects specific assembly files from users who may or may not have access to this workspace. Security can be controlled in the following ways:
-
Workspace level (access and maintenance security)
-
Maintenance unit level (access and maintenance security)
-
Application security roles that prevent others from writing assemblies in the application workspaces page (AdministerApplicationWorkspaceAssemblies)
-
System security roles that prevent others from writing assemblies in the system workspaces page (SystemApplicationWorkspaceAssemblies)
You must be inside the EncryptBusinessRules application security property to perform the following steps.
-
Right-click on an assembly file.
-
Select Encrypt File.
-
Provide a password and click OK. After you have provided a password, the file will be encrypted.
-
Optional. If you would like to decrypt the file, right-click and select Decrypt File.
Create an Assembly Folder
Assembly folders organize your assembly files. To create an assembly folder:
-
Select the assembly then click the Assembly Files tab.
-
Right-click the Files label and select Add Folder.
-
Give the folder a name and click OK.
-
Optional. To add files to the folder, right-click on the folder and select Add File.
NOTE: You cannot drag and drop files into a folder.
Create a Dependency
Dependencies are useful when you have methods within other assemblies or business rules.
-
Right-click the Dependencies label and select Add Dependency.
-
Choose a dependency type:
-
Workspace Assembly: Used when other assemblies might be included in this workspace. If you are creating a dependency with another workspace, you must provide the Shared Workspace Name and this workspace must have the Is Shareable Workspace property set to True.
Here is an example of how you would complete this dependency setup (multiple workspaces can be entered here in a comma delimited list).
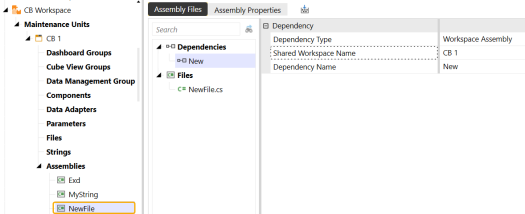
NOTE: If you are creating a dependency within the same workspace, do not fill in the Shared Workspace Name property.
-
Prepackaged Assembly: Assembly automatically included with the OneStream installation.
-
Business Rule: Create dependencies with any business rules located on the Business Rules page. Type the name of the business rule in the Dependency Name property and click Save.
-
After creating dependencies, you might receive an error when compiling the assembly if there is anything incorrect within the assembly or dependency itself.
Important notes when compiling with assemblies:
-
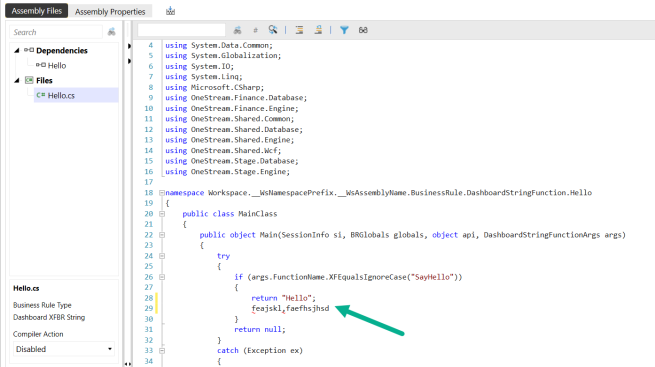
If the Compiler Action is set to Disabled for any dependent assembly file, you will not see an error even if you have issues with your syntax. For example, the following dependent assembly would not produce a syntax error even though one is present.
-
Assembly Files properties require you to type in the exact name of the workspace, assembly, and business rule. If incorrect, you will receive a compile error.


