Use the Profiles page to create Profiles and assign definitions and sites. Profiles are the final step in the administration journey. They bring your emission activity and Framework data points together, combining all necessary data collection into one place. Profiles acts as a structure for managing and organizing data entry, giving users the flexibility to provide narrative at higher levels while collecting Emission data at the Site level. For example, a Profile can be created for a location, and Sites within that location can be assigned to that Profile. Emission data is entered for Factors assigned to those Sites, and narrative is collected for the location based on reporting needs.
You can organize Profile structure by determining reporting needs. For example, if you report on multiple Frameworks, a Profile can be created for each Framework. Factor Group assignments can also determine different Profile structures. Profiles display on the Home page in the Assigned Tasks grid and organize data entry tasks. See Home
Use the toolbar options to manage Profiles.

-
To add a Profile, select the New button.
-
To remove a Profile, select the Delete button.
NOTE: You cannot delete a Profile that has one or more associated data entries.
-
To copy a Profile, select the Copy button.
-
To download a template for Profile data, select the Download button.
-
To import a template with Profile data, select the Import button.
Manage Profiles
To create a Profile, complete the following steps:
-
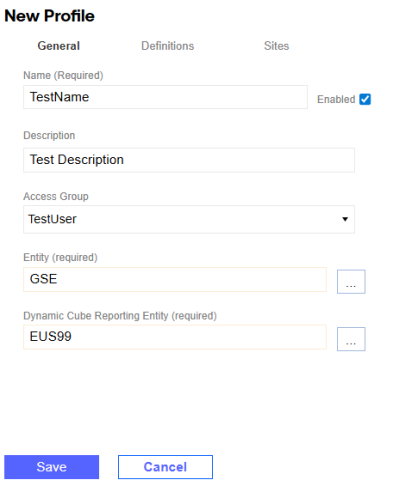
Select the New button to display the details pane.
-
In the General tab, enter Profile properties.
-
Enter a Profile name and description. A description is not required.
-
The Enabled checkbox is selected by default. To disable the Profile, deselect the Enabled checkbox.
NOTE: Disabled Profiles with statuses of Not Started, In Process, and Submitted do not display on the Home page. Disabled Profiles with a Completed status will still display on the Home page.
-
From the Access Group drop-down menu, select an Access Group for the Profile. See Access.
-
Assign an entity to the Profile.
-
Select the ellipses. In the Select Member window, under the Hierarchy tab, use the tree navigation to select an entity. Alternatively, use the Search tab to search for an entity. Select the OK button.
NOTE: You cannot select multiple entities. A profile must be made for each entity used.
-
-
The Dynamic Cube Reporting Entity field populates automatically. If the entity selected is set to a base level member, then the dynamic cube reporting entity is set to the entity. If the entity selected is set to a parent level member, then the dynamic cube reporting entity is set to the first base level member under the parent. Select the ellipses and use the Select Member window to modify the reporting entity.
-
Select the Save button.
-
-
In the Definitions tab, assign Definitions to the Profile.
NOTE: You cannot add Definitions if you have not saved the Profile.
-
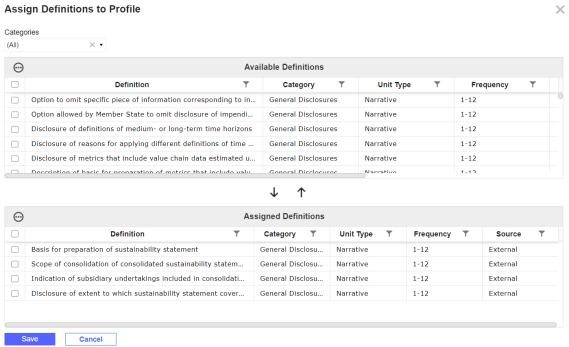
Select the Edit button to display the Assign Definitions to Profile slide-out panel.
-
To filter Definitions, from the Categories filter, select a category from the drop-down menu. This filter defaults to (All).
-
In the Available Definitions grid, use the checkboxes to select Definitions to add to the Profile.
-
Select the Add icon. The Definitions will display in the Assigned Definitions grid. To remove Definitions from the Profile, in the Available Definitions grid, use the checkboxes to select Definitions and then select the Remove icon.
-
Select the Save button. The assigned definitions will display in the Definitions tab.
NOTE: Definitions display in Profiles based on their assigned frequency. See Definitions.
-
-
In the Sites tab, assign sites to the Profile.
-
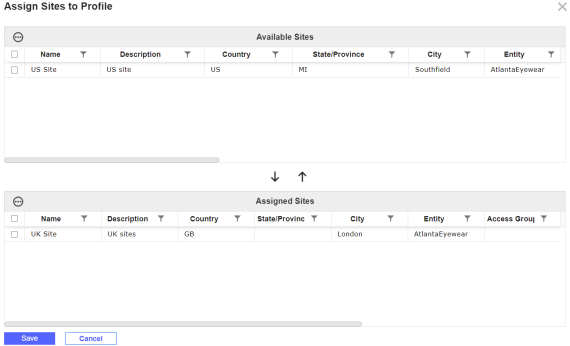
Select the Edit button to display the Assign Sites to Profile slide-out panel.
-
In the Available Sites grid, use the checkboxes to select Sites to add to the Profile. This table only lists sites under the entity selected for the Profile.
-
Select the Add icon. The Sites will display in the Assigned Sites grid. To remove Sites from the Profile, in the Available Sites grid, use the checkboxes to select Sites and then select the Remove icon.
-
Select the Save button. The assigned Sites will display in the Sites tab.
-
-
Select the Save button. The Profile will display in the grid.
Copy Profiles
-
Select the Profile you want to copy from the grid.
-
Select the Copy button.
-
Enter a Profile name and description. A description is not required. The Access Group and entity are copied over from the selected Profile.
-
To edit Definition and Site assignments, use the Definitions and Sites tabs. The copied Profile will have the same Definition and Site assignments as the selected Profile.
-
Select the Save button.
Import Profiles
Use the Download and Import buttons to download a Profile entry template and bulk import Profile data.
To import Profile data, complete the following steps:
-
Select the Download button. Fill in all required template columns.
Column Description Name Enter a name for the Profile. Description (Optional) Enter a description for the Profile. Access Group This column has a drop-down menu enabling you to select a valid Access Group. It populates all Sustainability Solution Access Groups. To review your Access Groups, see Access.
Select (Unassigned) if you do not need an Access Group assigned to the Profile.
Entity This columns has a drop-down menus enabling you to select a valid entity. It populates all members in the cube's Entity dimension. To review your cube selection, see Global Options. -
When you complete the template, select the Import button.
-
In the File Upload window, select the BROWSE button to open File Explorer.
-
Select the template and select the Open button.
-
Select the Upload button.
-
The Spreadsheet Import Report slide-out panel displays showing the number of entries added to the Profiles grid. Review the entries and select the Close button. If there are validation errors, the Spreadsheet Import Report slide-out panel displays a compiled list of errors.
NOTE: All imported Profiles are enabled by default.

