To enable single sign-on with Okta using SAML protocol, follow these steps:
-
Set Up for Single Sign-on with an External Identity Provider or Set Up for Native Authentication and Single Sign-on with an External Identity Provider.
Set Up the Application Server Configuration in OneStream
-
Open the OneStream Server Configuration Utility application.
-
Go to File > New Application Server Configuration File.
NOTE: Alternatively, you can open an existing file to edit it.
-
In the Security section, click the ellipsis to the right of External Authentication Providers.

-
Click the + icon to add an item.
-
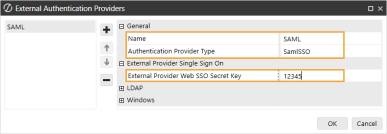
In the General and External Provider Single Sign On sections, complete the following fields:
-
Name: Enter the name of the identity provider. This name will display when configuring users to their external SSO.
-
Authentication Provider Type: Select SamlSSO in the drop-down menu.
-
External Provider Web SSO Secret Key: Enter a unique value. This key is used in the OneStream Application Server Configuration and the OneStream Web Server Configuration. It enables your application server to communicate with the web server.
-
-
Click the OK button.
-
Save changes and reset IIS.
NOTE: Reset IIS after you save any changes to the Application Server Configuration or Web Server Configuration.
Set Up the Applications in Okta
Set up the applications in Okta for the browser and desktop application.
Modern Browser Experience
To set up the application in Okta for the browser, you must complete these steps:
-
Enter the single sign-on URL and audience URI in Okta in this format: https://<domainname>/saml/sso
IMPORTANT: Follow the format listed for the single sign-on URL and audience URI exactly when you enter them in Okta. They must be an identical match.
-
Copy the single sign on (ACS) URL and metadata URL from Okta and paste them into the Web Server Configuration in OneStream.
Follow these detailed instructions. Depending on the identity provider version you use, the steps you must complete might be different.
-
Log in to your Okta account.
-
In the Applications list on the left, select Applications.
-
Click Create App Integration.
-
In the Create a new app integration dialog box, for Sign-in method, select SAML 2.0.
-
Click the Next button.
-
On the Create SAML Integration page, on the General Settings tab, in the App name field, enter the name of the application in Okta.
-
Click the Next button.
-
On the Create SAML Integration page, on the Configure SAML tab, complete the following fields:
-
Single sign-on URL: Enter the single sign-on URL in this format: https://<domainname>/saml/sso
IMPORTANT: Follow the format listed for the single sign-on URL exactly when you enter it in Okta. It must be an identical match.
-
Audience URI (SP Entity ID): Enter the audience URI in this format: https://<domainname>/saml/sso
IMPORTANT: Follow the format listed for the audience URI exactly when you enter it in Okta. It must be an identical match.
-
-
Click the Next button.
-
On the Create SAML Integration page, on the Feedback tab, for Are you a customer or partner?, select I'm an Okta customer adding an internal app.
-
Click the Finish button.
-
Copy the following information. You will need to paste this into the Web Server Configuration in OneStream.
-
In the General tab, copy the single sign on URL.
-
In the Sign on tab, copy the metadata URL.
NOTE: On the Assignments tab, you can assign users to the application.
-
Desktop Application
To set up the application in Okta for the desktop application, which includes the Windows Client application and the Excel Add-In, you must complete these steps:
-
Copy the single sign on (ACS) URL and metadata URL from Okta and paste them into the Web Server Configuration in OneStream.
-
Enter the single sign-on URL and audience URI in Okta in this format: https://<domainname>/OneStreamWeb/OneStreamLogonCallback.aspx/
IMPORTANT: Follow the format listed for the single sign-on URL and audience URI exactly when you enter them in Okta. They must be an identical match.
Follow these detailed instructions. Depending on the identity provider version you use, the steps you need to complete might be different.
-
Log in to your Okta account.
-
In the Applications list on the left, select Applications.
-
Click Create App Integration.
-
In the Create a new app integration dialog box, for Sign-in method, select SAML 2.0.
-
Click the Next button.
-
On the Create SAML Integration page, on the General Settings tab, in the App name field, enter the name of the application in Okta.
-
Click the Next button.
-
On the Create SAML Integration page, on the Configure SAML tab, complete the following fields:
-
Single sign-on URL: Enter the single sign-on URL in this format: https://<domainname>/OneStreamWeb/OneStreamLogonCallback.aspx/
IMPORTANT: Follow the format listed for the single sign-on URL exactly when you enter it in Okta. It must be an identical match.
-
Audience URI (SP Entity ID): Enter the audience URI in this format: https://<domainname>/OneStreamWeb/OneStreamLogonCallback.aspx/
IMPORTANT: Follow the format listed for the audience URI exactly when you enter it in Okta. It must be an identical match.
-
-
Click the Next button.
-
On the Create SAML Integration page, on the Feedback tab, for Are you a customer or partner?, select I'm an Okta customer adding an internal app.
-
Click the Finish button.
-
Copy the following information. You will need to paste this into the Web Server Configuration in OneStream.
-
In the General tab, copy the single sign on URL.
-
In the Sign on tab, copy the metadata URL.
NOTE: On the Assignments tab, you can assign users to the application.
-
Set Up the Web Server Configuration in OneStream
-
Open the OneStream Server Configuration Utility application.
-
Go to File > New Web Server Configuration File.
NOTE: Alternatively, you can open an existing file to edit it.
-
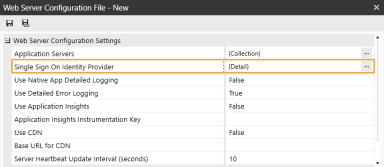
In the Web Server Configuration Settings section, click the ellipsis to the right of Single Sign On Identity Provider.
-
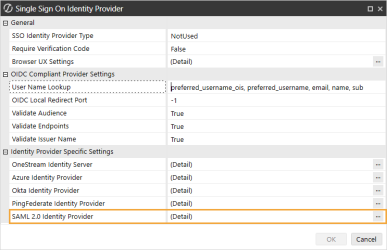
Click the ellipsis to the right of SAML 2.0 Identity Provider.
-
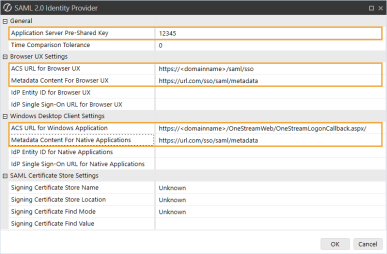
In the SAML 2.0 Identity Provider dialog box, complete the following fields:
General
-
Application Server Pre-Shared Key: Enter the same value from the External Provider Web SSO Secret Key field in the Application Server Configuration. See Set Up the Application Server Configuration in OneStream step 5.
Browser UX Settings
-
ACS URL for Browser UX: Enter the single sign on URL from Okta. See Modern Browser Experience step 12. Use this format: https://<domainname>/saml/sso
IMPORTANT: Follow the format listed for the single sign-on URL exactly when you enter it in the Web Server Configuration File. It must be an identical match.
-
Metadata Content for Browser UX: Enter the metadata URL from Okta. See Modern Browser Experience step 12.
NOTE: You can add the entity ID and single sign-on URL, but they are not needed if you entered the metadata URL from the identity provider.
Windows Desktop Client Settings
-
ACS URL for Windows Application: Enter the single sign on URL from Okta. See Desktop Application step 12. Use this format: https://<domainname>/OneStreamWeb/OneStreamLogonCallback.aspx/
IMPORTANT: Follow the format listed for the single sign-on URL exactly when you enter it in the Web Server Configuration File. It must be an identical match.
-
Metadata Content For Native Application: Enter the metadata URL from Okta. See Desktop Application step 12.
NOTE: You can add the entity ID and single sign-on URL, but they are not needed if you entered the metadata URL from the identity provider.
-
-
Click the OK button.
-
Save changes and reset IIS.
NOTE: Reset IIS after you save any changes to the Application Server Configuration or Web Server Configuration.
Set Up OneStream Login with Okta
-
In the desktop application, go to System > Security > Users > <user>.
-
In the Authentication properties, configure the user to authenticate through Okta.
-
External Authentication Provider: In the drop-down menu, select the Okta configuration.
-
External Provider User Name: Enter the username configured in Okta. This name must match the username set up in Okta and be used by only one user.
-
-
Click the Save icon.
Log in to OneStream with Okta
To log in with the browser, see the Modern Browser Experience Guide. To log in with the desktop application, follow these steps:
-
On the desktop application Logon screen, for Server Address, specify the URL or a client connection.
-
Click the Connect button.
-
Click the External Provider Sign In button.
-
Enter your Okta login credentials.
NOTE: If the Require Verification Code setting in the Web Server Configuration File is enabled, you will be provided with a one-time verification code to enter in the application. See Verification Code.
-
On the OneStream desktop application Logon screen, select an application from the drop-down menu.
-
Click the Open Application button.
NOTE: To log off, on any screen, click the Logoff icon and then click the End Session button.
SAML 2.0 Configuration with PingFederate
To enable single sign-on with PingFederate using SAML protocol, follow these steps:
-
Set Up for Single Sign-on with an External Identity Provider or Set Up for Native Authentication and Single Sign-on with an External Identity Provider.
Set Up the Application Server Configuration in OneStream
-
Open the OneStream Server Configuration Utility application.
-
Go to File > New Application Server Configuration File.
NOTE: Alternatively, you can open an existing file to edit it.
-
In the Security section, click the ellipsis to the right of External Authentication Providers.

-
Click the + icon to add an item.
-
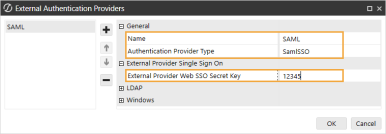
In the General and External Provider Single Sign On sections, complete the following fields:
-
Name: Enter the name of the identity provider. This name will display when configuring users to their external SSO.
-
Authentication Provider Type: Select SamlSSO in the drop-down menu.
-
External Provider Web SSO Secret Key: Enter a unique value. This key is used in the OneStream Application Server Configuration and the OneStream Web Server Configuration. It enables your application server to communicate with the web server.
-
-
Click the OK button.
-
Save changes and reset IIS.
NOTE: Reset IIS after you save any changes to the Application Server Configuration or Web Server Configuration.
Set Up the Applications in PingFederate
Set up the applications in PingFederate for the browser and desktop application.
Modern Browser Experience
To set up the application in PingFederate for the browser, you must complete these steps:
-
Enter the entity ID and assertion consumer service (ACS) URL in PingFederate in this format: https://<domainname>/saml/sso
IMPORTANT: Follow the format listed for the entity ID and ACS URL exactly when you enter them in PingFederate. They must be an identical match.
-
Export the metadata from PingFederate and then copy the URL, entity ID, and single sign-on from the metadata and paste them into the Web Server Configuration in OneStream.
Follow these detailed instructions. Depending on the identity provider version you use, the steps you must complete might be different.
-
Log in to your PingFederate account.
-
In the menu on the left, click Identity Provider.
-
Under the SP CONNECTIONS list, click the Create New button.
-
On the SP Connection page, in the Connection Template tab, select DO NOT USE A TEMPLATE FOR THIS CONNECTION, and click the Next button.
-
In the Connection Type tab, select BROWSER SSO PROFILES, and click the Next button.
-
In the Connection Options tab, click the Next button.
-
In the Import Metadata tab, click the Next button.
-
In the General Info tab, complete the following fields:
-
PARTNER'S ENTITY ID (CONNECTION ID): Enter the entity ID in this format: https://<domainname>/saml/sso
IMPORTANT: Follow the format listed for the entity ID exactly when you enter it in PingFederate. It must be an identical match.
-
CONNECTION NAME: Enter the name of the connection.
-
-
Click the Next button.
-
In the Browser SSO tab, click the Configure Browser SSO button.
-
In the SAML Profiles tab, in the Single Sign-On (SSO) Profiles list, select SP-INITIATED SSO. Click the Next button.
-
In the Assertion Lifetime tab, click the Next button.
-
In the Assertion Creation tab, click the Configure Assertion Creation button.
-
In the Identity Mapping tab, click the Next button.
-
In the Attribute Contract tab, click the Next button.
-
In the Authentication Source Mapping tab, click the Map New Adapter Instance button.
-
In the Adapter Instance tab, for ADAPTER INSTANCE, select HTML Form Adapter from the drop-down menu. Click the Next button.
-
In the Mapping Method tab, click the Next button.
-
In the Attribute Contract Fulfillment tab, for SAML_SUBJECT, in the Source drop-down menu, select Adapter. In the Value drop-down menu, select username. Click the Next button.
-
In the Insurance Criteria tab, click the Next button.
-
In the Summary tab, click the Done button.
-
-
In the Summary tab, click the Next button and then the Done button.
-
-
In the Assertion Creation tab, click the Next button.
-
In the Protocol Settings tab, click the Configure Protocol Settings button.
-
In the Assertion Consumer Service URL tab, In the Binding drop-down menu, select POST. Enter the Endpoint URL in this format: https://<domainname>/saml/sso and click the Add button. Click the Next button.
IMPORTANT: Follow the format listed for the ACS URL exactly when you enter it in PingFederate. It must be an identical match.
-
In the Allowable SAML Bindings tab, clear the checkboxes for ARTIFACT and SOAP. Select only POST and REDIRECT, and click the Next button.
-
In the Signature Policy tab, click the Next button.
-
In the Encryption Policy tab, click the Next button.
-
In the Summary tab, click the Done button.
-
-
In the Summary tab, click the Next button and then the Done button.
-
-
In the Browser SSO tab, click the Next button.
-
In the Credentials tab, click the Configure Credentials button.
-
In the Digital Signature Settings tab, in the SIGNING CERTIFICATE drop-down menu, select the certificate. Click the Next button.
-
In the Summary tab, click the Done button.
-
-
In the Activation & Summary tab, click the Next button and then the Save button.
-
Export the metadata to add to the Web Server Configuration File.
-
In PingFederate, in the menu on the left, click Identity Provider.
-
Under the SP CONNECTIONS list, click the Manage All button.
-
On the SP Connections page, in the row for the connection, in the Action column, click Select Action to view the drop-down menu options.
-
Select Export Metadata.
-
Select the signing certificate from the drop-down menu, and click the Next button.
-
Click the Export button.
-
Desktop Application
To set up the application in PingFederate for the desktop application, which includes the Windows Client application and the Excel Add-In, you must complete these steps:
-
Enter the entity ID and assertion consumer service (ACS) URL in PingFederate in this format: https://<domainname>/OneStreamWeb/OneStreamLogonCallback.aspx/
IMPORTANT: Follow the format listed for the entity ID and ACS URL exactly when you enter them in PingFederate. They must be an identical match.
-
Export the metadata from PingFederate and then copy the URL, entity ID, and single sign-on from the metadata and paste them into the Web Server Configuration in OneStream
Follow these detailed instructions. Depending on the identity provider version you use, the steps you must complete might be different.
-
Log in to your PingFederate account.
-
In the menu on the left, click Identity Provider.
-
Under the SP CONNECTIONS list, click the Create New button.
-
On the SP Connection page, in the Connection Template tab, select DO NOT USE A TEMPLATE FOR THIS CONNECTION, and click the Next button.
-
In the Connection Type tab, select BROWSER SSO PROFILES, and click the Next button.
-
In the Connection Options tab, click the Next button.
-
In the Import Metadata tab, click the Next button.
-
In the General Info tab, complete the following fields:
-
PARTNER'S ENTITY ID (CONNECTION ID): Enter the entity ID in this format: https://<domainname>/OneStreamWeb/OneStreamLogonCallback.aspx/
IMPORTANT: Follow the format listed for the entity ID exactly when you enter it in PingFederate. It must be an identical match.
-
CONNECTION NAME: Enter the name of the connection.
-
-
Click the Next button.
-
In the Browser SSO tab, click the Configure Browser SSO button.
-
In the SAML Profiles tab, in the Single Sign-On (SSO) Profiles list, select SP-INITIATED SSO. Click the Next button.
-
In the Assertion Lifetime tab, click the Next button.
-
In the Assertion Creation tab, click the Configure Assertion Creation button.
-
In the Identity Mapping tab, click the Next button.
-
In the Attribute Contract tab, click the Next button.
-
In the Authentication Source Mapping tab, click the Map New Adapter Instance button.
-
In the Adapter Instance tab, for ADAPTER INSTANCE, select HTML Form Adapter from the drop-down menu. Click the Next button.
-
In the Mapping Method tab, click the Next button.
-
In the Attribute Contract Fulfillment tab, for SAML_SUBJECT, in the Source drop-down menu, select Adapter. In the Value drop-down menu, select username. Click the Next button.
-
In the Insurance Criteria tab, click the Next button.
-
In the Summary tab, click the Done button.
-
-
In the Summary tab, click the Next button and then the Done button.
-
-
In the Assertion Creation tab, click the Next button.
-
In the Protocol Settings tab, click the Configure Protocol Settings button.
-
In the Assertion Consumer Service URL tab, In the Binding drop-down menu, select POST. Enter the Endpoint URL in this format: https://<domainname>/OneStreamWeb/OneStreamLogonCallback.aspx/ and click the Add button. Click the Next button.
IMPORTANT: Follow the format listed for the ACS URL exactly when you enter it in PingFederate. It must be an identical match.
-
In the Allowable SAML Bindings tab, clear the checkboxes for ARTIFACT and SOAP. Select only POST and REDIRECT, and click the Next button.
-
In the Signature Policy tab, click the Next button.
-
In the Encryption Policy tab, click the Next button.
-
In the Summary tab, click the Done button.
-
-
In the Summary tab, click the Next button and then the Done button.
-
-
In the Browser SSO tab, click the Next button.
-
In the Credentials tab, click the Configure Credentials button.
-
In the Digital Signature Settings tab, in the SIGNING CERTIFICATE drop-down menu, select the certificate. Click the Next button.
-
In the Summary tab, click the Done button.
-
-
In the Activation & Summary tab, click the Next button and then the Save button.
-
Export the metadata to add to the Web Server Configuration File.
-
In PingFederate, in the menu on the left, click Identity Provider.
-
Under the SP CONNECTIONS list, click the Manage All button.
-
On the SP Connections page, in the row for the connection, in the Action column, click Select Action to view the drop-down menu options.
-
Select Export Metadata.
-
Select the signing certificate from the drop-down menu, and click the Next button.
-
Click the Export button.
-
Set Up the Web Server Configuration in OneStream
-
Open the OneStream Server Configuration Utility application.
-
Go to File > New Web Server Configuration File.
NOTE: Alternatively, you can open an existing file to edit it.
-
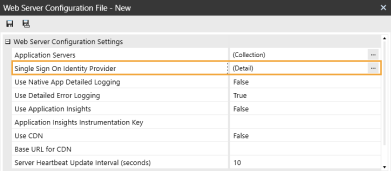
In the Web Server Configuration Settings section, click the ellipsis to the right of Single Sign On Identity Provider.
-
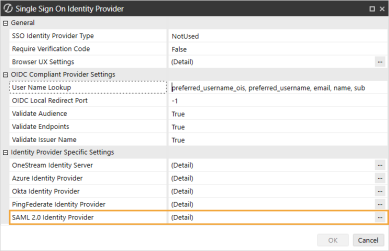
Click the ellipsis to the right of SAML 2.0 Identity Provider.
-
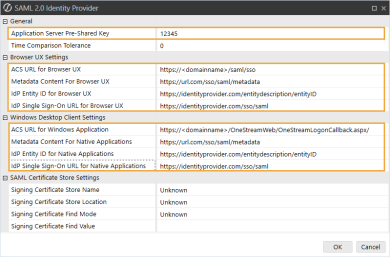
In the SAML 2.0 Identity Provider dialog box, complete the following fields:
General
-
Application Server Pre-Shared Key: Enter the same value from the External Provider Web SSO Secret Key field in the Application Server Configuration. See Set Up the Application Server Configuration in OneStream step 5.
Browser UX Settings
-
ACS URL for Browser UX: Enter the assertion consumer service (ACS) URL from PingFederate. See Modern Browser Experience step 10. Use this format: https://<domainname>/saml/sso
IMPORTANT: Follow the format listed for the ACS URL exactly when you enter it in the Web Server Configuration File. It must be an identical match.
-
Metadata Content for Browser UX: Enter the metadata URL from PingFederate. See Modern Browser Experience step 14.
-
IdP Entity ID for Browser UX: Enter the entity ID from the metadata. See Modern Browser Experience step 14.
-
IdP Single Sign-On URL for Browser UX: Enter the single sign-on from the metadata. See Modern Browser Experience step 14.
NOTE: You can add the entity ID and single sign-on URL, but they are not needed if you entered the metadata URL from the identity provider.
Windows Desktop Client Settings
-
ACS URL for Windows Application: Enter the assertion consumer service (ACS) URL from PingFederate. See Desktop Application step 10. Use this format: https://<domainname>/OneStreamWeb/OneStreamLogonCallback.aspx/
IMPORTANT: Follow the format listed for the ACS URL exactly when you enter it in the Web Server Configuration File. It must be an identical match.
-
Metadata Content For Native Application: Enter the metadata URL from PingFederate. See Desktop Application step 14.
-
IdP Entity ID for Native Applications: Enter the entity ID from the metadata. See Desktop Application step 14.
-
IdP Single Sign-On URL for Native Applications: Enter the single sign-on from the metadata. See Desktop Application step 14.
NOTE: You can add the entity ID and single sign-on URL, but they are not needed if you entered the metadata URL from the identity provider.
-
-
Click the OK button.
-
Save changes and reset IIS.
NOTE: Reset IIS after you save any changes to the Application Server Configuration or Web Server Configuration.
Set Up OneStream Login with PingFederate
-
In the desktop application, go to System > Security > Users > <user>.
-
In the Authentication properties, configure the user to authenticate through PingFederate.
-
External Authentication Provider: In the drop-down menu, select the PingFederate configuration.
-
External Provider User Name: Enter the username configured in PingFederate. This name must match the username set in PingFederate and be used by only one user.
-
-
Click the Save icon.
Log in to OneStream with PingFederate
To log in with the browser, see the Modern Browser Experience Guide. To log in with the desktop application, follow these steps:
-
On the desktop application Logon screen, for Server Address, specify the URL or a client connection.
-
Click the Connect button.
-
Click the External Provider Sign In button.
-
Enter your PingFederate login credentials.
NOTE: If the Require Verification Code setting in the Web Server Configuration File is enabled, you will be provided with a one-time verification code to enter in the application. See Verification Code.
-
On the OneStream desktop application Logon screen, select an application from the drop-down menu.
-
Click the Open Application button.
NOTE: To log off, on any screen, click the Logoff icon and then click the End Sessionbutton.
SAML 2.0 Configuration with ADFS
To enable single sign-on with ADFS using SAML protocol, follow these steps:
-
Set Up for Single Sign-on with an External Identity Provider or Set Up for Native Authentication and Single Sign-on with an External Identity Provider.
Set Up the Application Server Configuration in OneStream
-
Open the OneStream Server Configuration Utility application.
-
Go to File > New Application Server Configuration File.
NOTE: Alternatively, you can open an existing file to edit it.
-
In the Security section, click the ellipsis to the right of External Authentication Providers.

-
Click the + icon to add an item.
-
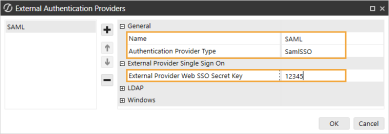
In the General and External Provider Single Sign On sections, complete the following fields:
-
Name: Enter the name of the identity provider. This name will display when configuring users to their external SSO.
-
Authentication Provider Type: Select SamlSSO in the drop-down menu.
-
External Provider Web SSO Secret Key: Enter a unique value. This key is used in the OneStream Application Server Configuration and the OneStream Web Server Configuration. It enables your application server to communicate with the web server.
-
-
Click the OK button.
-
Save changes and reset IIS.
NOTE: Reset IIS after you save any changes to the Application Server Configuration or Web Server Configuration.
Set Up the Applications in ADFS
Set up the applications in ADFS for the browser and desktop application.
Modern Browser Experience
To set up the application in ADFS for the browser, you must complete these steps:
-
Enter the relying party SAML 2.0 SSO service URL and relying party trust identifier in ADFS in this format: https://<domainname>/saml/sso
IMPORTANT: Follow the format listed for the relying party SAML 2.0 SSO service URL and relying party trust identifier exactly when you enter them in ADFS. They must be an identical match.
-
Copy the ACS URL and metadata URL from ADFS and paste them into the Web Server Configuration in OneStream.
Follow these detailed instructions. Depending on the identity provider version you use, the steps you must complete might be different.
-
Log in to your ADFS account.
-
On the left of the screen, open the AD FS folder, and then open the Relying Party Trusts folder.
-
In the Actions pane on the right, in the Relying Party Trusts menu, select Add Relying Party Trust.
-
In the Add Relying Party Trust Wizard dialog box, on the Welcome screen, select Claims Aware and click the Start button.
-
On the Select Data Source screen, select Enter data about the relying party manually and click the Next button.
-
On the Specify Display Name screen, enter a name for the application and click the Next button.
-
On the Configure Certificate screen, click the Next button.
-
On the Configure URL screen:
-
Select Enable support for the SAML 2.0 WebSSO protocol.
-
Enter the relying party SAML 2.0 SSO service URL in this format: https://<domainname>/saml/sso
IMPORTANT: Follow the format listed for the relying party SAML 2.0 SSO service URL exactly when you enter it in ADFS. It must be an identical match.
-
Click the Next button.
-
-
On the Configure Identifiers screen:
-
Enter the relying party trust identifier in this format: https://<domainname>/saml/sso
IMPORTANT: Follow the format listed for the relying party trust identifier exactly when you enter it in ADFS. It must be an identical match.
-
Click the Next button.
-
-
On the Choose Access Control Policy screen, select an option and click the Next button.
-
On the Ready to Add Trust screen, click the Next button.
-
On the Finish screen, click the Close button.
-
In the Relying Party Trusts list, right-click on the item you created, and click Edit Claim Issuance Policy.
-
In the Edit Claims Issuance Policy dialog box, click the Add Rule button.
-
In the Add Transform Claim Rule Wizard dialog box, on the Select Rule Template screen, in the Claim rule template drop-down menu, select Send LDAP Attributes as Claims and click the Next button.
-
On the Configure Rule screen, in the Claim rule name field, type Attributes. In the Attribute store drop-down menu, select Active Directory. In the Mapping of LDAP attributes to outgoing claim types table of drop-down menus, select these options:
-
LDAP Attribute: Given-Name and Outgoing Claim Type: Given Name
-
LDAP Attribute: Surname and Outgoing Claim Type: Surname
-
LDAP Attribute: E-Mail-Addresses and Outgoing Claim Type: E-Mail Address
-
-
Click the Finish button.
-
In the Edit Claims Issuance Policy dialog box, click the Add Rule button.
-
In the Add Transform Claim Rule Wizard dialog box, on the Select Rule Template screen, in the Claim rule template drop-down menu, select Send LDAP Attributes as Claims and click the Next button.
-
On the Configure Rule screen, in the Claim rule name field, type Windows Account Name. In the Attribute store drop-down menu, select Active Directory. In the Mapping of LDAP attributes to outgoing claim types table of drop-down menus, select these options:
-
LDAP Attribute: SAM-Account-Name and Outgoing Claim Type: Name ID
-
-
Click the Finish button.
-
In the Edit Claims Issuance Policy dialog box, click the Add Rule button.
-
In the Add Transform Claim Rule Wizard dialog box, on the Select Rule Template screen, in the Claim rule template drop-down menu, select Send LDAP Attributes as Claims and click the Next button.
-
On the Configure Rule screen, in the Claim rule name field, type UpnToAppId. In the Attribute store drop-down menu, select Active Directory. In the Mapping of LDAP attributes to outgoing claim types table of drop-down menus, select these options:
-
LDAP Attribute: User-Principal-Name and Outgoing Claim Type: Application Identifier
-
-
Click the Finish button.
-
In the Edit Claims Issuance Policy dialog box, click the OK button.
Desktop Application
To set up the application in ADFS for the desktop application, which includes the Windows Client application and the Excel Add-In, you must complete these steps:
-
Enter the relying party SAML 2.0 SSO service URL and relying party trust identifier in ADFS in this format: https://<domainname>/OneStreamWeb/OneStreamLogonCallback.aspx/
IMPORTANT: Follow the format listed for the relying party SAML 2.0 SSO service URL and relying party trust identifier exactly when you enter them in ADFS. They must be an identical match.
-
Copy the ACS URL and metadata URL from ADFS and paste them into the Web Server Configuration in OneStream.
Follow these detailed instructions. Depending on the identity provider version you use, the steps you must complete might be different.
-
Log in to your ADFS account.
-
On the left of the screen, open the AD FS folder, and then open the Relying Party Trusts folder.
-
In the Actions pane on the right, in the Relying Party Trusts menu, select Add Relying Party Trust.
-
In the Add Relying Party Trust Wizard dialog box, on the Welcome screen, select Claims Aware and click the Start button.
-
On the Select Data Source screen, select Enter data about the relying party manually and click the Next button.
-
On the Specify Display Name screen, enter a name for the application and click the Next button.
-
On the Configure Certificate screen, click the Next button.
-
On the Configure URL screen:
-
Select Enable support for the SAML 2.0 WebSSO protocol.
-
Enter the relying party SAML 2.0 SSO service URL in this format: https://<domainname>/OneStreamWeb/OneStreamLogonCallback.aspx/
IMPORTANT: Follow the format listed for the relying party SAML 2.0 SSO service URL exactly when you enter it in ADFS. It must be an identical match.
-
Click the Next button.
-
-
On the Configure Identifiers screen:
-
Enter the relying party trust identifier in this format: https://<domainname>/OneStreamWeb/OneStreamLogonCallback.aspx/
IMPORTANT: Follow the format listed for the relying party trust identifier exactly when you enter it in ADFS. It must be an identical match.
-
Click the Next button.
-
-
On the Choose Access Control Policy screen, select an option and click the Next button.
-
On the Ready to Add Trust screen, click the Next button.
-
On the Finish screen, click the Close button.
-
In the Relying Party Trusts list, right-click on the item you created, and click Edit Claim Issuance Policy.
-
In the Edit Claims Issuance Policy dialog box, click the Add Rule button.
-
In the Add Transform Claim Rule Wizard dialog box, on the Select Rule Template screen, in the Claim rule template drop-down menu, select Send LDAP Attributes as Claims and click the Next button.
-
On the Configure Rule screen, in the Claim rule name field, type Attributes. In the Attribute store drop-down menu, select Active Directory. In the Mapping of LDAP attributes to outgoing claim types table of drop-down menus, select these options:
-
LDAP Attribute: Given-Name and Outgoing Claim Type: Given Name
-
LDAP Attribute: Surname and Outgoing Claim Type: Surname
-
LDAP Attribute: E-Mail-Addresses and Outgoing Claim Type: E-Mail Address
-
-
Click the Finish button.
-
In the Edit Claims Issuance Policy dialog box, click the Add Rule button.
-
In the Add Transform Claim Rule Wizard dialog box, on the Select Rule Template screen, in the Claim rule template drop-down menu, select Send LDAP Attributes as Claims and click the Next button.
-
On the Configure Rule screen, in the Claim rule name field, type Windows Account Name. In the Attribute store drop-down menu, select Active Directory. In the Mapping of LDAP attributes to outgoing claim types table of drop-down menus, select these options:
-
LDAP Attribute: SAM-Account-Name and Outgoing Claim Type: Name ID
-
-
Click the Finish button.
-
In the Edit Claims Issuance Policy dialog box, click the Add Rule button.
-
In the Add Transform Claim Rule Wizard dialog box, on the Select Rule Template screen, in the Claim rule template drop-down menu, select Send LDAP Attributes as Claims and click the Next button.
-
On the Configure Rule screen, in the Claim rule name field, type UpnToAppId. In the Attribute store drop-down menu, select Active Directory. In the Mapping of LDAP attributes to outgoing claim types table of drop-down menus, select these options:
-
LDAP Attribute: User-Principal-Name and Outgoing Claim Type: Application Identifier
-
-
Click the Finish button.
-
In the Edit Claims Issuance Policy dialog box, click the OK button.
Set Up the Web Server Configuration in OneStream
-
Open the OneStream Server Configuration Utility application.
-
Go to File > New Web Server Configuration File.
NOTE: Alternatively, you can open an existing file to edit it.
-
In the Web Server Configuration Settings section, click the ellipsis to the right of Single Sign On Identity Provider.

-
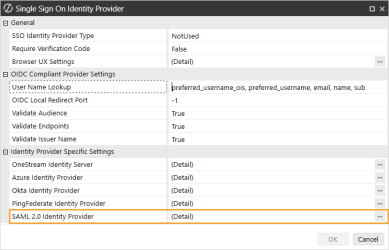
Click the ellipsis to the right of SAML 2.0 Identity Provider.
-
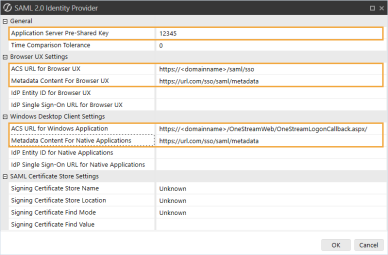
In the SAML 2.0 Identity Provider dialog box, complete the following fields:
General
-
Application Server Pre-Shared Key: Enter the same value from the External Provider Web SSO Secret Key field in the Application Server Configuration. See Set Up the Application Server Configuration in OneStream step 5.
Browser UX Settings
-
ACS URL for Browser UX: Enter the relying party SAML 2.0 SSO service URL and relying party trust identifier in ADFS. See Modern Browser Experience step 9. Use this format: https://<domainname>/saml/sso
IMPORTANT: Follow the format listed for the relying party SAML 2.0 SSO service URL exactly when you enter it in the Web Server Configuration File. It must be an identical match.
-
Metadata Content for Browser UX: Enter the metadata URL from ADFS. To find the metadata URL, in ADFS, go to AD FS > Service > Endpoints > Metadata. Copy the URL path for the Federation Metadata. Paste that URL path to the end of the URL to the ADFS VM.
NOTE: You can add the entity ID and single sign-on URL, but they are not needed if you entered the metadata URL from the identity provider.
Windows Desktop Client Settings
-
ACS URL for Windows Application: Enter the relying party SAML 2.0 SSO service URL from ADFS. See Desktop Application step 9. Use this format: https://<domainname>/OneStreamWeb/OneStreamLogonCallback.aspx/
IMPORTANT: Follow the format listed for the relying party SAML 2.0 SSO service URL exactly when you enter it in the Web Server Configuration File. It must be an identical match.
-
Metadata Content For Native Application: Enter the metadata URL from ADFS. To find the metadata URL, in ADFS, go to AD FS > Service > Endpoints > Metadata. Copy the URL path for the Federation Metadata. Paste that URL path to the end of the URL to the ADFS VM.
NOTE: You can add the entity ID and single sign-on URL, but they are not needed if you entered the metadata URL from the identity provider.
-
-
Click the OK button.
-
Save changes and reset IIS.
NOTE: Reset IIS after you save any changes to the Application Server Configuration or Web Server Configuration.
Set Up OneStream Login with ADFS
-
In the desktop application, go to System > Security > Users > <user>.
-
In the Authentication properties, configure the user to authenticate through ADFS.
-
External Authentication Provider: In the drop-down menu, select the ADFS configuration.
-
External Provider User Name: Enter the username configured in ADFS. This name must match the username set up in ADFS and be used by only one user.
-
-
Click the Save icon.
Log in to OneStream with ADFS
To log in with the browser, see the Modern Browser Experience Guide. To log in with the desktop application, follow these steps:
-
On the desktop application Logon screen, for Server Address, specify the URL or a client connection.
-
Click the Connect button.
-
Click the External Provider Sign In button.
-
Enter your ADFS login credentials.
NOTE: If the Require Verification Code setting in the Web Server Configuration File is enabled, you will be provided with a one-time verification code to enter in the application. See Verification Code.
-
On the OneStream desktop application Logon screen, select an application from the drop-down menu.
-
Click the Open Application button.
NOTE: To log off, on any screen, click the Logoff icon and then click the End Session button.
SAML 2.0 Configuration with Salesforce
To enable single sign-on with Salesforce using SAML protocol, follow these steps:
-
Set Up for Single Sign-on with an External Identity Provider or Set Up for Native Authentication and Single Sign-on with an External Identity Provider.
Set Up the Application Server Configuration in OneStream
-
Open the OneStream Server Configuration Utility application.
-
Go to File > New Application Server Configuration File.
NOTE: Alternatively, you can open an existing file to edit it.
-
In the Security section, click the ellipsis to the right of External Authentication Providers.

-
Click the + icon to add an item.
-
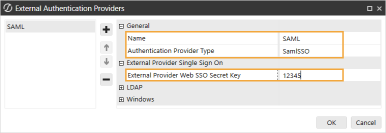
In the General and External Provider Single Sign On sections, complete the following fields:
-
Name: Enter the name of the identity provider. This name will display when configuring users to their external SSO.
-
Authentication Provider Type: Select SamlSSO in the drop-down menu.
-
External Provider Web SSO Secret Key: Enter a unique value. This key is used in the OneStream Application Server Configuration and the OneStream Web Server Configuration. It enables your application server to communicate with the web server.
-
-
Click the OK button.
-
Save changes and reset IIS.
NOTE: Reset IIS after you save any changes to the Application Server Configuration or Web Server Configuration.
Set Up the Applications in Salesforce
Set up the applications in Salesforce for the browser and desktop application.
Modern Browser Experience
To set up the application in Salesforce for the browser, you must complete these steps:
-
Enter the Entity Id and ACS URL in Salesforce in this format: https://<domainname>/saml/sso
IMPORTANT: Follow the format listed for the Entity Id and ACS URL exactly when you enter them in Salesforce. They must be an identical match.
-
Copy the ACS URL and metadata discovery endpoint from Salesforce and paste them into the Web Server Configuration in OneStream.
Follow these detailed instructions. Depending on the identity provider version you use, the steps you must complete might be different.
-
Log in to your Salesforce account.
-
On the left of the screen, under PLATFORM TOOLS, in the Apps list, select App Manager.
-
Click the New Connected App button.
-
On the New Connected App page, in the Basic Information and Web App Settings sections, complete the following fields:
-
Connected App Name: Enter a name for the application.
-
API Name: Enter an API name.
-
Contact Email: Enter an email address.
-
Enable SAML: Select this option.
-
Entity Id: Enter Entity Id in this format: https://<domainname>/saml/sso
IMPORTANT: Follow the format listed for the Entity Id exactly when you enter it in Salesforce. It must be an identical match.
-
ACS URL: Enter the ACS URL in this format: https://<domainname>/saml/sso
IMPORTANT: Follow the format listed for the ACS URL exactly when you enter it in Salesforce. It must be an identical match.
-
-
Click the Save button.
NOTE: On the left of the screen, go to PLATFORM TOOLS > Apps > Connected Apps > Manage Connected Apps to view the Entity ID and ACS URL.
Desktop Application
To set up the application in Salesforce for the desktop application, which includes the Windows Client application and the Excel Add-In, you must complete these steps:
-
Enter the Entity Id and ACS URL in Salesforce in this format: https://<domainname>/OneStreamWeb/OneStreamLogonCallback.aspx/
IMPORTANT: Follow the format listed for the Entity Id and ACS URL exactly when you enter them in Salesforce. They must be an identical match.
-
Copy the ACS URL and metadata discovery endpoint from Salesforce and paste them into the Web Server Configuration in OneStream.
Follow these detailed instructions. Depending on the identity provider version you use, the steps you must complete might be different.
-
Log in to your Salesforce account.
-
On the left of the screen, under PLATFORM TOOLS, in the Apps list, select App Manager.
-
Click the New Connected App button.
-
On the New Connected App page, in the Basic Information and Web App Settings sections, complete the following fields:
-
Connected App Name: Enter a name for the application.
-
API Name: Enter an API name.
-
Contact Email: Enter an email address.
-
Enable SAML: Select this option.
-
Entity Id: Enter Entity Id in this format: https://<domainname>/OneStreamWeb/OneStreamLogonCallback.aspx/
IMPORTANT: Follow the format listed for the Entity Id exactly when you enter it in Salesforce. It must be an identical match.
-
ACS URL: Enter the ACS URL in this format: https://<domainname>/OneStreamWeb/OneStreamLogonCallback.aspx/
IMPORTANT: Follow the format listed for the ACS URL exactly when you enter it in Salesforce. It must be an identical match.
-
-
Click the Save button.
NOTE: On the left of the screen, go to PLATFORM TOOLS > Apps > Connected Apps > Manage Connected Apps to view the Entity ID and ACS URL.
Set Up the Web Server Configuration in OneStream
-
Open the OneStream Server Configuration Utility application.
-
Go to File > New Web Server Configuration File.
NOTE: Alternatively, you can open an existing file to edit it.
-
In the Web Server Configuration Settings section, click the ellipsis to the right of Single Sign On Identity Provider.

-
Click the ellipsis to the right of SAML 2.0 Identity Provider.

-
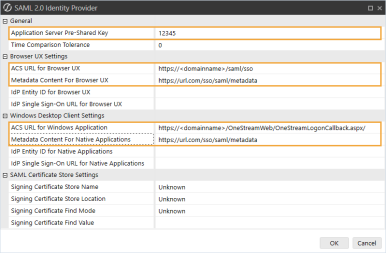
In the SAML 2.0 Identity Provider dialog box, complete the following fields:
General
-
Application Server Pre-Shared Key: Enter the same value from the External Provider Web SSO Secret Key field in the Application Server Configuration. See Set Up the Application Server Configuration in OneStream step 5.
Browser UX Settings
-
ACS URL for Browser UX: Enter the ACS URL from Salesforce. See Modern Browser Experience step 4. Use this format: https://<domainname>/saml/sso
IMPORTANT: Follow the format listed for the ACS URL exactly when you enter it in the Web Server Configuration File. It must be an identical match.
TIP: In Salesforce, on the left of the screen, go to PLATFORM TOOLS > Apps > Connected Apps > Manage Connected Apps to view the ACS URL.
-
Metadata Content for Browser UX: Enter the metadata discovery endpoint from Salesforce.
TIP: In Salesforce, on the left of the screen, go to PLATFORM TOOLS > Apps > Connected Apps > Manage Connected Apps to view the metadata discovery endpoint.
NOTE: You can add the entity ID and single sign-on URL, but they are not needed if you entered the metadata URL from the identity provider.
Windows Desktop Client Settings
-
ACS URL for Windows Application: Enter the ACS URL from Salesforce. See Desktop Application step 4. Use this format: https://<domainname>/OneStreamWeb/OneStreamLogonCallback.aspx/
IMPORTANT: Follow the format listed for the ACS URL exactly when you enter it in the Web Server Configuration File. It must be an identical match.
TIP: In Salesforce, on the left of the screen, go to PLATFORM TOOLS > Apps > Connected Apps > Manage Connected Apps to view the ACS URL.
-
Metadata Content For Native Application: Enter the metadata discovery endpoint from Salesforce.
TIP: In Salesforce, on the left of the screen, go to PLATFORM TOOLS > Apps > Connected Apps > Manage Connected Apps to view the metadata discovery endpoint.
NOTE: You can add the entity ID and single sign-on URL, but they are not needed if you entered the metadata URL from the identity provider.
-
-
Click the OK button.
-
Save changes and reset IIS.
NOTE: Reset IIS after you save any changes to the Application Server Configuration or Web Server Configuration.
Set Up OneStream Login with Salesforce
-
In the desktop application, go to System > Security > Users > <user>.
-
In the Authentication properties, configure the user to authenticate through Salesforce.
-
External Authentication Provider: In the drop-down menu, select the Salesforce configuration.
-
External Provider User Name: Enter the username configured in Salesforce. This name must match the username set up in Salesforce and be used by only one user.
-
-
Click the Save icon.
Log in to OneStream with Salesforce
To log in with the browser, see the Modern Browser Experience Guide. To log in with the desktop application, follow these steps:
-
On the desktop application Logon screen, for Server Address, specify the URL or a client connection.
-
Click the Connect button.
-
Click the External Provider Sign In button.
-
Enter your Salesforce login credentials.
NOTE: If the Require Verification Code setting in the Web Server Configuration File is enabled, you will be provided with a one-time verification code to enter in the application. See Verification Code.
-
On the OneStream desktop application Logon screen, select an application from the drop-down menu.
-
Click the Open Application button.
NOTE: To log off, on any screen, click the Logoff icon and then click the End Session button.


