To increase security against vulnerabilities, we strongly recommend you configure single sign-on with an external identity provider with one of the following options:
-
For OpenID Connect (OIDC) and SAML 2.0 identity providers, enable a time-based one-time password (TOTP), which requires users to enter a one-time verification code for authentication. See Verification Code.
-
For OIDC identity providers only, run a local loopback with a local redirect port. See OIDC Local Redirect Port.
If both of these options are enabled, the local loopback will run with the designated port. The one-time verification code will not display for users when they log in.
Verification Code
When enabled, users are provided with a one-time verification code to enter in the application after they have successfully authenticated with the configured identity provider. The verification code is only valid for 30 seconds.
NOTE: If the OIDC local redirect port is also enabled, the one-time verification code will not display for users when they log in. See OIDC Local Redirect Port.
The verification code can be enabled for the following external identity providers:
-
Three OIDC identity providers:
-
Azure Active Directory (Azure AD [Microsoft Entra ID])
-
Okta
-
PingFederate
-
-
SAML 2.0 identity providers (for example, Okta, PingFederate, Active Directory Federation Services [ADFS], and Salesforce)
This section includes instructions for how to configure the verification code and a description of the login flow with a verification code.
Configure the Verification Code
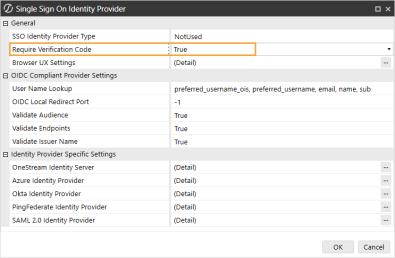
By default, the Require Verification Code setting is False. To enable a one-time verification code, update the setting to True.
-
Open the OneStream Server Configuration Utility application.
-
Go to File > New Web Server Configuration File.
NOTE: Alternatively, you can open an existing file to edit it.
-
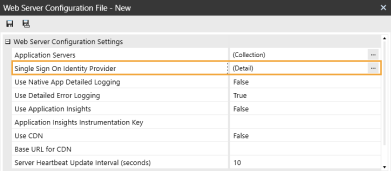
In the Web Server Configuration Settings section, click the ellipsis to the right of Single Sign On Identity Provider.
-
In the General section, in the Require Verification Code drop-down menu, select True.
-
Click the OK button.
-
Save changes and reset IIS.
NOTE: Reset IIS after you save any changes to the Web Server Configuration.
Login Flow with a Verification Code
-
On the OneStream Desktop Application Logon screen, for Server Address, specify the URL or a client connection.
-
Click the Connect button.
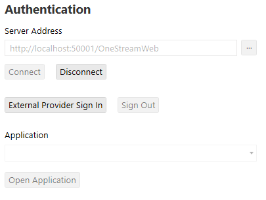
NOTE: The Logon screen will look different depending on how your environment is configured (external identity provider or both native authentication and an external identity provider).
-
Click the External Provider Sign In button.
-
Enter your login credentials.
-
After successful authentication with the external identity provider, a one-time verification code is provided. Copy this code.
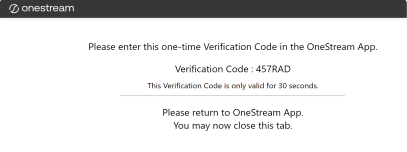
IMPORTANT: The verification code is only valid for 30 seconds. If the code expires, you will need to log in again to generate a new code.
NOTE: If the OIDC local redirect port is enabled, the one-time verification code will not display for users when they log in. See OIDC Local Redirect Port.
-
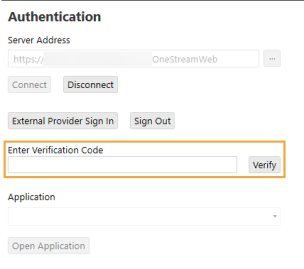
On the OneStream Desktop Application Logon screen, enter the verification code in the field, and click the Verify button.
-
Select an application from the drop-down menu.
-
Click the Open Application button.
OIDC Local Redirect Port
We strongly recommend enabling a local redirect port when configuring your environment for OIDC authentication. When enabled, a local loopback will run with the designated port.
NOTE: If the verification code is also enabled, the local loopback will run with the designated port. The one-time verification code will not display for users when they log in. See Verification Code.
The OIDC local redirect port can be enabled for the following external OIDC identity providers:
-
Azure Active Directory (Azure AD [Microsoft Entra ID])
IMPORTANT: For Azure AD (Microsoft Entra ID) identity providers, you must configure the app registration to issue access tokens. See Configure the OIDC Local Redirect Port steps 9–11.
-
Okta
-
PingFederate
IMPORTANT: For PingFederate identity providers, you must add the OneStream Windows App JWKS Path. See Configure the OIDC Local Redirect Port step 5.
By default, the OIDC Local Redirect Port setting is disabled (-1). You can update the field to enable the setting and use a dynamic or specific port.
| Identity Provider | Enable OIDC Local Redirect Port |
|---|---|
| Azure AD (Microsoft Entra ID) | You can enter 0 for a dynamic port assignment or any number from 1024 through 65535 to specify the port. A dynamic port helps to prevent the risk of port conflicts if multiple sources attempt to use the same port at the same time. |
| Okta | You must specify the port. Enter any number from 1024 through 65535. |
| PingFederate | You must specify the port. Enter any number from 1024 through 65535. |
Configure the OIDC Local Redirect Port
-
Open the OneStream Server Configuration Utility application.
-
Go to File > New Web Server Configuration File.
NOTE: Alternatively, you can open an existing file to edit it.
-
In the Web Server Configuration Settings section, click the ellipsis to the right of Single Sign On Identity Provider.

-
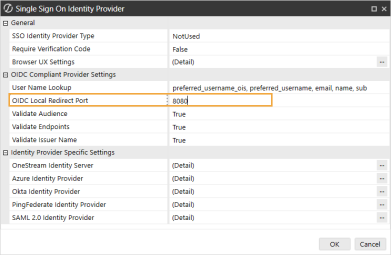
In the OIDC Compliant Provider Settings section, next to OIDC Local Redirect Port, enter the value to use a dynamic port (0), specify a port (1024–65535), or disable the feature (-1).
-
For a PingFederate identity provider, enter the OneStream Windows App JWKS Path. For Azure AD (Microsoft Entra ID) and Okta identity providers, go to step 6.
-
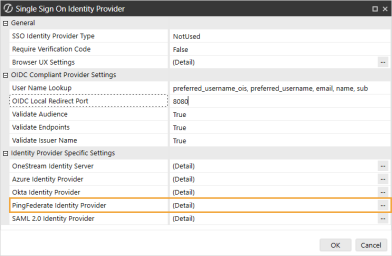
In the Identity Provider Specific Settings section, click the ellipsis to the right of PingFederate Identity Provider.
-
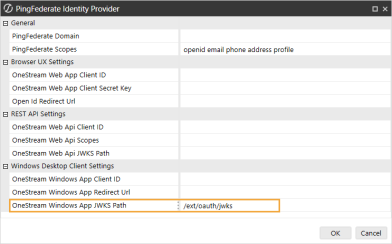
In the Windows Desktop Client Settings section, in the OneStream Windows App JWKS Path field, enter the JWKS endpoint path from PingFederate, which is the path on the PingFederate server that publishes a JSON Web Key Set.
Example: OneStream Windows App JWKS Path: /ext/oauth/jwks
-
-
Click the OK button.
-
Save changes and reset IIS.
NOTE: Reset IIS after you save any changes to the Web Server Configuration.
-
Update the redirect URI on your identity provider to reference the value for the OIDC local redirect port entered in step 4.
Example: If you entered 0 for dynamic port assignment, the redirect URI would be: http://localhost/callback
Example: If you entered 12345 for a specific port, the redirect URI would be: http://localhost:12345/callback
-
For Azure AD (Microsoft Entra ID) identity providers, in the identity provider app registration for the Windows application:
-
Select Access tokens (used for implicit flow) to enable the identity provider to issue access tokens.
-
Add a custom scope for the app registration.
-
-
For Azure AD (Microsoft Entra ID) identity providers:
-
In the OneStream Server Configuration Utility application, go to File > Web Server Configuration File > Single Sign On Identity Provider > Azure Identity Provider.
-
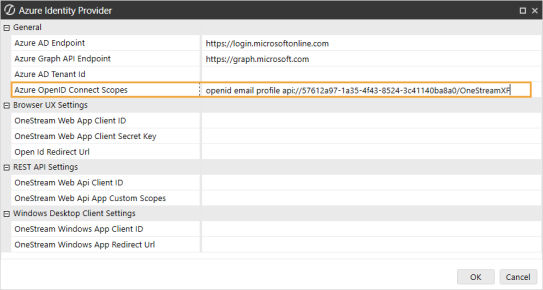
In the General section, in the Azure OpenID Connect Scopes field, add the custom scope from the app registration created in step 9b.
IMPORTANT: Add the custom scope from the app registration to the Azure OpenID Connect Scopes field. Do not replace existing scopes. See the following image for example.
-
Click the OK button.
-
Save changes and reset IIS.
NOTE: Reset IIS after you save any changes to the Web Server Configuration.
-
-
For Azure AD (Microsoft Entra ID) identity providers:
-
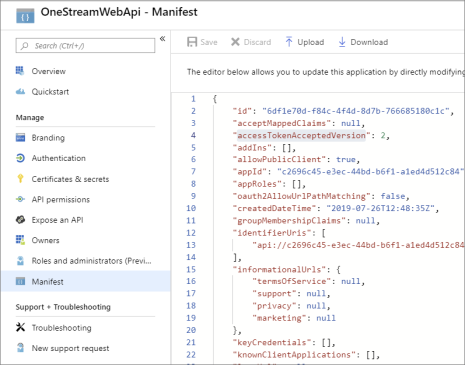
In the identity provider app registration for the Windows application, in Manifest, find accessTokenAcceptedVersion.
-
Set the value to 2 and save.
-


