Access Control
Access Groups can be initially set up to support the concept of backup people in the case of vacation or other reasons where the person assigned to a primary role cannot perform their duties in a given month. It can contain many users of each role. For example, an Access Groups may contain more than one user for the Preparers role. By adding more than one user per role in this way, the main person’s backup is already granted access.
Another way that backups are built in is where a person in a superior role can act in place of a person in a lessor role for a given month. For example, if a user in a Preparers role is on vacation, a person in the Approvers 1 role can act as a Preparer that month, but cannot approve the reconciliation because of enforced Segregation of Duties requirements. Someone else must approve for this particular month.
See Security for more information including the concepts of Local Admin and Segregation of Duties.
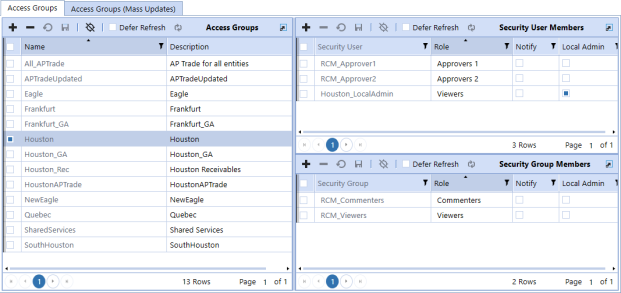
To manage access groups:
-
Click + to add a row.
-
Select the boxes next to one or more items in the list and click - to delete. As a best practice, export your access groups before making a mass update. See Access Groups (Mass Updates).
-
Click Save to save changes.
-
Click Cancel All Changes Since Last Save to cancel unsaved changes.
Access Groups (Editor)

Name: Name of the Access Group. It is recommended to use a common naming configuration since there could be many of these. For instance, starting the Name with R_ is a good way to signify that this Access Group is meant to be assigned to an individual Reconciliation Inventory item. Starting with G_ would mean that this Access Group is meant to be assigned to an Account Group. Whatever standard is set by your project team, it is recommended that this is documented and followed by all Account Reconciliation Admins.
Description: A more detailed description of this Access Group.
Security User Members
Security User: Select a user from a list of all users within the OneStream Framework. A user can only be added to an Access Group once.
Role: Select a role for this user:
-
Preparers – Can see assigned reconciliations and perform preparation duties through clicking the Prepare button.
-
Approvers 1 through Approvers 4 – Choose up to four levels of approvers. You should assign at least as many Approvers as there are approval levels on the reconciliation that this Access Group is assigned to. For example, if the reconciliation has Approvals set at 3, there must be at least a user assigned to the related Access Group at Preparer, Approval 1, Approval 2, and Approval 3 to be able to prepare, and approve the reconciliation.
-
Commenters – Optional. This user can see the data and activity but can only make comments related to this reconciliation.
-
Viewers – Optional. This user can see the data and activity but cannot make comments related to this reconciliation.
Notify: Select this box to send email notifications to this user (as configured under the Notifications tab on the Administration page).
Local Admin: Select this box if this person acts as the Local Admin for this Access Group. See Local Admin Permissions for more information.
Security Group Members
Security Group: Select a group from Platform Security Groups. A group can only be added to an Access Group once.
Role: Select a role for this group:
-
Preparers– Can see assigned reconciliations and perform preparation duties by clicking the Prepare button.
-
Approvers 1 through Approver 4 – Choose up to four levels of approvers. You should have an Approver for each approval level on the reconciliation that this Access Group is assigned to. For example, if the reconciliation has Approvals set at 3, there must be at least a group assigned to the related Access Group at Preparer, Approval 1, Approval 2, and Approval 3 to be able to prepare, complete, and approve the reconciliation.
-
Commenters– Optional. This group can see the data and activity but can only make comments related to this reconciliation.
-
Viewers– Optional. This group can see the data and activity but cannot make comments related to this reconciliation.
Notify: Select this box to send email notifications to this group (as configured under the Notifications tab on the Administration page).
Local Admin: Select this box if this group acts as the Local Admin for this Access Group. See Local Admin Permissions for more information.
Access Groups (Mass Updates)
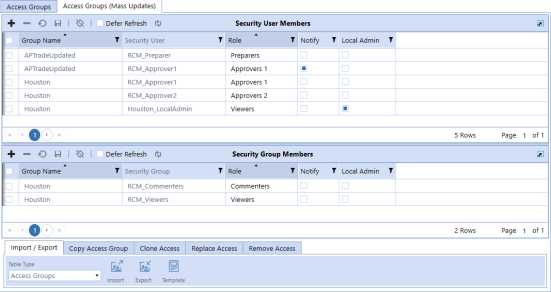
Import / Export of Access Groups
Allows you to use Excel to edit Access Groups.

Table Type: Select whether to export data or a template for Access Groups or Members of Access Groups.
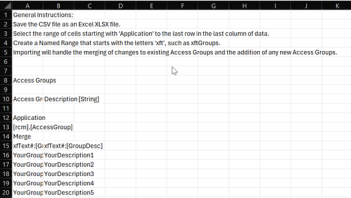
Export: Exports either Access Groups or Access Group Members to a CSV file that opens in Excel for editing. You must add a Named Range starting with the letters ‘xft’ covering appropriate columns and rows, with the cell with the word Application in it being the top left cell of the range. Save this file in Excel xlsx format. See Templates for more information.

Template: Opens a pre-fixed Excel template for loading Access Groups or Access Group Members depending on the Table Type selection.

Import: Opens a dialog to select an Excel or CSV file that contains Access Groups or Access Group Members to merge changes or add new records.
CAUTION: When you import, make sure that the source file is not open on your computer otherwise an error occurs.
Copy Access Group

Select a Source Access Group as the model group, enter a name for the Target Access Group, and then click Copy. The Users and User Settings in the Source Access Group are added to the newly created Target Access Group.
Clone Access

Select a Source Security User as the model user and a Target Security User, and then click Clone. The Target Security User is added into every Access Group that the Source Security User is in. If the Target Security User was previously in an Access Group that the Source Security User is not in, the Target Security User is removed from that group. The Target Security User and Source Security User will have the same access.
You can use the same procedure to clone security group access.
Replace Access

Select a Source Security User who will be replaced in every Access Group with the Target Security User and then click Replace.
You can use the same procedure to replace security groups.
Remove Access

Removes the selected security user or group from every Access Group.


