After an RFC connection is established, create a connector using these steps:
-
Select the type of connector to create:

Queries: Executes queries that can be created by the SAP transactions SQ02 and SQ01.

Tables: Reads SAP tables to display.

BW (MDX): Executes MDX Query.

SE37 CF: Executes function modules.
-
Click a button to create the respective query.
-
Click the Create button.
Example Queries Connector
RFC Queries are used to perform predefined functions in SAP systems. This example walks through how to create a Queries Connector.
-
Click the Queries button.
-
Click the Create button.
-
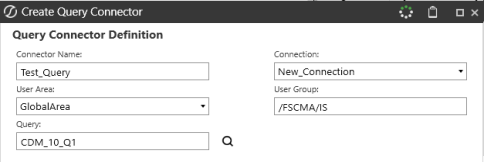
In the Create Query Connector dialog box, populate the following fields:
-
Connector Name: Preferred Name for the Connector.
-
User Area: Select GlobalArea or StandardArea.
-
GlobalArea: The query objects of the global areas are cross-client objects.
-
StandardArea: All query objects are created and managed specifically for each client.
-
-
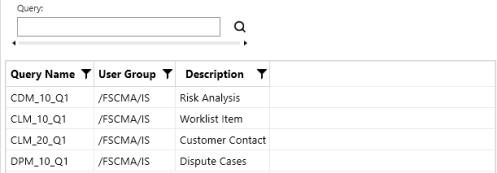
Query: Enter the name of the query to connect to. If you are unsure, locate a query using one of the below options:
-
Search Button: Use the search button to open a grid of all available queries. Select any query from the grid to populate the Query field.
-
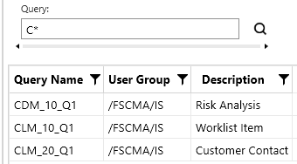
Search with Wildcard: Locate a query using * as a wildcard and click the search button. For example C* would pull the following results:
NOTE: Connection and User Area fields must be populated to search for a query.
-
-
Connection: Use the drop-down menu to select the RFC Connection to use for the query.
-
User Group: Enter the name of user group the query is assigned to.
-
-
Click the Save button. When saved, the connector displays in the table.

-
Select the Query to view specific parameters that the query expects to operate. In this example, the parameters include Sign, Operator, Value (Low), and Value (High).

-
After the parameters are entered, click the Preview button to view all columns for the query connector. There is no row limit on the preview for query connectors.
-
When you are satisfied with the data the connector is pulling, click the Manage Objects button to write the business rule.
NOTE: The business rule is created from a template and the given template adapts based on what type of connector that is being generated in SPC.
-
In the Manage Connector Objects dialog box, if you select Link to Profile (add DataSource), it will create a data source, which prompts you to select a cube. The Transformation Rule Profile, Import Profile, and Import Profile Scenario Type fields are optional.

-
When done, click the Apply button to complete the creation of the business rule.


