This example walks you through how to create a Web API Endpoint.
Authentication
Before creating an endpoint, you will first need to set up an authentication for your Web API.
-
From the menu, click the Authentication button. The Web API Authentication table displays any existing authentications.
-
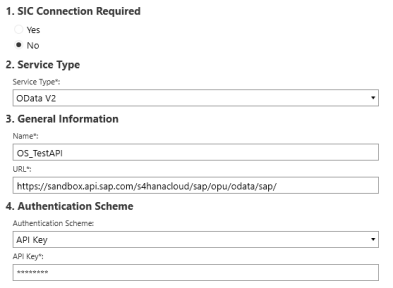
Click the Create button to open a dialog box. Populate the required fields:
-
SIC Connection
-
Service Type, either OData V2 or V4
-
Name
-
URL
-
Authentication Scheme and associated details
See Create Authentication for details on these fields.
-
-
When done, click the Save button.
Services
Setup
After you create your authentication, you must set up the Web API Services.
-
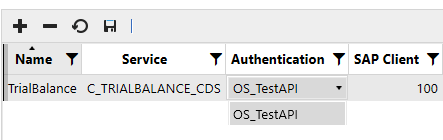
From the menu, click the Services button. The API Service List table displays all existing services that you have configured.
-
Click the Insert Row button and populate the Name, Service, and Authentication fields. The Authentication field drop-down will display a list of the authentications you have created in SAP Connector. Additionally, you can update the default value of 100 in the SAP Client field if needed to ensure your data is routing to the correct SAP client.
Test
Verify if your service is reaching SAP successfully using the Test button.
-
Select your connection from the API Services table.
-
Click the Test button.
Endpoints
You can now set up your endpoints.
-
From the menu, click the Endpoints button. Previously created endpoints display in the SAP Web API Endpoints Table.
-
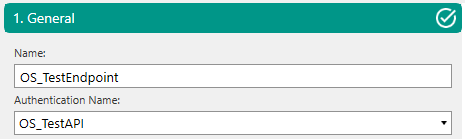
Click the Create button to open the dynamic sidebar.
-
In the General step, enter a Name for the endpoint and choose an Authentication from the Authentication Name drop-down menu.
-
Use the API Service step to select an API Name from the drop-down menu. Options displayed are pulled from the services set up in the Web API Services page.

-
For Endpoint Type, use the drop-down menu to select from the list of available endpoints. Options displayed dynamically update from previous selections. See 3. Endpoint Type.

-
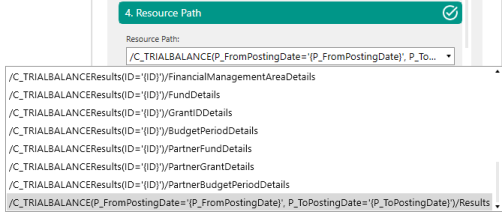
Use the Resource Path drop-down menu to select the applicable path. See 4. Resource Path.
-
Populate the final Query Options step, which includes the following fields:
-
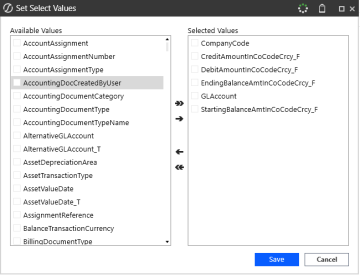
Set Select Values: Optionally, click the Set Select Values button to choose which data points to include. If you skip this step, all values are included.
-
OneStream Parameter: If your data has a date parameter, optionally enable the OneStream Parameter? setting. See Use Substitution Variables in Web API.
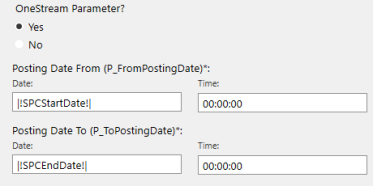
If you select no, you can set your dates using the integrated date picker to choose your posting date.
-
Filter Text: Populate the Filter text field, if applicable. Content you add will be used to filter your data using the SAP server, increasing your performance.

-
Set Order By Values: Optionally, click the Set Order By Values button to choose to display your data in ascending or descending order. If you do not make a selection, your data will not be sorted. See Set Order By Values.
-
-
Click the Save Connector button.
Connector Objects
Create a Connector Business Rule and, optionally, a Data Source for you connector.
-
Select your connection on the SAP Web API Endpoints table.
-
Click the Manage Objects button.
-
Optionally choose to Link to Profile (add DataSource). If enabled, use the drop-down menus to choose your Cube, Transformation Rule Profile, Import Profile, and Import Profile Scenario Type.
-
Click the Apply button to create your business rule.
You have now successfully set up a Web API Authentication, Service, and Endpoint Connector.


