Administration Tasks
Create a New View
To create a new view for a Metadata request type:
-
Go to Administration > Views.
-
Create a new view.
-
Select Metadata from the Flow Type.
-
Click Save (this will allow you to add the Properties and Validations).
- Move the corresponding property over. Use the Filter drop-down to toggle between different categories.
-
Save the view and close the View Editor.
To create a new view for a Security request type:
-
Go to Administration > Views.
-
Create a new view.
-
Select Security from the type.
- Move the corresponding property over. Select Security from the Filter drop-down to see relevant properties.
-
Save the view and close the View Editor.
Create a New Flow
To create a new flow for a Metadata request type:
-
Go to Administration > Flows.
-
Create a new flow .
-
Create Name and Label (recommended to be the same).
-
Select Metadata from the Category list.
-
Click Save (this will allow you to add the Steps, Options, and Views).
-
On the Steps tab, add the steps for your approval workflow.
-
On the Options tab, assign the Dimension and Actions combination for this flow.
-
After all steps and options are added, on the Views tab, select the Assigned View for each Step and Option combination. (See Create a New View).
-
Ensure the flow is enabled to make it available in the New Request drop-down list.
-
Save the flow and close the Flow Editor.
-
Run the Create Flow Views process.
To create a new flow for a Security request type:
-
Go to Administration > Flows.
-
Create a new flow.
-
Create Name and Label (recommended to be the same).
-
Select Security from the Category List.
-
Click Save (this will allow you to add the Steps, Options, and Views).
-
On the Steps tab, add the steps for your approval workflow.
-
On the Options tab, assign the Security Actions for this flow.
-
After all steps and options are added, on the Views tab, select the Assigned View for each Step and Option combination. (See Create a New View ).
-
Ensure the flow is enabled to make it available in the New Request drop-down list.
-
Save the flow and close the Flow Editor.
-
Run the Create Flow Views process.
Refreshing Dynamic View Dashboards
-
Make the changes to the flow that you want to update. Changes can be updating a label, adding or removing a property, changing the order of the properties, adding or removing steps in a flow, and views assignment.
-
Go to Administration> Flows.
-
Select the flow that you changed.
-
Click Create.

TIP: To refresh all dynamic dashboards, click Create All.
Create Custom Reports
You can add custom reports using combinations of business rules, dashboard data adapters, dashboard components, and dashboards.
NOTE:
Follow the sample steps below to add a new custom report to show the values of the custom properties FlowReason and FlowPriority.
-
Add the report definition to the ACM_Reports by navigating to Business Rules > Dashboard Data Set > ACM_Reports.
-
Add the report to the list of reports. Be sure to add the comma to the previous line.
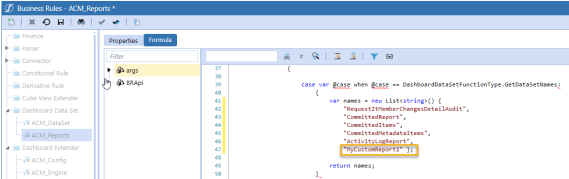
-
Copy and paste rows 112-121 and update for the new report name.
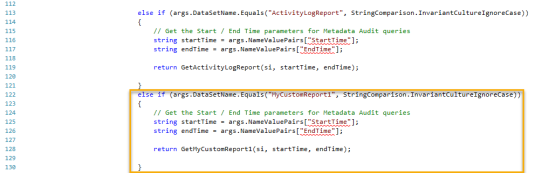
- Insert the following code after line 331:
private DataTable GetMyCustomReport1(SessionInfo si, string startTime, string endTime)
{
    try
    {
        using (DbConnInfo dbConnFW = BRApi.Database.CreateFrameworkDbConnInfo(si))
        {
            using (DbConnInfo dbConnApp = BRApi.Database.CreateApplicationDbConnInfo(si))
            {
    endTime = endTime.Replace("/", "-") + " 23:59:59";

    // Create the data table to return
    var sql = new System.Text.StringBuilder();
                sql.Append("Select r.ID, r.RequesterID, r.Status, ");
                sql.Append("'Commit' As StepType, f.Label, r.LastModified, ");
                sql.Append("'" + startTime + "' As CriteriaStartTime, ");
                sql.Append("'" + endTime + "' As CriteriaEndTime, ");
            //For item level properties, use i.ItemProperties instead of r.RequestProperties
                sql.Append("JSON_Value(r.RequestProperties, '$.Properties.FlowReason') As FlowReason, ");
                sql.Append("JSON_Value(r.RequestProperties, '$.Properties.FlowPriority') As FlowPriority ");
            //FOR ITEM LEVEL PROPERTIES, UNCOMMENT NEXT 2 LINES
                // sql.Append("From " + ACM_Globals.m_ItemView + " i ");
                // sql.Append("RIGHT Join " + ACM_Globals.m_MasterRequestView + " r On i.FKRequestID = r.RequestID ");
                sql.Append("From " + ACM_Globals.m_MasterRequestView + " r ");
                sql.Append("INNER JOIN " + ACM_Globals.m_StepTable + " s ON r.FKStepID = s.StepID ");
                sql.Append("INNER JOIN " + ACM_Globals.m_FlowTable + " f ON r.FKFlowID = f.FlowID ");
                sql.Append("WHERE s.StepType = 3 AND r.Status = 'Completed' AND ");
                sql.Append("r.LastModified >= '" + startTime + "' And r.LastModified <= '" + endTime + "' ");
                sql.Append("ORDER BY r.LastModified DESC");

                using (var dt = BRApi.Database.ExecuteSql(dbConnApp, sql.ToString(), false))
                {
                    dt.TableName = "MyCustomReport1";
                    return dt;
                }
            }
        }
    }
    catch (Exception ex)
    {
        Logger.Write(si, "Error getting Activity Log Report.", ACM_Globals.LogLevel.ERR, ACM_Globals.LogCategory.AcmReports, ex);
        throw ErrorHandler.LogWrite(si, new XFException(si, ex));
    }
}
This is what it will look like in the business rule:
        private DataTable GetMyCustomReport1(SessionInfo si, string startTime, string endTime)
        {
            try
            {
                using (DbConnInfo dbConnFW = BRApi.Database.CreateFrameworkDbConnInfo(si))
                {
                    using (DbConnInfo dbConnApp = BRApi.Database.CreateApplicationDbConnInfo(si))
                    {
                        endTime = endTime.Replace("/", "-") + " 23:59:59";

                        // Create the data table to return
                        var sql = new System.Text.StringBuilder();
                        sql.Append("SELECT r.ID, r.RequesterID, r.Status, ");
                        sql.Append("'Commit' AS StepType, f.Label, r.LastModified, ");
                        sql.Append("'" +  startTime + "' AS CriteriaStartTime, ");
                        sql.Append("'" + endTime + "' AS CriteriaEndTime, ");
                    // For ITEM LEVEL Properties, use i.ItemProperties instead of r.RequestProperties
                        sql.Append("JSON_Value(r.RequestProperties, '$.Properties.FlowReason') AS FlowReason, ");
                        sql.Append("JSON_Value(r.RequestProperties, '$.Properties.FlowPriority') AS FlowPriority ");
                    // For ITEM LEVEL Properties, UNCOMMENT NEXT 2 LINES
                        // sql.Append("FROM " + ACM_Globals.m_ItemView + " i ");
                        // sql.Append("RIGHT JOIN " + ACM_Globals.m_MasterRequestView + " r ON i.FKRequestID = r.RequestID");
                        sql.Append("FROM " + ACM_Globals.m_MasterRequestView + " r ");
                        sql.Append("INNER JOIN " + ACM_Globals.m_StepTable + " s ON r.FKStepID = s.StepID ");
                        sql.Append("INNER JOIN " + ACM_Globals.m_FlowTable + " f ON r.FKFlowID = f.FlowID ");
                        sql.Append("WHERE s.StepType = 3 AND r.Status = 'Completed' AND ");
                        sql.Append("r.LastModified >= '" + startTime + "' AND r.LastModified <= '" + endTime + "' ");
                        sql.Append("ORDER BY r.LastModified DESC");

                        using (var dt = BRApi.Database.ExecuteSql(dbConnApp, sql.ToString(), false))
                        {
                            dt.TableName = "MyCustomReport1";
                            return dt;
                        }
                    }
                }
            }
            catch (Exception ex)
            {
                throw ErrorHandler.LogWrite(si, new XFException(si, ex));
            }
        }
5. Compile the business rule to check the syntax.
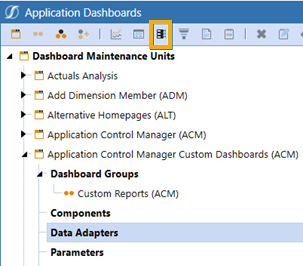
Add Reports to the Application Control Manager Custom Dashboard
Add the reports to the Application Control Manager Custom dashboard as follows:
-
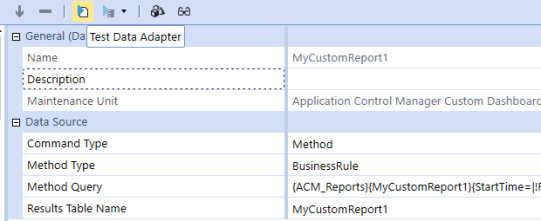
Click Application Dashboards > Dashboard Maintenance Units > Data Adapters.
-
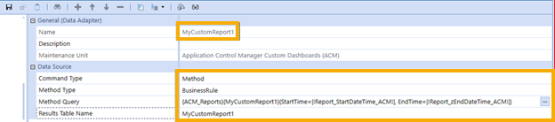
Click Create Data Adapter.
-
Enter a name for the data adapter.
-
For Command Type select Method.
-
For Method Type select Business Rule.
-
For Method Query, click the ellipsis and add the following:
{ACM_Reports}{MyCustomReport1}{StartTime=|!Report_StartDateTime_ACM!|, EndTime=|!Report_zEndDateTime_ACM!|}
-
In Results Table Name enter MyCustomReport1.
-
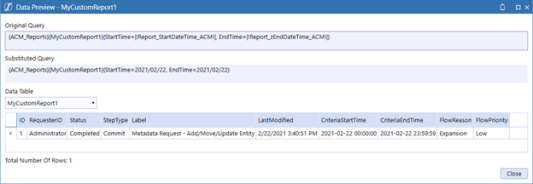
Click Test Data Adapter to test the adapter.
You should see similar results to this:
Creating a Grid View Component
Perform the following steps to create a Grid View component.
-
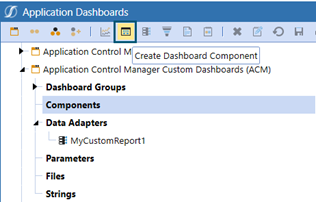
Select Components and click Create Dashboard Component.
-
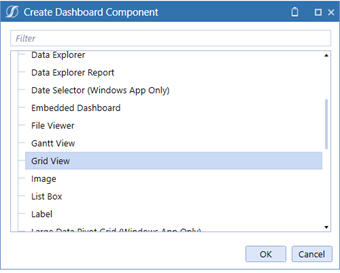
Scroll to select Grid View.
-
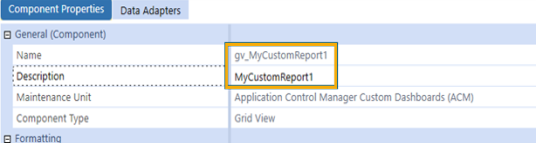
Input a Name and Description for the Grid View. Prefix components, using, in this case, “gv_” for Grid View. Click OK.
-
Click Data Adapters , the + icon, MyCustomReport1 Data Adapter, then OK.
-
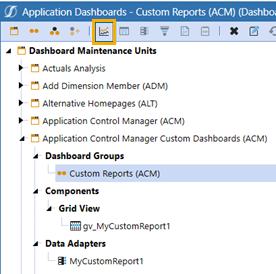
Navigate to and expand Dashboard Groups.
-
Select Custom Reports and click Create Dashboard .
-
Click Save.
-
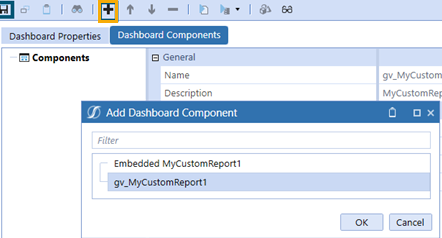
Click Add Dashboard Component.
-
Select gv_MyCustomReport1.
-
Click OK, then Save.
-
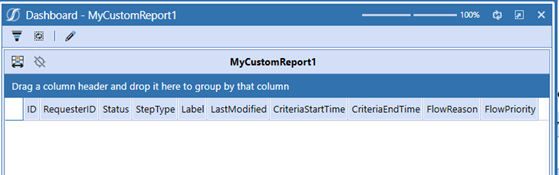
Test the dashboard by clicking View Dashboard.
A successful dashboard test would look like this:
Complete the Configuration
Once your dashboard tests successfully, finish the configuration in Application Control Manager.
-
Return to the Application Control Manager dashboard.
-
Click Administration.
-
Click Reports.
-
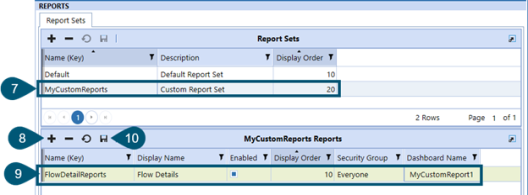
Add a new Report Set by clicking +.
-
Name the Report Set, give it a Description, and assign a Sort Order (this is for display order).
-
Click Save.
-
Highlight the MyCustomReports row in the Report Sets table.
-
Click + in the MyCustomReports table.
-
Fill out the information, selecting the dashboard you created from the drop-down in the Dashboard Name field.
-
Click the table Save button.
-
Navigate to Reports.
-
Change the drop-down from Default Report Set to Custom Report Set.
-
Select the Flow Details report set.
-
View the report.
Setup Email Notification
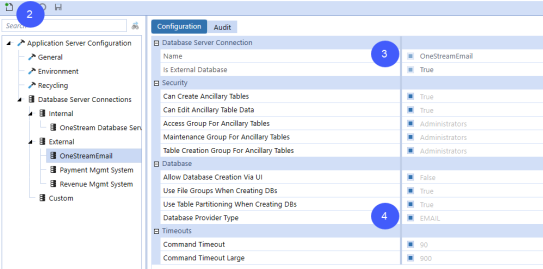
You can set up an email server in the Application Server Configuration Tool and then create the connection in the OneStream Windows Application. The name for the Database Server Connection must match the Server Config Name. If you do not know the name, contact OneStream Support.
OneStream Windows Application
If you are an administrator in OneStream, you can find the name through the following:
-
Navigate to System > Administration > System Configuration > Database Server Connections.
-
Click Create Item to add a new server.
-
Enter a name for the server.
-
Set the Database Provider Type to EMAIL.
-
Enter a connection string.
-
Reset the server.
Email Settings in a Flow
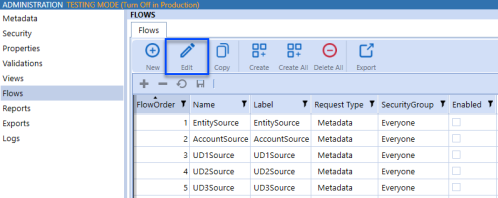
You can set an email address in each step of the flow from the Flows tab under Administration.
-
Ensure the email server configuration is updated in Administration > Global Setup > Email Settings. (See Email Settings section for more info.)
-
Navigate to Administration > Flows.
-
Select a flow and click Edit.
-
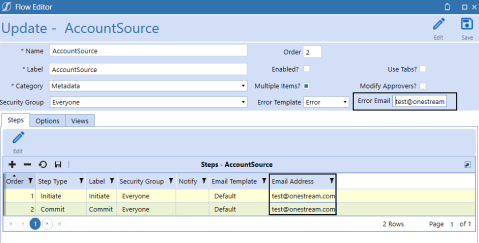
-
Enter an email under Error Email.

-
Enter an email address in each step on the Flows.
Metadata Import
Set Up Data Sources
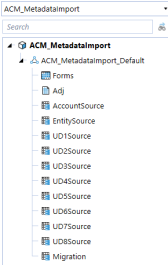
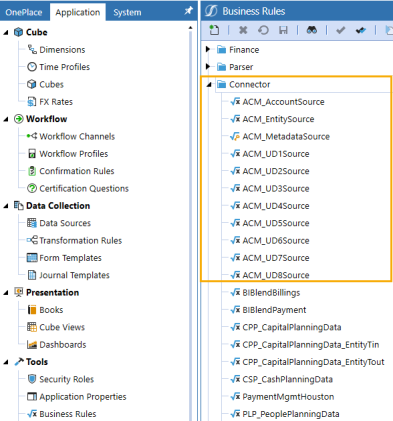
When Application Control Manager is installed, a default set of data connectors is installed. There is one connector for each supported dimension:
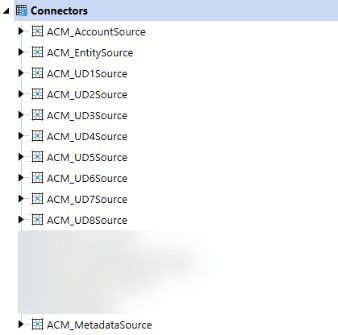
These data sources are set up to connect to Application Control Manager staging tables, which are created during the installation process. These staging tables are named with the following format: ACM_Metadata<dimension>ImportTree and ACM_Metadata<dimension>ImportMembers.
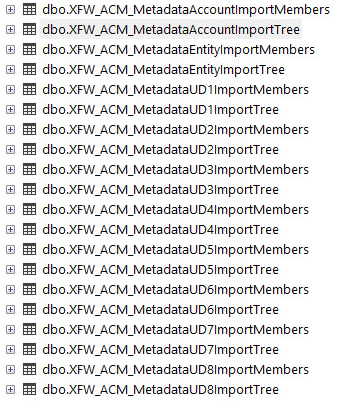
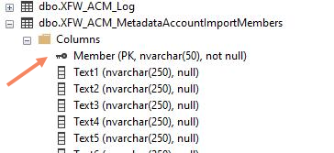
The tables with Members in the name store the unique list of members from the source metadata system. Each dimension table has a different set of properties, including various properties related to the member, that you can import into OneStream.
The tables with Tree in the name store the Metadata relationship details, parent, and child. Each table contains a different set of properties, including relationship properties, that you can import into OneStream.

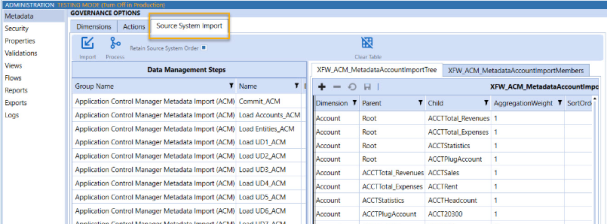
The Dimension column must be populated with the Label of the Application Control Manager dimension that you are loading. This is set up in the Administration > Metadata > Dimensions page.

The Parent and Child columns are populated with member names found in the Member column of the associated Members table. SortOrder can be used to sort the hierarchy. If order is not important, enter a value of 1 for all rows in the hierarchy table.
To load Metadata details to the tables mentioned above, you can either modify the Data Connector to pull from a specific file, or you can use an Excel template and upload the metadata into Application Control Manager using the Source System Import tab.
Workflow Profiles
When Application Control Manager is installed, a Workflow Profile named ACM_MetadataImport_Default is automatically created in your system. In addition, a unique cube is created: ACM_MetadataImport.
By default, the data source name for each dimension is set to use default data connectors configured during installation.
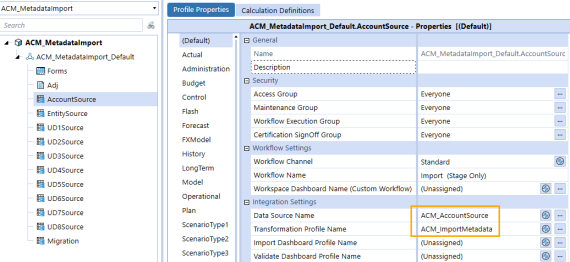
Select the transformation profile named ACM_ImportMetadata. This is automatically created in your environment when Application Control Manager is installed.
The Workflow Profiles are used to import the metadata loaded in the Application Control Manager staging tables into the OneStream staging tables. After the information is loaded, the metadata is analyzed to determine differences that exist between the source data and the metadata stored in OneStream. The system looks for differences in this order:
-
Missing members in the metadata compared to the source system.
-
Existing members that need to be moved or copied to a different hierarchy.
-
Updates to existing member properties.
If Application Control Manager finds any updates, it generates a request in the application. The results of this process are displayed on the main home page of Application Control Manager.
Global POV Time
When running a source system import, the system loads the data in the current year and month staging tables, and the Global Time is set to a full year.
If Enforce Global POV is set to TRUE, the load process uses the value set in the Global POV. If the Global POV is set to a date format other than YYYYMM, an error occurs because the OneStream Software workflow profile will not load properly.
If Enforce Global POV is set to FALSE, the data management source system import process ignores any Global POV settings and instead uses the system date and time to determine the period for loading data.
Metadata Import Fields
To map the import data to the metadata properties in OneStream, go to the Application Control Manager Administration screen and select Views. A single view for each workflow profile is created when Application Control Manager is installed and these views contain every property related to the dimension. To customize these views, create a new view and use the Copy Properties button to copy the properties that you can then modify accordingly.
If you click on Edit on the default Views, on the right side of the View Editor, you can see the list of metadata properties that map in the same order as the default Data Connectors.
These properties also match the information in the database tables:
| Member Properties for Account | |
|
|
|
Member Properties for Entity
|
|
|
|
| Member Properties for UD1 | |
|
|
| Member Properties for UD2-8 fields | |
|
NOTE: If you want to change the list of properties monitored and updated in OneStream, you can create a new View and then use the Copy Properties button to copy the properties from the default view. Then, you can remove the property or change the order of the property. To change the order of the property, use the arrow buttons to move fields in and out of the list.
NOTE: If you are using a customized view, you must modify the related Connector Business Rule.
In the Connector business rules, find the GetFieldList method and associated method containing the SQL to pull information from the database in GetSourceDataSQL.
NOTE: Make sure the fields match the order that Application Control Manager has in the associated view.
Data Management Groups
The process of loading and committing metadata updates to OneStream is handled using Data Management steps and sequences.
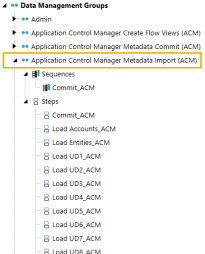
The data management steps are preconfigured when Application Control Manager is installed. The Load items are set up to execute the workflow profile associated with the dimension name. The process loads the data from the database into the Application Control Manager staging tables, performs the comparison process, and builds a request if necessary.
The associated Workflow Profile is in the Parameters on the data management step: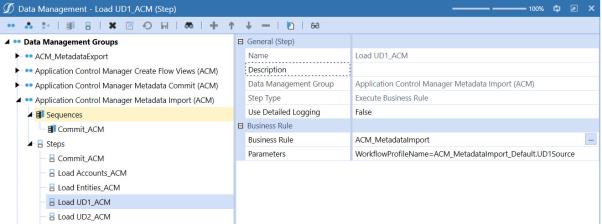
-
WorkflowProfileName: Specify the name of the dimension you are importing for. This matches the Workflow Profile as well as the WF Profile Name in the Metadata Import Fields screen.
Ensure the Business Rule is set to ACM_MetadataImport.
The execution of the steps Load <…> perform the following steps:
-
Loads the data from the database or file into the workflow for the current global POV time and scenario.
-
Compares the data loaded into staging to the existing OneStream members for the selected dimension and determines which members need to be added.
-
Compares the data loaded into staging to the existing OneStream hierarchy for the selected dimension and determines which updates are required to the overall hierarchy.
-
Compares the data loaded into staging to the existing OneStream members and determines which properties need to be modified.
-
Compares the existing members and hierarchy in OneStream to the data loaded into the staging to determine which members need to be removed from the hierarchy. Any member not in the import file/table is marked as orphaned in OneStream. The member is not deleted.
-
Generates an Application Control Manager request that performs all the required operations in a single transaction.
After a request has been generated, the Commit All Metadata Updates data management step runs to commit the updates to the system.
The Data Management Steps can be combined into a sequence to enable the full automation of the process using a PowerShell script and the Windows Task Scheduler on the OneStream application server. You can automate the load and commit steps to include no user interaction before commit or you can set the system up to require an individual on the Finance team to review the request before manually committing it into the system.
Metadata Synchronization
Initial Setup and Configuration
The metadata migration and synchronization feature of Application Control Manager keeps the metadata hierarchies between two OneStream installations/applications aligned with one another. This is accomplished by using the REST API built into OneStream. The configuration is completed in the destination environment. The REST API in the source environment requires setup on the server side to ensure that the correct configuration is in place and to request the following details for your Azure Single Sign-on configuration from your technical support representative:
-
Azure AD Tenant ID
-
OneStream Web API Client ID
-
OneStreamWeb API Client Secret Key
-
Source OneStream System URL
-
Source OneStream System Application Name
The first three values can be found in the OneStream WebServerconfig.xml:

Set Up Remote Source Server Environment
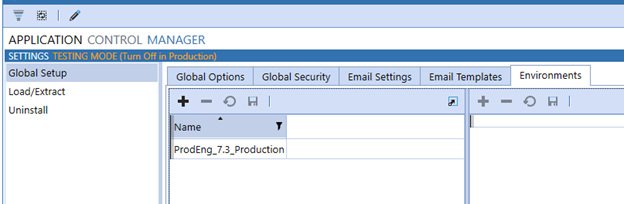
First, you must set up a Remote Source Server Environment to start Migration.
-
Navigate to Settings > Global Setup > Environments.
-
Click + in Name Table Editor.
-
Create and enter an Environment Name under the Name field.
TIP: Remember the Environment Name. This will be used in future steps.
-
Save the Environment Name.
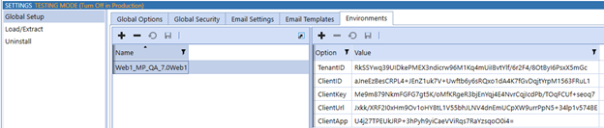
Create Environment Options
Next, you must create the Environment that surrounds the source system.
-
Click + in Options / Value Table Editor.
-
Click the Option column to display the list for the Environment Options.
NOTE: If the remote server is a OneStream IdentityServer (OIS) with a personal access token (PAT), only the ClientUrl, ClientApp, and PAT options are necessary.
NOTE: If the remote server is a Legacy Azure SSO Environment, TenantID, ClientID, ClientKey, ClientUrl, and ClientApp options are necessary. PAT is not needed.
TenantID, ClientID, ClientKey, and ClientUrl can all be found in the Server XFConfig file under the following keys:
-
TenantID = AzureADTenantId
-
ClientID = AzureADClientId
-
ClientKey = AzureADWebApiSecretKey
-
ClientUrl = XFWebApiUrl (only the URL's protocol and domain are needed)
-
ClientApp is the remote server's application that is being used for the Migration.

Data Management Job Configuration
The metadata synchronization process is run using a Data Management job in OneStream. When Application Control Manager is installed, a Data Management Group named Application Control Manager Metadata Migration (ACM) group containing associated steps is automatically created:
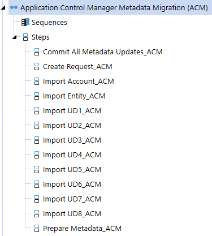
As with other features in Application Control Manager, there is a step associated with each of the dimensions in OneStream.
To complete the setup, you must update the Parameters section of the step. The EnvironmentName parameter is entered in the initial setup step from Application Control Manager:
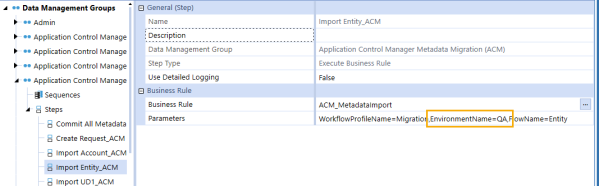
The WorkflowProfileName is always Migration and the FlowName is the flow name you created previously. These two values should not be changed.
Execution
When any of the Load <dimension name> steps are executed, the following processes occurs:
-
Prepare metadata on remote (source system)
-
Using the REST API that was configured in the Application Control Manager system administration screen, the system remotely executes a Data Management setup on the source system named Application Control Manager Metadata Migration (ACM) -> Prepare Metadata.
-
This process gathers all metadata information including the member list, hierarchy, and properties for the dimension specified in the workflow profile. This information is stored in a temporary staging table in the database.
-
-
Retrieve metadata from a remote system
-
Using the REST API, make a built-in API call named GetAdoDataSetForSqlCommand on the remote system. The system pulls the information and loads it into the local (destination) OneStream application database for further processing.
-
-
After the data is loaded into the database, the same processing that occurs during a metadata import takes place. If any updates are required, the system automatically generates a request, which can be committed using the Application Control Manager Metadata Migration (ACM) -> Commit All Metadata Updates Data Management step.
Configure Flows With Migration Step
Application Control Manager can migrate requests from one OneStream environment to another. You can use this as a testing feature to see how metadata updates will impact a production system before committing them in that environment. You can also use it to keep two systems synchronized with each other.
Before continuing, follow the setup steps outlined in the Metadata Synchronization section. You must set up a destination environment where requests will be sent.
If you have a large data set to migrate (>100k of data), make sure to increase your Command Timeout or Task Inactivity Timeout (minutes) settings under Database Server Connections > Connection String Settings > Command Timeout or Application Server Configuration Settings > Task Inactivity Timeout (minutes).
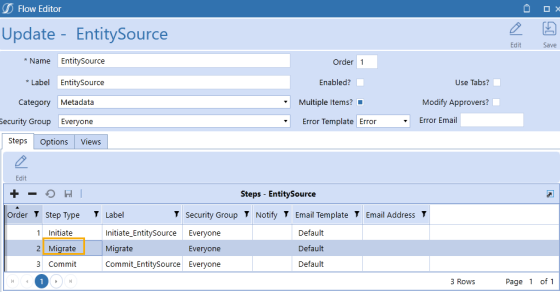
Add a new step to any flow you have configured in the system. In the Application Control Manager administration screen, select Flows and edit or create a flow to use for the migration. Add a new step to the flow after the Initiate step and select Migrate.
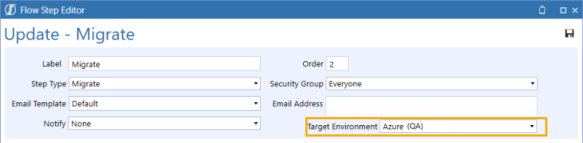
Click Edit:

Specify the destination system to commit the request. This was defined in the prior configuration step.
Select the target environment:
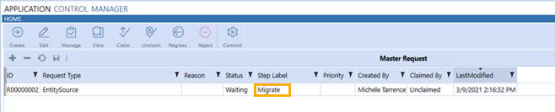
When you create a new request in the system and advance from the initiate step, you will see the system report the next step to be Migrate:
When you manage this request and advance to the next step, the system automatically connects to the target environment REST API and pushes the request information from the source system to the destination environment and automatically commits the request. After reviewing and testing in that environment, return to the source system and continue processing as you typically would.