Administration
On the Administration page you can define controlled governance in Application Control Manager:

-
Metadata: Set up dimensions, actions, and source system imports.
-
Security: Enable and disable allowed security actions.
-
Properties: Works with OneStream defined properties and custom properties.
-
Validations: Business rules can be set up to ensure user entry is appropriate.
-
Views: Create and edit views. Assign properties and validations to views.
-
Flows: Create the steps in the request approval process.
-
Reports: Create custom report sets.
-
Exports: Create and copy export groups and files.
-
Logs: View log details.
Metadata
Provides options for the metadata governance set up of Application Control Manager. There are three tabs for metadata information:
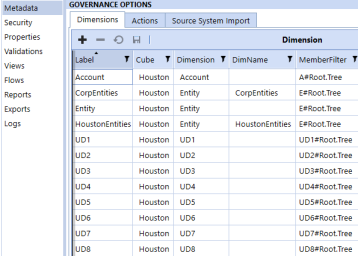
Dimensions Tab
Use this tab to define the dimensions that you want to be able to update in a request.
-
Label: Unique label for the dimension. Click
 to add a new dimension.
 -
Cube: Cubes in the current OneStream application.
-
Dimension: OneStream dimension types.
-
DimName: OneStream dimension names.
-
MemberFilter: Text input field to assign the default member filter associated with this dimension.
-
Grouped (visible if enabled in Global Options): Default is False. Set to True to create a Grouped Dimension type. If enabled, when a new item is created, an item is created for each dimension defined in the GroupedDim property. The Grouped dimension is not a true OneStream dimension and is not committed to the Metadata Dimension Library.
-
GroupDim (visible if enabled in Global Options): A comma-separated list of the dimension labels to group together.
-
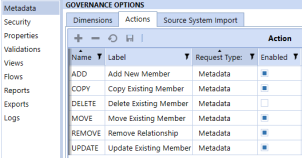
Name: Unique name for the action in Application Control Manager. These actions are not editable and do not allow additions.
-
Label: Display name of the action in Application Control Manager.
-
Request Type: The type of request that uses the action in Application Control Manager.
-
Enabled: Enable or disable actions for your Application Control Manager design.
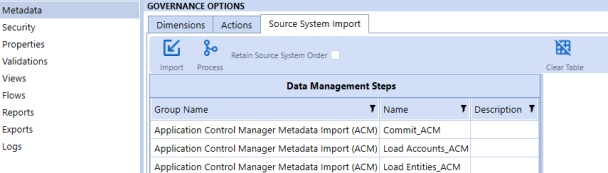
Source System Import Tab
Use this tab to manage source system import options of Application Control Manager.
-
Import: Import and upload an Excel template for Metadata.
-
Process: Launches the data management step selected in the table.
-
Clear Table: Erases the Metadata table for the selected data management step.
NOTE: If you are using an Excel template, ensure that you have consolidated the varying properties into the Member tab and that you have appended the varying property updates.
Retain Source System Order
The Source System Import sort order allows new members and existing members to import the custom order defined in the source system. Select Retain Source System Order to maintain the source system sort order.
-
Go to Application Control Manager > Administration > Metadata > Source System Import.
-
Select Retain Source System Order
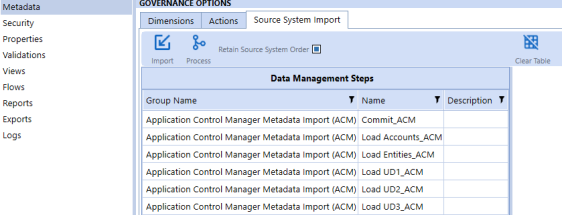
Retain Source System import performs the following processes:
-
Imports the Metadata into the staging table with the sort order specified in the file.
-
Generates a request if the sort order is changed when imported.
-
Commits sort order changes in the correct order as specified by the import template.
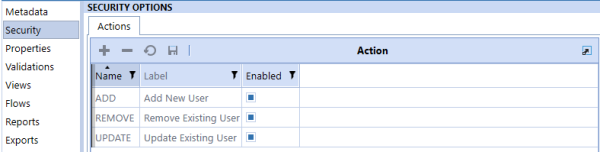
Security
Allows you to enable or disable actions to govern user security-type requests. You cannot add actions.
-
Name: Unique name for the action.
-
Label: Display name for the action.
-
Enabled: Enable or disable the action.
Properties
Properties table contains a list of fields that can be assigned to a view. Once assigned, users will be allowed to update the values of those properties. There are two types of properties:
-
OneStream defined properties, such as any of the built-in metadata properties. The following are default OneStream properties that are pre-installed in the table:
-
OneStream metadata properties for the supported dimensions.
-
OneStream relationship properties.
-
OneStream user security properties.
-
-
Custom properties leverage OneStream components to provide specific functionality for Application Control Manager. The following custom properties are pre-installed in the table:
-
Parent Member Selector: Member selector specifically for a Parent property, to distinguish from a default Member Selector for other properties.
-
Member Selector: Member selector that pulls properties from an existing member. This is used to create a new member in an alternate hierarchy.
-
Security Group Selector: Member selector that pulls from security groups.
-
Alternate Hierarchy: Member selector that creates a copy of the current item and creates the new member in an alternate hierarchy.
-
Varying Member Property Selector: Member selector for selecting Scenario Type, Cube Type, or Time Value for varying properties.
-
You can also create and add custom properties in Application Control Manager to support your organization needs.
Properties Tab
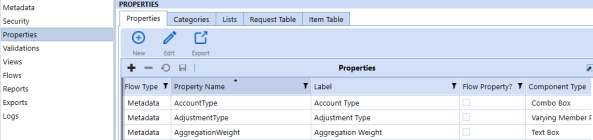
Flow Type: Specifies the type of flow this property belongs to. Available options are: Metadata, Security, and Generic.
Property Name: Unique property name.
Label: Descriptive label to be used across the solution.
Flow Property: Indicates if the property can be assigned at the flow level.
Component Type: List of dashboard components you can assign to a view. These are the same as the default OneStream components:
-
Check Box
-
Combo Box
-
List Box
-
Member Selector
-
Text Box
Parameter Type: The type of parameter attached to the component:
-
Literal Value
-
Input Value
-
Delimited List
-
Bound List
-
Member List
-
Member Dialog
Parameter Name: If necessary, select an existing parameter to populate choices in the delimited list and bound list.
Namespace: Indicates if the property is built in OneStream or is custom.
Default Value: Sets the default value for the property. The default value is blank.
Property Options (Optional): Name-value pairs used to override default settings throughout the solution. Property option values can be strings or parameters in the OneStream format, for example, |!ParameterName!|.
-
IsName: Indicates that this property is a Name property. Used for Custom Name properties.
-
IsDesc: Indicates that this property is a Description property. Used for Custom Description properties.
-
IsRef: Indicates that this is a Reference member.
-
IsParentName: Indicates that this property is a Parent Name. Used for Custom Parent properties.
-
PropName: Used for custom properties. Set the OneStream property this should update.
-
DimTypeName: Overrides the default DimTypeName on Member Selector type components.
-
Dimension: Overrides the default Dimension on Member Selector type components.
-
MemberFilter: Overrides the default MemberFilter on Member Selector type components.
-
CubeName: Overrides the default CubeName on Member Selector type components.
-
Tooltip: Sets the tooltip on the component.
Varying Properties
The Varying Properties listed in the following categories can be added or modified using a user-initiated metadata request or source system import request:
-
Vary by Cube Type
-
Vary by Scenario Type
-
Vary by Scenario Type and Time
The varying properties are differentiated by the following types:
-
Account
-
Member Properties
-
Relationship Properties
-
-
Entity
-
Member Properties
-
Relationship Properties
-
-
UDs
-
Member Properties
-
Relationship Properties
-
Non-varying Properties
The Non-varying Properties listed below can be added or modified using a user-initiated metadata request or source system import:
-
Entity
-
Position Within Parent
-
Position
-
-
Default Parent
-
Parent Sort Order
-
-
-
Account and UDs
-
Position within Parent
-
Position
-
-
Aggregation
-
Aggregation Weight
-
-
Security Properties
The following are OneStream defined User Security properties that are pre-installed in the application. These properties can be assigned to a user-initiated request:
-
Culture
-
Description
-
Email
-
External Auth Provider Name
-
External Auth User Name
-
Grid Rows per Page
-
Security Groups
-
Enabled
-
User Name
-
Text 1
-
Text 2
-
Text 3
-
Text 4
-
UserName
-
UserType
- Interactive: Allows all functionality. The user type defaults to Interactive for new users and upgrades.
-
View: Allows users to view all data, reports, and dashboards in the production environment and the derived database. The View user privileges do not permit the authorized user to load, calculate, consolidate, certify, or change data.
-
Restricted: Assigns contractual limits for certain functional tasks, such as limiting rights to solutions such as Account Reconciliation or Lease.
-
Third Party Access: Allows OneStream access using a named account, and logging on interactively using a third-party application. There is no access using the OneStream Windows application or the OneStream browser interface. The user cannot change data or modify OneStream application artifacts.
-
Financial Close: Allows users to perform Account Reconciliation solutions or Transaction Matching.
Categories Tab
Property categories are used to organize similar properties or dimension-specific properties into groups. Category groups are listed on the left. The properties assigned to the group are on the right.
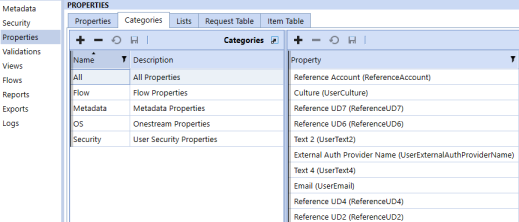
These property categories display when adding properties to views.
Lists Tab
On the Lists tab, you can create name-value pair lists to be used as references in properties. An example of how you might use a property list would be for a drop-down list in a property.
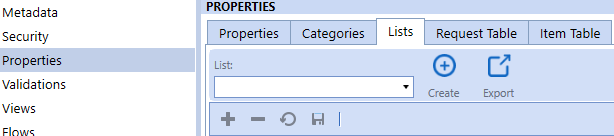
Click Create to create a new list.
-
Display: Display text that a user sees when interacting with the list. Click
to add a new list member. -
Value: Value is used by the system when making changes.
Request Table and Item Table Tabs
The Request Table and Item Table tabs are system-generated and cannot be updated by the administrator.
Validations
Validations are business rules that run to verify that user input follows specific rules. A validation can be assigned to a property within a view. Application Control Manager is pre-installed with a list of default validations. You can also create and add custom validations to meet your organization needs.
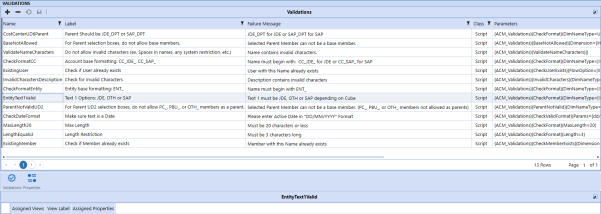
Name: Unique validation name.
Label: Description of validation.
Failure Message: Message that displays when the validation fails.
Class: All validations are set to script.
Parameters: The business rule and associated parameters needed to run the validation script.
Validation Assignment
There are two ways to assign a validation to a property in Application Control Manager, directly in the Validation administration page or using the View editor (refer to View editor section for more info).
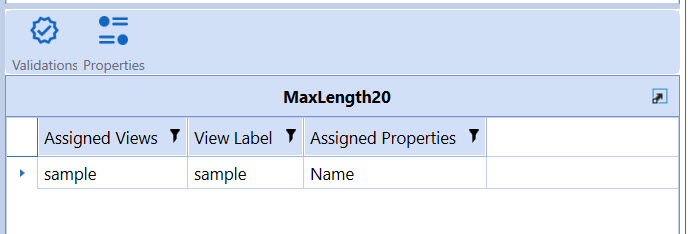
Validations : Use this to select the view you want to assign the validation to.
Properties : Once the view has been selected, use this to select the specific property to apply the validation.
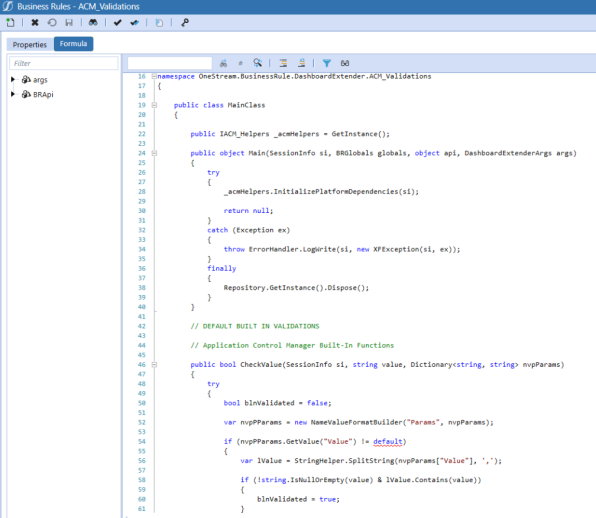
Validation Business Rules
Views
A view is what you want a user to see at an Application Control Manager step. Properties and validations are assigned to views and then the view is assigned to a flow step.
Views Tab
Click New and Edit to create and edit views.
![]()
Name: Unique view name.
Label: Description of view. It is helpful to include the dimension, step, and action.
Request Type: This is selected from a list after view creation. Available types are: Metadata, Security, and Generic.
View Editor
To see the details or to modify a view, select a view and then click Edit.
Properties Tab: Includes two lists: Available Properties and Assigned Properties.
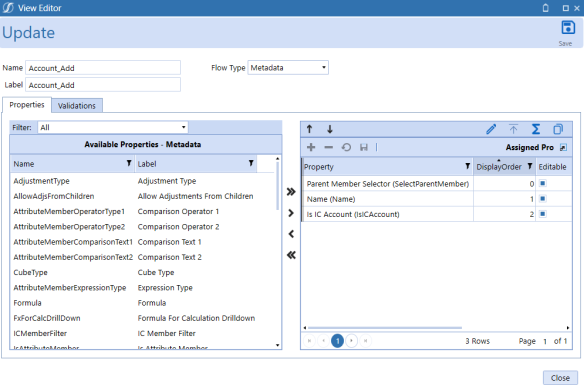
The Filter drop-down list allows you to switch between property categories to see which properties are available to assign to the view.
Use the center arrows to add or remove the selected property or all properties to or from the assigned properties list.
Use the Assigned Properties toolbar to:
-
 : Move the selected property up in the display order.
 -
 : Move the selected property down in the display order.
 -
 : Toggle the editable property for all assigned properties.
 -
 : Toggle the required property for all assigned properties.
 -
 : Toggle the calculated property for all assigned properties.
 -
 : Open a window to select an existing view from which to copy all properties.
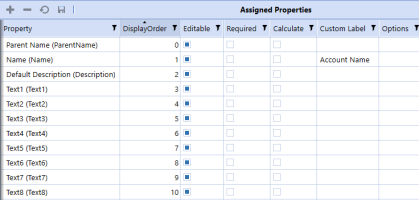
After you assign the property to the view, configure the following settings:
-
Display Order: The order of properties displayed in the view. Duplication in display order will cause an error when processing source system import.
-
Editable: Indicates if the property can be edited.
-
Required: Indicates if the property is required. If True, it will not pass validation if a required property is blank.
-
Calculated: Indicates if the property is calculated based on another property.
-
Custom Label: Overrides the property label.
-
Options: Name-value pairs that are used for solution functionality.
-
Tooltip: Overrides the property tooltip.
-
UseRef: Use the property values from the Reference member assigned in the view.
-
DimTypeName: Overrides the DimTypeName for the property.
-
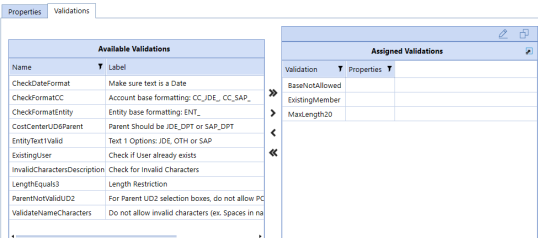
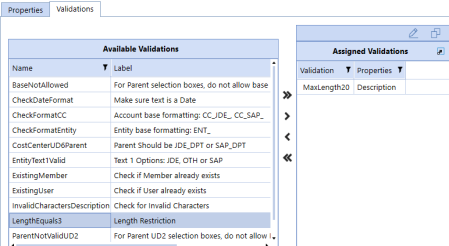
Validations Tab: Assign validations to views.
-
Use the arrows to assign validations to specific properties within the view.
-
Complete one of the following actions:
-
Select an assigned validation and then click the pencil to assign the validation to one or more properties.
-
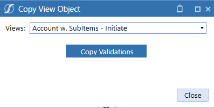
Click Copy to copy validations from another view.
-
From the drop-down box, select the view to copy from and then click Copy Validations.
-
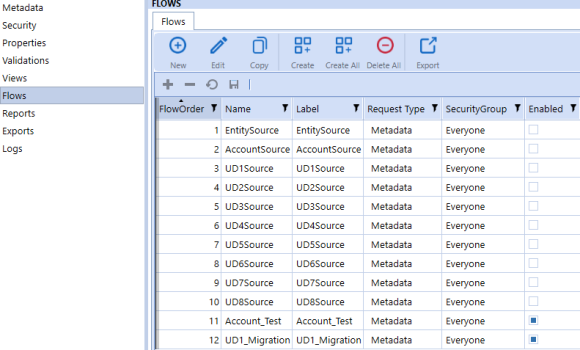
Flows
Flows represent the entire request approval process that a user completes when creating a request. You can define the steps or stages of the approval, notification setting for each step, security group, actions type, and views assignment for the Flow.
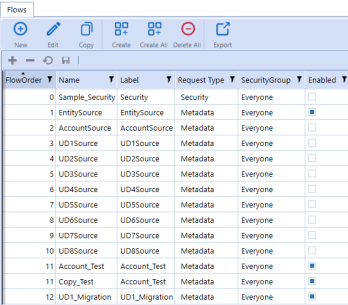
Flow Editor
New: Create a new flow.
Edit: Edit a flow.
Copy: Copy a flow.
Create: Create dynamic dashboard components for the selected flow.
Create All: Create dynamic dashboard components for all flows.
Delete All: Deletes all dynamic dashboard components for all flows.
Export: Export flows to a .csv file for review in Excel or another text editor.
![]()
-
Name: Unique request flow name.
-
Label: Descriptive label that users see for the request type.
-
Category: Available options are: Metadata, Security, and Generic.
-
Security Group: Indicates who can initiate these types of requests.
-
Order: The order the request type displays in the drop-down list when a user creates a new request.
-
Enabled: Determines if the request type is visible in the new request drop-down list.
-
Multiple Items?: Determines if the request allows more than one item in the request.
-
Error Template: Email template sent out for errors at the flow level.
-
Use Tabs?: Determines if the flow is using multiple tab views.
-
Modify Approvers?: Determines if the user is allowed to select the approver from a drop-down list.
-
Error Email: Email group that receives flow error emails.
-
Edit Button: Allows you to add a flow property to the flow level.
-
Save Button: Saves updates made to the flow header.
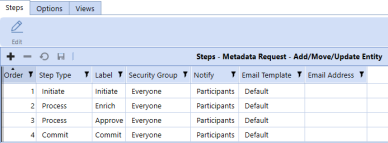
Steps Tab
Steps represents the different stages a request should go through.
-
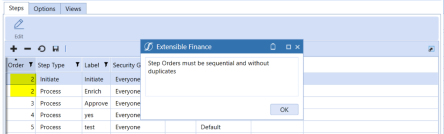
Order: Step order. The Initiate step is the first step and the Commit step is the last step for metadata requests. When creating flows on the Steps tab, the step order must be sequential and cannot be duplicated. Validations are present to ensure the step order and duplication are identified.
-
Step Type: These are the five available built-in step types.
-
Initiate
-
Process
-
Commit
-
Migrate
-
Export
-
-
Label: Unique label for flow-step combination.
-
Security Group: Specify which group of users has access at each step.
-
Notify: Select who gets notified on this step.
NOTE: Not currently implemented, only notifies email address defined.
-
None, Assignees, Participants, Assignees and Participants
-
-
Email Template: Select the email template to use for notification.
-
Email Address: Email group to be notified when the request is at the current step.
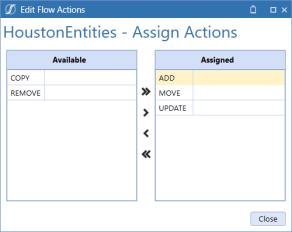
Options Tab
For Metadata request types, assign the dimensions to work with on this request type and then assign the actions to perform for each dimension.
![]()
Assign Actions
Views Tab
The Views tab allows administrators to assign the previously created views to each individual step-dimension-action in the flow process. If the views have not been created, you can also access the View Editor from here. The view assignment label list is automatically created when you add a new step or option. You must select the Assigned View from the drop-down list.
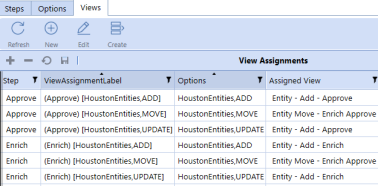
NOTE: Refresh: If the View Assignment list looks incorrect or not up to date, click Refresh to manually refresh the list.
New: Create a view.
Edit: View the details or edit an assigned view. Select the view step and then click Edit.
Create: Create dynamic dashboard components for the flow.
Create Dynamic Dashboard for Flow Views
After you create the flow and assign the views to each flow step, or anytime after you modify the flow options, you must run a process to create the dashboard components. Go back to the main Flows screen, select the flow, and click Create.
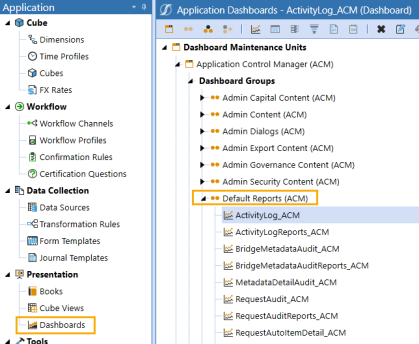
The dynamic dashboards are created in a specific Dashboard Maintenance Unit named Application Control Manager Dynamic Dashboards (ACM). The dashboards can be reviewed here.
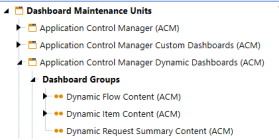
IMPORTANT: Do not make updates to the Dashboard here because any changes are overwritten when the Create process runs. Only make updates using the View or Flow Editor.
Reports Setup
The Reports page allows you to set up report sets for access through the Application Control Manager Reporting page. A set of defaults reports are pre-installed with the application (refer to the Reports section for more info). You can also create custom report to meet your organization needs (refer to Create Custom Reports section for more info).
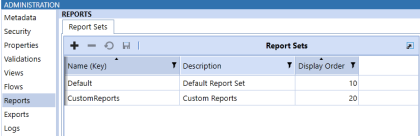
Report Sets
Use to group Application Control Manager reports into report sets.
-
: Add a new report set.
-
 : Delete a selected report set.
 -
 : Undo unsaved changes.
 -
 : Save changes to the report sets.
The workspace has three main columns:
-
Name (Key): Unique name for the report set.
-
Description: More detailed description of the report set.
-
Display Order: Arrange your report sets in numerical order.
Reports
When you click on a report set, the lower pane opens where you can add the reports to the set.
-
: Add a report to the set.
-
: Delete a selected report from the set.
-
: Undo unsaved changes.
-
: Save changes to the report.
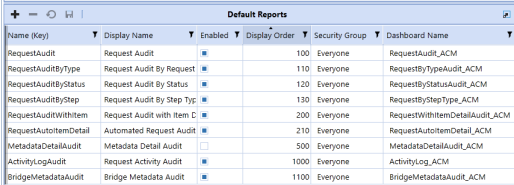
The dashboard has six columns:
-
Name(Key): Unique name for the report.
-
Display Name: The name of the report displayed to the end user.
-
Enabled: Determines if the report in the set can be seen by the end user.
-
Display Order: Arranges reports in numerical order.
-
Security Group: Assigns the OneStream security group that can view this report.
-
Dashboard Name: Name of the report dashboard in Application Control Manager.
The reports dashboard groups are in Application > Presentation > Dashboards > Application Control Manager (ACM).
There are reports that come with Application Control Manager and are listed under Default Reports.
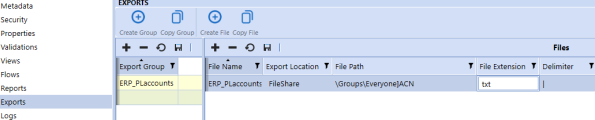
Exports
On the Exports page, you can create and copy export groups and files.
-
File Name: The title of the file.
-
Export Location: The file location after it is exported.
-
Local
-
User Folder
-
File Share
-
Application Database
-
External
-
-
File Path: The location of the file.
-
File Extension: File extension examples are .txt. and .csv.
-
Delimiter: Delimiters are used to separate the export properties on file.
-
OverwriteFile: If selected, the file can be overwritten.
-
HasHeader: Indicates if the file has a header row.
-
PropsInRow: If selected, properties in the row can be set.
-
FilterActions: This setting is used to specify if only certain actions are allowed to get exported. If not selected, all actions are included in the file.
-
FileActions: Actions that can be added to the file such as add, modify, and remove.
Logs
Application Control Manager has detailed logging where administrators can view all of the processing events including errors that have occurred in the solution.
NOTE: Detailed Logging check box must be checked off under Global Options.
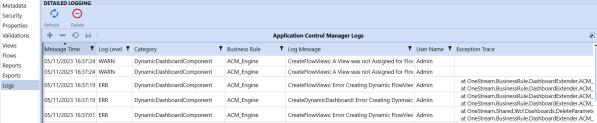
Click Refresh to refresh the detailed logging screen. Click Delete to clear all Application Control Manager log files.
-
Message Time: Time stamp for the activity.
-
Log Level: Captures the type of Log item that was written (for example, Information, Warning, Error, or Fatal).
-
Category: The organization of the system type that generated that Log Entry.
-
Business Rule: Business Rule responsible for writing the Log Entry.
-
Log Message: Description of the activity.
-
User Name: Login name of the user who performed the activity.
-
Exception Trace: The full path of the error. These breadcrumbs lead to the error.