Loading Form Data
Form Excel Template
When loading Form data via Excel, a specific template must be created to determine the form properties, the Dimensions to which the data is loaded, the data entry amount, and any data attachment information.
OneStream reads this template using a specific Named Range which is explained later in this section. Ensure the following information is included in the Named Range.
Property Tokens
The first four rows of the Named Range in the Excel template must include the following token definitions:
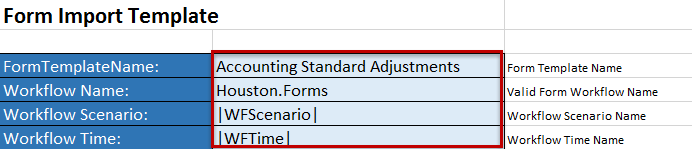
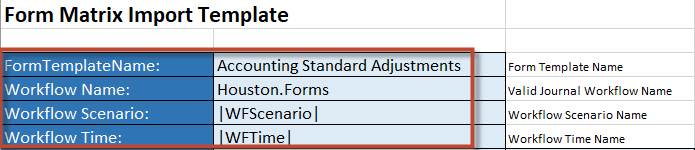
Form Template Name
Enter the Form Template name intended for the Form data load.
Workflow Name
Enter the Form Workflow name. For example, if the name of the Workflow Profile is Houston, and the Form input type is named Forms, enter Houston.Forms.
Workflow Scenario
Enter the current Workflow Scenario such as Actual, Budget, etc. To dynamically use the current Workflow Scenario, use the |WFScenario| Substitution Variable.
Workflow Time
Enter the current Workflow Time Period. To dynamically use the current Workflow Time, use the |WFTime| Substitution Variable.
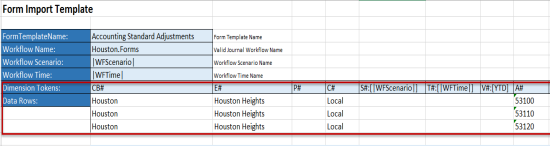
Dimension Tokens
Next, create the Dimension Tokens necessary to load the form data to the correct Dimensions in OneStream. The Dimension tokens need to be the column header for each data row. The standard tokens used determine the Cube, Entity, Parent, Account, Flow, Intercompany, the User Defined Members, and an Amount. Refer to Loading Stage Data for the syntax. The form specific tokens are as follows:
HD#
Has Data
Enter Yes or No to specify whether the row has data.
AN#
Annotation
AS#
Assumption
AD#
Audit Comment
FN#
Footnote
VE#
Variance Explanation
Header Abbreviations
Static Value
Use :[] to fix a specific Member to the entire column creating a Static Value for the specified Source Dimension. For example, F#:[None] imports the None Flow Member for every Flow row within the Named Range. This syntax applies to all Dimension Tokens.
Using Substitution Variables
If a Substitution Variable is used to define the Workflow Scenario or Workflow Time Tokens, link the Scenario and Time Dimension Tokens using the Ampersand (&) Excel Function and referencing the Excel cell.
Example: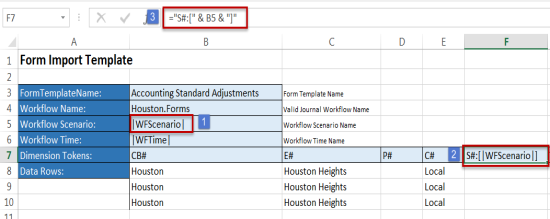
-
The Workflow Scenario Token, located in cell B5, is using a Substitution Variable to dynamically reference the user’s current Scenario.
-
The Scenario Dimension Token needs to reference that Substitution Variable to ensure the correct Scenario is used and the template functions properly.
-
The syntax to reference the cell B5 is =”S#:[“ & B5 &”]”
This references the correct variable and displays it in the proper cell.
After the Dimension Tokens are configured, enter the data in the corresponding column. The Dimensions can be in any order.


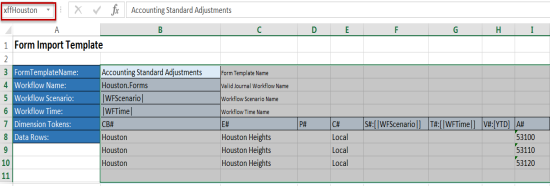
The final step is to create a Named Range beginning with XFF making sure to include the definition of each property, the Dimension tokens, and the data rows. The Named Range must begin with XFF for OneStream to read and load the form data correctly. Multiple XFF Named Ranges can be used across multiple tabs.
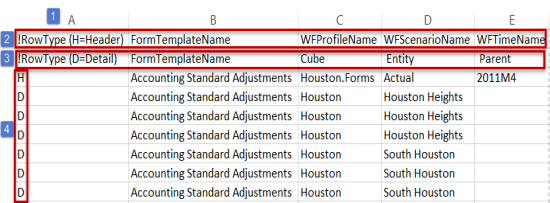
Form Matrix Excel Template
A form matrix template is used to load multiple amount columns to multiple time periods at once. In this template, the Time Dimension Token is combined with the amount to identify which amount should load to which period.
This template uses the same property tokens as a regular Excel Form template shown above.
In the Matrix Form template, Amount and Time must be specified in the same column. A third Dimension can be specified (e.g., Scenario) if desired. The example below is indicating the Amount Column using AMT# and then specifying to which Time Members the Amount detail belongs.

Form CSV Template
To set up a CSV template for a Form, the Header and Detail values must be specified.
-
Column A Specifies Row Type
In the first two rows of Column A, create two Row Type Parameters specifying the Header and the Detail. In the example above, !RowType (H=Header) and !RowType (D=Detail) are used to tag the corresponding rows with H or D identifying where the Header and Detail information is located in the CSV file. -
Row One Specifies the Headers
After the Header Parameter is configured, enter the form column headers. The required Form Headers are FormTemplateName, WFProfileName, WFScenarioName, and WFTimeName. For more details on these, refer to Form Excel Template. -
Row Two Specifies the Details
After the Detail Parameter is configured, enter the form detail headers. The required Form Detail Headers are FormTemplateName, all 18 standard Dimensions, Amount, HasData, Annotation, Assumptions, AuditComment, Footnote, and VarianceExplanation. For more details on these, refer to Form Excel Template. -
Header and Detail Tags
The Form data is driven by how each row in column A is tagged. Any rows tagged with H load as the Headers and any row tagged with D load as the details.
Loading Form Details via Workflow
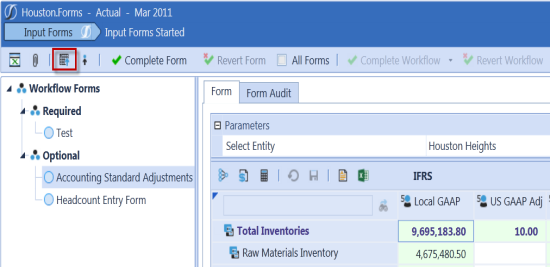
After the template is configured, users can load it directly into OneStream during the Workflow process. While the Form Input type is selected, click the  icon in the Form toolbar. This allows the user to select the desired Excel or CSV template and load it into OneStream. After the file is loaded, the data will appear in the Form grid and it auto-saves upon importing to the Cube.
Loading Form Details via Business Rules
Users can load Form details from an Excel Template or CSV file by configuring an Extensibility Business Rule and using the ImportandProcessForms BRApi. Within the BRApi, define the Session Info, file path, and Form actions.
Load Example
'BRApi.Forms.Data.ImportAndProcessForms(si, filePath, save, complete, throwOnError)