Administration
Each section within the Administration page are designed to work together to define the change request. Only administrators should have access to these pages.
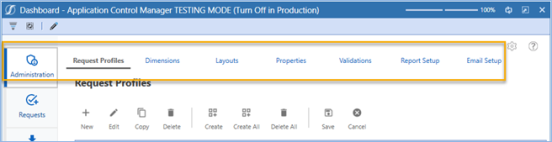
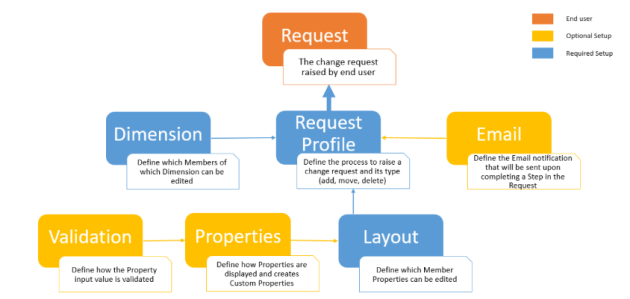
Typically, the sequence below is what you will follow to create and complete a Request Profile, which is the main control for a change request. Each section below will be explained in more detail in this guide.
-
Dimensions (required): This is the first step in designing a request. This page defines which dimension types, cubes, and hierarchies are to be managed in a request. This is a required step for the request to commit correctly.
-
Properties (optional): The Properties page defines all the possible properties that can be added to a request and how these properties will be rendered on screen in the Request Profile. The properties table is pre-populated with OneStream properties and delivered custom properties for the users. Normally you will not need to modify the default properties. However, this page allows you to create additional custom properties to enrich requests.
-
Layouts (required): The layout is where you define the properties that can be input within a request step. A layout is required in the Request Profile to turn on allowable actions.
-
Validations (optional): Validation controls the data integrity during input. It is an automated process that runs upon saving a line item and is validating the user input to prevent them from moving a request forward if the field is not valid. You can use the default validations or create a custom validation.
-
Email Setup (optional): Setup an email server and templates here to send out notifications to users throughout a request process. Two email templates are pre-installed in the application, but additional templates can be created. Even if you choose not to leverage email alerts, the system does require an email template to be assigned to the Request Profile as well as each step in the request process.
-
Request Profiles (required): You can define the steps a request should go through, as well as assign security groups and email addresses for each step. You will also define what actions can be taken in a request by assigning a layout to the action. Layouts can vary at each step of the process so that a requester can have a layout different from other users that need to enrich or approve the request during the process.
-
Report Setup (optional): Setup security access for the default reports or create a custom report here.
Refer to Sample User-Initiate Request to learn how to configure a request process from end-to-end with screenshots.
Dimensions
This is the starting point when setting up Application Control Manager. First, users need to define which dimension, cube, and hierarchy can be updated through a change request. A valid dimension configuration is required to complete the Request Profile and for a request to run correctly.
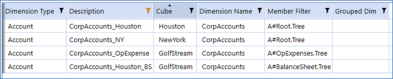
A single dimension can be setup across multiple cubes, or the same dimension can be separated by different hierarchies or inherited dimensions.
For example, when setting up for an Account dimension:
-
The same CorpAccounts dimension name with the same root hierarchy can be assigned to different cubes.
-
The same CorpAccounts dimension name can also be filtered down to a subset of the hierarchy such as Balance Sheet or Operating Expenses.
-
If there is an inherited dimension, you can also setup a dimension for it by selecting the inherited dimension name.
Dimensions that are configured here will be used as selections when setting up the Request Profile.
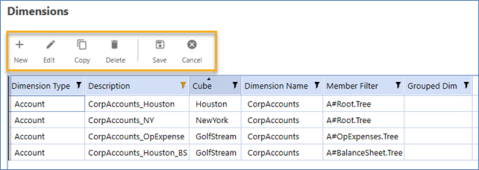
Dimensions Toolbar
-
New: Create a new dimension selection. This will bring up the Dimensions editing page allowing you to filter the dimensions as discussed in the section above.
-
Edit: Select a dimension and click Edit to modify.
NOTE: If a Dimension has any associated request, either open or closed, you will only be able to edit the Member Filter tied to the dimension. This preserves the audit trail of the request.
-
Copy: Select an existing dimension to copy. This will bring you to the editing page where you will be required to provide a unique description.
-
Delete: Select an existing dimension to delete. A dimension cannot be deleted if it is assigned to a Request Profile. This restriction is to ensure accidental deletion when a Dimension is being used in a change request. The system will deliver with preset dimensions to support the Metadata File Import process using the Excel template.
IMPORTANT: It is not recommended that you delete these dimensions.
-
Save: Save changes made in the grid.
-
Cancel: Cancels all changes made directly in the grid since the last save
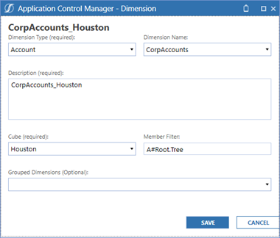
Dimensions Grid and Editing Page
Dimension fields can be edited directly on the Dimension page grid or by using the editing page. This page is accessible when you select New, Edit, or Copy icons.
-
Dimension Type (required): Type of dimension that can be updated within the request. Drop-down list of the twelve supported dimension types (Entity, Account, Scenario, Flow and UD1-UD8).
-
Dimension Name: Based on the selection of the dimension type above, this field will filter a list of associated dimensions from the application's dimension library.
-
Description (required): Unique identifier used in the Request Profile to manage a dimension. Description length cannot exceed 250 characters.
-
Cube (required): All available cubes within your application are listed in the drop-down.
-
Member Filter: Further limit the dimension hierarchies, members, and more, that are available for updates by specifying a member filter here. Example format of member filters is:
A#Root.Tree
UD1#CostCenters.Base
The first part of the filter indicates the dimension type with the # sign, followed by the level of the hierarchy, and then the expansion. These are the available dimensions and expansions:
-
Dimensions:
-
A# - Account
-
E# - Entity
-
S# - Scenario
-
F# - Flow
-
UD1# through UD8# - UD1 through UD8
-
-
Member Expansions:
-
Member
-
Base
-
Children
-
Children(I)
-
Descendants
-
Descendants(I)
-
Tree
-
Tree Descendants
-
Tree Descendants (I)
-
-
-
Grouped Dimensions (optional): This feature allows you to create a member in multiple dimensions with only one input during a user-initiated request process. Grouped Dimensions can only be edited from the Dimension editor dialog box, not in the summary grid.
For example, when you group Entity and UD1 together, a user only needs to input once in the request and the application will automatically generate the second line item for the other grouped dimension.
NOTE: The Grouped Dimensions feature is not compatible with Mass Update. To make changes to multiple dimensions in a single request, add your dimensions to the request profile, then you can make changes to multiple dimensions when using Mass Update.
See Setup and Use Group Dimensions.
Properties
The Properties page contains a table that is pre-installed with all the OneStream dimension properties and commonly used custom properties that you can leverage when creating a request. In this page, users can view, edit, or add properties that may be leveraged when creating a layout.
Properties must appear on this page to be added to a layout and used in the request process.
CAUTION: Administrators should avoid editing or deleting any of the pre-installed properties. Editing the parameters or component types for OneStream dimension properties may cause a commit error. There is no risk to leaving the properties in the table for potential future use.
For information on the function of each OneStream property,
Properties Toolbar
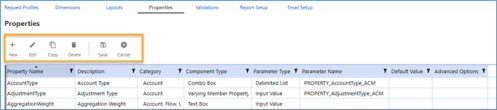
New: Create a new property, like a custom property needed to support your organization’s request process.
Edit: Select a property and click Edit to modify.
Copy: Select an existing property to copy. This will bring you to the editing page where you will provide a unique description.
Delete: Select an existing property to delete. A property cannot be deleted if there is an associated request.
Save: Save changes made in the grid.
Cancel: Cancel all changes made directly in the grid since the last save.
Properties Grid and Editing Page
All properties for the twelve OneStream supported dimensions, the Security User properties, and the Custom created properties are included in the property grid. For each property, the following configurable fields are available for update either directly on the grid or by using the editing page.
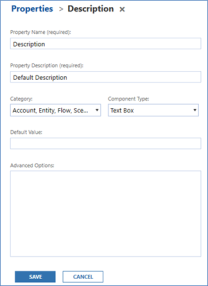
Property Name and Property Description
The required property name and description for default properties are defined by OneStream. It is not recommended to delete or edit the default OneStream properties. Users will need to create a name and description for any custom created properties. All properties must have a unique name and description in order to save.
The unique name is used for data storing purposes in the table. You can use the custom label function within the Layout page to control how an end user will see the property names in the layout.
Example: if the property “Description” is used across multiple categories, the property may have different custom labels for ease of use within the different layouts. If a user creates two layouts Entity and UD1, they may have the Description property in both. The Description property within the Entity layout could have a custom label of “Entity Name” while within the UD1 layout, the Description property could have the custom label “Cost Center Name”, making them unique and easier for the end user to understand.
Category
Each property is attached to a category to allow easy filtering. You will see the filtering in the Layouts page under the Available Properties pane. The categories include:
- The standard twelve OneStream dimension types: Account, Entity, Scenario, Flow, and UD1-UD8
- User Security properties
- Custom properties specific to Application Control Manager
A property can be linked to multiple dimension types. For example, the Description property is attached to all twelve standard dimension types.
In addition, you can create a custom property and link it to a dimension category so that it is easy to find in the available properties list within the layout screen.
Example: If you wants to track the department requesting an account, you can create a custom property for department, assuming it is not already a UD, and categorize it in Custom Properties as well as in the Account. This ensures admins can find the property when creating a new layout.
Component Type
Component type defines how the property will appear in the request. It is not recommended to edit the component types for the default OneStream properties and Security properties. These components are displayed in the grid for informational purposes only.
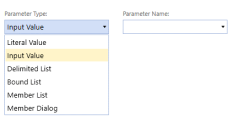
There are many component types available to the user when creating custom properties. The component selection is primarily used for Custom property creation and is normally set to Text Box, Check Box, Combo Box, or List Box.
The table below defines the component types within the drop-down menu:
| Component Type | Description |
| Text Box | Free form input field |
| Check Box | Ability to check on or off |
|
Combo Box and List Box |
Provides a drop-down that can be populated using the following parameter type:
|
| Member Selector | Presents the existing hierarchical structures from the Dimension Library to help users quickly click and select a base member. |
| Parent Member Selector |
Presents the existing hierarchical structures from the Dimension Library to help users quickly click and select a parent member. NOTE: For this component type, the Advanced Options need to have the proper parameters including: IsParentName, DimTypeName, and PropName. There should be no spaces in the parameters. For example, IsParentName=True, DimTypeName=|!Item_mdb_DimTypeName_ACM!|, PropName=ParentName |
| Security Group Selector | Provides a drop-down list of all existing Security Groups in the application. |
| Security Group Membership |
This component has a built-in feature to copy the security group assignment from an existing user. The Users drop-down list shows all existing users in the application. The
|
| Position Within Parent Selector | Custom component type to support the relationship property Position. This property does not store any values and it reverts to Retain Current Position after every commit. This behavior is consistent with the Dimension Library. |
| Varying Member Property Selector |
Custom component type to support all OneStream varying properties. Following are the different varying types that a property could utilize:
|
| Cultural Description Selector |
Custom component type to support selecting and storing of multiple cultural descriptions.
Cultures: Drop-down list that displays all the Cultural codes that are setup in the application. Cultural Description: Text field to input the desired description. Click the Add button to save the description in the Cultural Descriptions grid. Administrators can set up culture codes in the OneStream System Configuration. In the drop-down menu, the culture codes display in the correct code format (for example, en-US or fr-FR). You must use the code format not the name of the language (for example, use en-US not English). For metadata file import, you must provide a separate line for each culture code. |
| Formula Editor | Custom component type created to support the Scenario dimension property Formula. This Formula property differs from other dimension properties by opening an editor instead of a varying property selector. |
 icon is used to copy the selected user’s security group to the
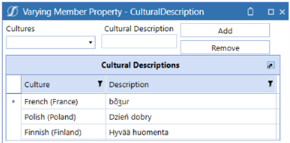
Default Value
Default value provides a pre-populated value when creating a request. This field is optional, and if not filled out, will appear as an empty field awaiting to be populated.
Advanced Options
Some component types can be customized by passing parameters. When writing parameters ensure there are no spaces in between the parameter name, the equal sign, and the parameter value (within squared brackets). Below are some examples of the parameters in the Advanced Options:
For a Combo Box, Check Box, or Text Box component type, a tooltip can be added to show customized message. When hovering over the property, the user will be able to read the message. An example of a tooltip parameter is:
Tooltip=[Select True if Entity is not the same as IC]
Tooltip=[Field allows for 50 character length Max]
-
Use a Member Selector or Parent Selector component type to display existing hierarchical structures from the Dimension Library by entering this parameter:
IsParentName=True, DimTypeName=|!Item_mdb_DimTypeName_ACM!|, PropName=ParentName
-
Or to specify a property as a Parent Selector, you would enter: IsParentName=True
Custom Delimited List
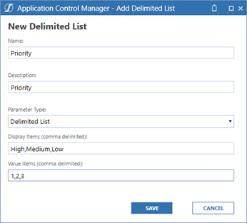
When creating a Combo box or List box, you must specify a parameter name in order to save. You can select an existing parameter or create a new delimited list. To create a new delimited list:
-
Select the <New Delimited List> in the Parameter Name field.

-
In the Add Delimited List dialogue, populate the Name, Description (limit to 87 characters), and Value items.
-
Click Save. The list will be created as a Parameter under Workspaces > Application Control Manager (ACM) > Parameters, with a prefix of "CustList_" and can be edited from the workspace page.
Custom Properties
Custom properties are used to enrich requests. This allows organizations to create requests with specific sets of information outside the typical security or metadata properties. Examples may include tracking the department generating the request, the risk of the request, or the urgency of the request.
NOTE: These custom properties are only stored within the Application Control Manager table. They are not passed to the OneStream platform, and therefore their values are not stored in the OneStream Dimension Library.
Application Control Manager delivers several commonly used custom properties, but you can set up as many custom properties as needed. A list of the custom properties delivered in Application Control Manager are in the table below:
| Name | Description | Definition |
| ReferenceAccount | Reference Account |
Created for user-initated type requests, not applicable for the Metadata File Import process. Member Selector component type. Display a list of existing hierarchical structures from the Dimension Library based on the dimension specified in the Request Profile. The parameter in these properties uses the member filter provided for the dimension on the Dimensions page. |
| ReferenceEntity | Reference Entity | |
| ReferenceFlow | Reference Flow | |
| ReferenceScenario | Reference Scenario | |
| ReferenceUD1 | Reference UD1 | |
| ReferenceUD2 | Reference UD2 | |
| ReferenceUD3 | Reference UD3 | |
| ReferenceUD4 | Reference UD4 | |
| ReferenceUD5 | Reference UD5 | |
| ReferenceUD6 | Reference UD6 | |
| ReferenceUD7 | Reference UD7 | |
| ReferenceUD8 | Reference UD8 | |
| SelectMember | Base Member Selector |
Created for user-initiated type requests, not applicable for the Metadata File Import process. Member Selector component type. Display a list of base members based on the dimension specified in the Request Profile. |
| SelectParentMember | Parent Member Selector | |
| CubeType | Cube Type | Created for the Metadata File Import process. Not applicable for user-initiated request. This property allows the user to include the vary by cube type information in the import source file. |
| TimeVal | Time | Created for the Metadata File Import process. Not applicable for user-initiated requests. This property allows the user to include the vary by time value information in the import source file. |
| RelationshipScenarioType | Scenario Type | Created for the Metadata File Import process. Not applicable for user-initiated requests. This property allows users to include the relationship vary by scenario type information in the import source file. |
| RelationshipTimeVal | Time | Created for the Metadata File Import process. Not applicable for user-initiated requests. This property allows users to include the relationship vary by time value information in the import source file. |
Layouts
A layout is used to design the input form a user will leverage to enter details or to enrich a request during a change request process. A layout is required to create a Request Profile and layouts can vary by the different actions allowed in a request.
You can control a set of properties that are allowed to be updated, set required fields, or apply validations to the properties in a layout. A different layout can be created and assigned to different steps and actions in a Request Profile to control who can update what properties.
For example:
-
For a requester creating a new account (Add action), the layout may contain most of the basic properties, but for copying an account (Copy action), you may create a different layout that only needs the Name and Parent name.
-
For an Enricher, a layout may contain additional properties such as Text1 field where a requester will not have visibility into.
-
For an Approval, a layout may be entirely read-only to control data integrity.
In the examples above, four separate layouts would be created to support the process.
Layouts Toolbar

New: Create a new layout. This will bring up the Layouts editing page.
Edit: Select a layout and click Edit to modify. This will bring up the Layouts editing page.
Copy: Select an existing layout to copy. This will bring you to the editing page where you will provide a unique description.
Delete: Select an existing layout to delete. A layout cannot be deleted if there is an associated request. It is not recommended to delete the OneStream pre-installed layouts. There is no risk in leaving the layouts in the list for potential future use.
Save: Save changes made in the grid.
Cancel: Cancel all changes made directly in the grid since the last save.
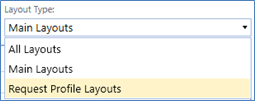
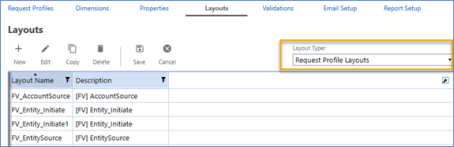
Layout Type: There are two types of layouts:
-
Main Layouts: This is the layout a user will use as the main input form. When you create a new layout, it will automatically be labeled as a main layout.
-
Request Profile Layouts: Prefixed with FV_ and is automatically created when a new Request Profile is created. Refer to the Request Profile Layouts (FV_) section for more information.
Default Layouts for Metadata File Import
Application Control Manager is pre-installed with a set of default layouts specifically to support the Metadata File Import process. Each layout contains the standard OneStream properties relevant to the dimension, as well as additional custom properties to support varying member properties.
Reference
CAUTION: It is not recommended that you update or delete the default layouts. If you edit the default layouts, you will also need to update the Metadata File Import Data Sources connectors. See Define Metadata Import Properties for information on customizing the import process.
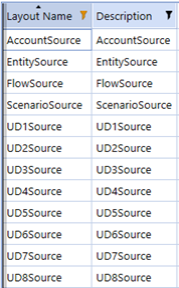
The following are the default layouts that are pre-installed in the application:
-
AccountSource
-
EntitySource
-
FlowSource
-
ScenarioSource
-
UD1Source
-
UD2Source
-
UD3Source
-
UD4Source
-
UD5Source
-
UD6Source
-
UD7Source
-
UD8Source
Layouts Editing Page
This page is accessible when you click the New, Edit, or Copy icons on the Layouts page.
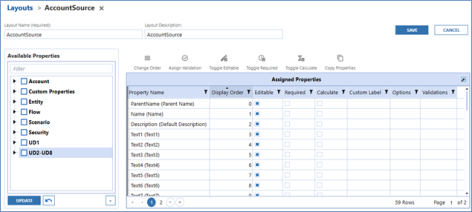
Layout Name (required): Provide a unique layout name. No duplications are allowed.
Layout Description: This is what will show in the Request Profile when assigning a layout to an action. Description length cannot exceed 250 characters.
Available Properties: All the properties from the Properties page will be displayed in the Available Properties pane organized by dimension types.
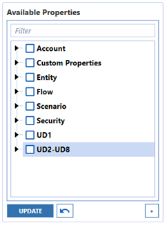
-
Filter: Properties are categorized by dimension type. Use the Filter function to instantly search for a property.
-
Update Button: After selecting the properties by selecting the checkbox, click on the Update button to move the selected properties to the Assigned Properties grid.
-
Reset Property Selection: Undo the checkbox selections in the Available Properties pane. This does not unassign or change the Assigned Properties grid.
-
Create New Custom Property: This will bring up the property editing page that allows you to create a new custom property. The new property will be available for selection immediately and will automatically be added in the Properties page.
Assigned Properties Grid: The main control of what and how a user can interact with each property assigned in the layout.

Property Name: Use the Available Properties pane to assign properties here. In the Metadata File Import Process, this property name must match the Business Rule connector field for the import to run correctly.
Display Order: The order of properties displayed in the layout. In the Metadata File Import process, this display order must match the Business Rule connector field in order for the import to run correctly. Duplication in display order will cause an error when processing the file import.
The following options are only applicable to user-initiated requests. They do not apply to the Metadata File Import process.
-
Editable: Indicates whether the property can be edited during the request process.
-
Required: Indicates if the property is required. When set to True, users will not be able to save the line item if the property is left blank.
-
Calculate: Indicates if the property is calculated based on another property. Typically, this is used in conjunction with a Reference property. For example, referencing another Account when creating a new account, you may want to make Account Type as a calculate field to copy the same account type as the member being referenced.
-
Custom Label: Overrides the property label.
-
Options: Advanced options are used to allow passing of parameters to set a property as a reference property or set the property tooltip.
-
Validations: Use the Assign Validation button to assign a validation to the property. A property can have multiple validations assigned to it. Assigned validations will be displayed in this column separated by a comma delimiter. In the Request Profile, a validation will run on a saved line item or on demand by clicking the Validate button.
Assigned Properties Toolbar

Change Order: Click this button to access the change order editing page.
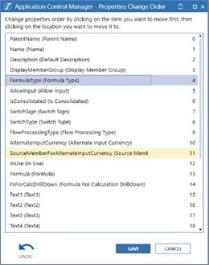
To change the order of the properties:
-
Select the property to move.
-
Select the property you would like to move it above.
-
Click Save.
-
Click the Undo icon to revert the last action.
-
Click the Cancel button to close the assignment window.
The Change Order column in the Assigned Properties grid will automatically update with the new order.
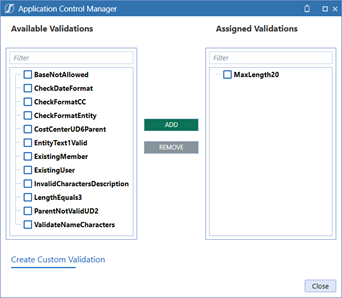
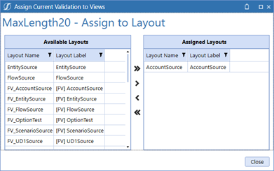
Assign Validation: Click this button to view the validation assignment window.
-
Available Validations displays the pre-installed and custom validations available.
-
Filter allows searching for a validation by name.
-
Select one or more validations and click the Add button to move them to Assigned Validations.
-
Click the Remove button to unassign validations.
-
Click Create Custom Validation to create a new validation from this pane.
Toggle Editable: This will either select all or clear all checkboxes in the Editable column in the Assigned Properties grid. After you click this button, all previous selections you have made in the grid will be overwritten and cannot be undone.
Toggle Required: This will either select all or clear all checkboxes in the Required column in the Assigned Properties grid. After you click this button, any previous selections you have made in the grid will be overwritten and cannot be undone.
Toggle Calculate: This will either select all or clear all checkboxes in the Calculate column in the Assigned Properties grid. Clicking this will overwrite any previous selections, which cannot be undone.
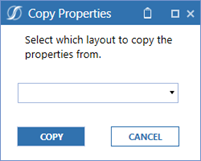
Copy Properties: Use this button to quickly copy all the properties from an existing layout. Once you select which layout to copy the properties from, properties you have previously assigned in the grid will be overwritten and cannot be undone.
Request Profile Layouts (FV_)
Some users may want to capture information about a request as a whole (request level) versus at the individual line-item level. For example, information retrieved from a request level may be the Request Priority or Business Justification for submitting the request.
Application Control Manager can assist in this situation. When a Request Profile is created, the application automatically creates a corresponding Layout for it. The layout is saved as Request Profile Layouts type and is named with a prefix of FV_ followed by the Request Profile’s name.
For example, if the Request Profile name is Entity_Initiate1, then the layout will be named FV_ Entity_Initiate1.
To access these layouts, navigate to Layouts page then select Request Profiles Layouts from the Layout Type filter.
Continuing with the earlier example, to capture the Priority of a request, first create a custom property in the Properties page. Then navigate back to Layouts page, select Request Profile Layouts from the filter, then select Edit to bring up the Layout editing page where you can then assign a custom property. Only Custom properties should be used as the request level.
Properties assigned to the Request Profile Layouts level will appear after you select the Request Profile and click Create from the home page.
Validations
Validations are a set of rules that can be applied to a property to ensure data integrity. For example, descriptions can be set to not exceed a certain number of characters, or a particular date format can be set. Validations are optional and are not required to complete a Request Profile.
NOTE: Validations do not work on the initiate step in the Metadata File Import process. They are only applicable to user-initiated requests. However, they can be part of a following layout profile for Metadata File Import.
Validations will run when you save the line-items, or when you click the Validate button.
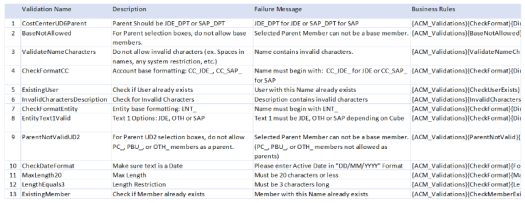
Application Control Manager is pre-installed with the following default validations.
You can also create custom validations.
Validations Toolbar
![]()
-
New: Create a new validation. This will bring up the Validation editing page.
-
Edit: Select a validation and click Edit to modify. This will bring up the Validation editing page.
-
Copy: Select an existing layout to copy. This will bring up the editing page to allow for a unique description to be provided.
-
Delete: Choose an existing validation to delete.
-
Save: Save changes made in the grid.
-
Cancel: Cancel all changes made in the grid since the last save.
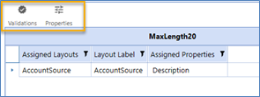
Use the Validations and Properties buttons to select an existing layout and assign the validation to one or multiple properties assigned to the selected layout.
NOTE: You must first select a layout by clicking the Validations button before clicking the Properties button.
Validations: This allows you to select an existing layout and assign a validation. First select the desired validation, then click on this button to display the assignment window.
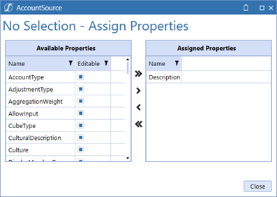
Properties: Select a layout before clicking this button. This displays a window with the assigned properties for the selected layout.
Validations Grid and Editing Page
Some fields can be edited directly on the Validations page grid or by using the editing page. This page is accessible when you select New, Edit, or Copy.
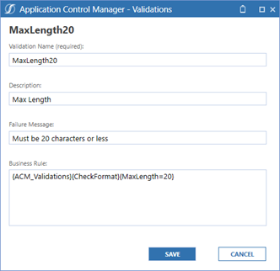
Validation Name (required): Choose a unique name for the validation. Duplication is not allowed.
Description: Enter a description of the validation. Description length cannot exceed 250 characters.
Failure Message: This is the message users will receive when the validation is triggered.
Business Rule: Enter the rules and parameters for the validation. All validation rules are stored in the ACM_Validations.cs assembly within workspaces.
IMPORTANT: When creating a custom validation rule, ensure the parameters are added to the ACM_Validations business rule, which is unencrypted. Using another business rule is not supported at this stage.
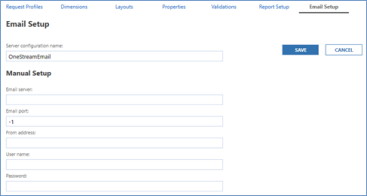
Email Setup
Email can be used to notify users of the status of a request or notify the application admin when there is failure in a process. An email template is required to complete a Request Profile. You can elect not to use email notification by leaving the email addresses blank.
-
Error Email Template (required): Email template sent out when there is an error running the request profile.
-
Email Template: After a request is submitted, this is the email template sent to the specified email addresses.
Email Server Setup
Define the email server that should be used to send out email notifications from the application.
The server name is pre-populated with OnestreamEmail server. Choose this or enter your own server name and click Save to register it in the application.
-
Server Configuration name: Specify the email server account to send notifications from Application Control Manager
-
Manual Setup: Alternatively, you can manually input the configuration to setup the server.
-
Email server: Name matching the email server setup in the OneStream Server Configuration
-
Email port: Email port that is setup in the server configuration
-
From address: The address the application will use to send out the email
-
User name: User name for the email account used above
-
Password: Password for the email account used above
-
Email Templates
You can set up a different email template to use at different stages in a request. For example, a template can contain next step information to notify users of a pending request. An email template could notify users when a request has been committed.
Two defaults email templates are pre-installed with the application: Error and Default templates. You can edit these default templates or create new templates using the available placeholders from the application.

Email Templates Toolbar
New: Create a new template. This will bring up the email template editing page.
Copy: Select an existing template to copy. This will bring you to the editing page, where you will provide a unique description.
Edit: Select an existing template and click Edit to modify. This will bring up the email template editing page.
Delete: Select an existing template to delete.
Email Template Editing Page
Some fields can be edited directly on the Email Templates grid or by using the editing page. This page is accessible when you select New, Edit, or Copy on the Email Setup page.

-
Label: A unique name for the email template. No duplication is allowed.
-
Subject: Description that will show up in the subject line of the email.
-
Message: The message that will show up in the email body. This can be customized by using the placeholder options below.
Email Placeholder Options
Using the email placeholder and the escape sequences below, you can customize an email template for use in different steps in the request.
For example, type in the content you would like to see in the body of the email, like Request Name:. Then specify the placeholder and enclose it with # signs, like #FlowLabel#. Enter \n to insert a line break.
Below are the available placeholder options:
-
FlowName: Request profile name
-
FlowType: Type of request, either metadata or security type
-
FlowLabel: Request profile description
-
FlowStepLabel: Current request profile step description
-
PriorFlowStepLabel: Previous request profile step description
-
FlowStepType: Current request profile step type
-
Message: Custom message
-
RequestID: Request identification number
-
Requester: Name of the person who created the request
-
RequestStatus: Current status of the request
-
RequestNextAction: Show if the request is claimed by someone
Escape sequence options:
-
\n: newline
-
\": doublequote
-
\r: carriage return
-
\t: tab
The Default email template is prefilled with the below placeholders as an example of how to format the message:
Request Name: #FlowLabel# \n Current Step: #PriorFlowStepLabel# \n Request Status: #RequestStatus# \n Requester: #Requester# \n Next Step: #CurrentFlowStepLabel#
The resulting email with these placeholders would look like this:
![]()
Request Profiles
Request Profiles represent the entire approval process a user completes when creating a new request. When a requester wants to start a change request, they must first select a request profile. A request profile controls the following elements in a change request process:
-
Which dimension and hierarchy can be changed. This is defined in the Dimensions page.
-
What approval or enrichment steps are required
-
Who can have access to each step
-
What email notification should be sent out for each step. This is setup in the Email Setup page.
-
What actions (Add, Copy, Update, etc.) are allowed to be performed on the dimension
-
Which properties can be changed. This is defined in the Layouts page.
Request Profiles Toolbar
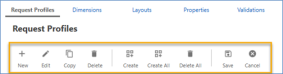
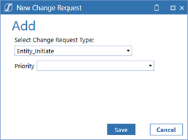
New: Create a new profile. This will bring up the Request Profile editing page, allowing you to enter details.
Edit: Select a profile and click Edit to modify. If a Request Profile has an associated open request, you will receive a prompt asking if you would like to close out the request before proceeding.
Copy: Select an existing profile to copy. This will bring you to the editing page where you will be required to provide a unique description.
Delete: Select an existing profile to delete. Ensure there are no associated, open, or completed requests to prevent the audit trail from being deleted.
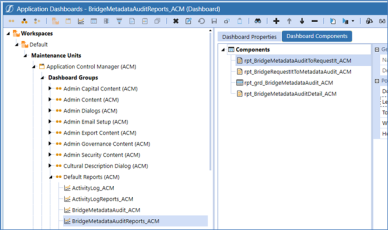
Create: Create dynamic dashboard components for the selected Request Profile. Every time there is a change in a profile, you must click Create to regenerate the dynamic dashboard.
Create All: Create dynamic dashboard components for all Request Profiles.
Delete All: Delete all dynamic dashboard components for all Request Profiles. This only deletes the underlying dynamic dashboards, not the Request Profile.
Save: Save changes made in the grid.
Cancel: Cancel all changes made directly in the grid since the last save.
IMPORTANT: The dynamic dashboards are created in a specific Maintenance Unit named Application Control Manager Dynamic Dashboards (ACM). Do not make updates to the Dashboard there. Any changes will be overwritten when the Create process is run. Only make updates using the Request Profile editing page.
Default Request Profiles for Metadata File Import
Application Control Manager is pre-installed with a set of default Request Profiles specifically to support the Metadata File Import process. Each profile is set with the following configurations:
-
Dimension is set to the same dimension as the profile name. For example, Entity is selected for the EntitySource request profile name.
-
The Initiate and Commit steps
-
The Action Group for each step is set to Everyone
-
Email Template is set to the pre-installed templates, the Error and Default templates.
-
Actions (Add, Copy, Update, Move, Remove) are turned on with the pre-installed layouts.
CAUTION: We do not recommended you update or delete the default Request Profiles. If you edit the default profiles, make sure to update the Data Source and supply the new Request Profile names for the default Metadata File Import to run correctly. Deleting the default profiles may cause import errors.
See Define Metadata Import Properties for more information on customizing the import process.
The following are the default layouts that are pre-installed in the application:
-
EntitySource
-
AccountSource
-
UD1Source
-
UD2Source
-
UD3Source
-
UD4Source
-
UD5Source
-
UD6Source
-
UD7Source
-
UD8Source
-
FlowSource
-
ScenarioSource
![]()
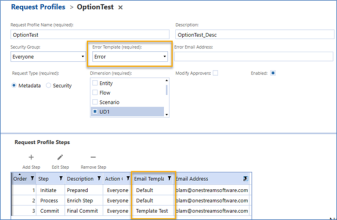
Request Profiles Editing Page
This page is accessible when you click the New, Edit, or Copy icons on the Request Profile page.

General Request Profiles Information
-
Request Profile Name (required): Unique name for the profile
-
Description: Description users see when creating a request
-
Display Order: Order in which the request will display for user selection
-
Security Group: Indicates who can manage the Request Profile
-
Error Email Template (required): Email template sent out for errors relating to the Request Profile
-
Error Email Address: Email address receiving the profile error email, usually the application administrator group. Input the full email address such as admin@onestream.com.
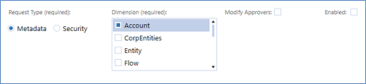
Request Type
-
Request Type(required): Specify if the profile is for Metadata or Security updates. Depending on the selected type, different actions will be available (Add, Copy, Update, Move, Remove, and Delete for Metadata. Add, Update, and Remove for Security).
-
Dimension (required): Indicates which dimensions the request can update. You will select the Dimension Description as defined in the Dimensions creation step above. You can also select multiple dimensions and use the Grouped Dimensions functionality. See Setup and Use Grouped Dimensions. This will appear after selecting Metadata under Request Type and saving.
-
Modify Approvers: Determines if the Approvers icon will be visible to users on the Request page. Enabling this features will bypass the security action group specified in the steps. See Use Modify Approvers for more information.
-
: Determines if the request profile is visible to the user.
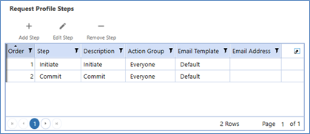
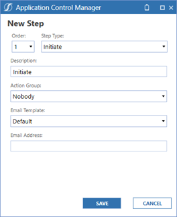
Steps
-
Order: Indicates the stages the request will go through. Minimally you need the Initiate and Commit steps in order for a request to be created and committed correctly. Step orders must be sequential and cannot be duplicated.
-
Step: The application is setup to support five step types. You can have multiple Process steps, but should only have one Initiate and Commit step.
-
Initiate: First step in creating a request. This step cannot be deleted.
-
Process: Additional processing steps to support the request. For example, for approval, enrichment, or review.
-
Commit: Makes the updates to the OneStream Dimension Library.
-
Migrate: Migrate requests to the target environment based on the setup in Global Options. A target environment is required to save this step correctly.
-
Export: Export Requests to the target folder based on the setup in Exports > Export Request. An Export Group selection is required to save this step correctly.
-
-
Description: Give a description of the purpose of each step.
-
Action Group: Specify which users have access at each step.
-
Email Template: Select the email template for email notification. Email templates are setup on the Email Setup page.
-
Email Address: Email group to be notified when the request has reached their assigned step. Input the full email address such as ABC@onestream.com.
Use the toolbar and step editing page to manage the steps in the request profile.
-
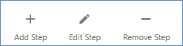
Add Step: This will bring up the step editing page. The next number is automatically populated.
-
Edit Step: This will bring up the step editing page and the selected step information will be displayed on the page.
-
Remove Step: Select the step you would like to delete, then click on the Remove Step icon. You cannot delete a Initiate step.
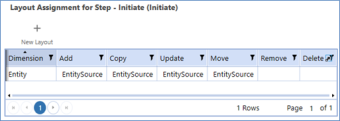
Layout Assignment Actions
Determine what actions a user can submit in a request by assigning a layout to it in order to activate it. For example, to allow Adding of a new account, assign an Account layout to the Add column. Or to prevent user from removing an Entity, leave the Remove column blank to turn the action off.
Only the Initiate and Process steps need to have layout assignments for actions.
-
Dimension: Auto-populated based on the Dimension selection.
-
Actions: There are six available actions in the application. Action types will only be processed if a Layout is assigned.
-
Add: Create a new member
-
Copy: Copy a member and it's relationships
-
Update: Change the property value of a member
-
Move: Move a member to a new parent. This will remove the member from their current relationship.
-
Remove: Remove the current relationship of a member without moving them to a new one. If the Member is no longer a part of the Dimension structure, it will be placed under Orphans.
-
Delete: Delete a member. Members that have underlying stored data (such as Actual amount or Budget data) cannot be deleted.
-
As you select the Request Profile type, you will see the available actions in the Layout Assignment grid.
For Metadata the available actions are: Add, Copy, Update, Move, Remove, and Delete.
For User Security the available actions are: Add, Update, and Remove.

Click on the New Layout icon to bring up the Layout editing page and create a new layout without leaving the page.
IMPORTANT: After creating the Request Profile, or anytime after modifying profile options, you must return to the Request Profile Summary page to run the create dashboard process.
Report Setup
Defaults reports are pre-installed with the application. You can also create custom reports. All custom reports should first be created in the application dashboard group below:
Application > Presentation > Dashboards > Application Control Manager (ACM)
After the custom report dashboard has been added, you can then set up the report sets and assign security to the report.
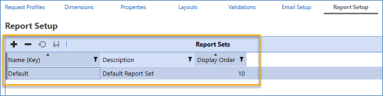
Report Sets
Report sets contain a group of individual reports. The pre-installed reports are grouped in the Default report set.
-
 : Add a new report set.
 -
 : Delete a selected report set.
 -
 : Undo unsaved changes.
 -
 : Save changes to the report sets.
Reports
When you click on a report set, the lower pane opens where you can add and manage individual reports.
-
: Add a report to the set.
-
: Delete a selected report from the set.
-
: Undo unsaved changes.
-
: Save changes to the report.
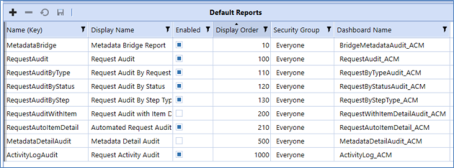
The report table has the following columns:
-
Name (Key): Unique name for the report.
-
Display Name: The name of the report displayed to the end user.
-
Enabled: Determines if the report in the set can be seen by the end user.
-
Display Order: Arranges reports in numerical order.
-
Security Group: Assigns the OneStream security group that can view this report.
-
Dashboard Name: Name of the report dashboard in Application Control Manager. Custom reports must first be created in the Application > Presentation > Dashboards > Application Control Manager (ACM).