Mass Update
The mass update feature enables you to enter multiple metadata or security items within a single request using the OneStream spreadsheet, rather than entering each change individually on the Request Details page. This provides you with multiple methods of adding and editing your request line-items, which can be particularly useful when many changes may need to be made at one time.
For a walk through of how to use this feature, see Use Mass Update.
Spreadsheet Generation
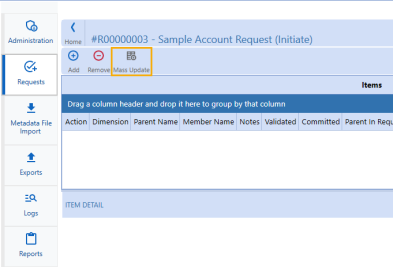
When you click the Mass Update button on the Request Details page, a spreadsheet will be dynamically generated and open within the OneStream application.
Temporary Spreadsheet
The temporary spreadsheet that populates is generated based on the line items in the request. One temporary file will be generated for each user when they open the Mass Update spreadsheet. This file can be found in the OneStream file explorer under Documents within the user's folder.
NOTE: Since the file created is temporary, any formatting or additional tabs created on the spreadsheet will not be retained the next time the Mass Update spreadsheet is opened for the same request. To maintain formatting and use the spreadsheet for future requests, save the spreadsheet to your local device.
Line Items Tab
One tab will generate titled Line Items. This tab is required and should not be deleted or renamed.

Headers Row
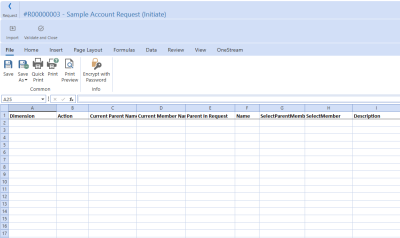
The first header row, which is automatically generated, contains the properties that are assigned in the layouts for the request profile. Some fixed headers or properties appear in every spreadsheet. These properties do not need to be created or added to the layouts, they are generated automatically.
For Metadata request types, there are six fixed headers:
-
Dimension: Drop-down list of dimension(s) that are assigned in the request profile
-
Actions: Drop-down list of allowable actions in the request profile
-
Current Parent Name: All actions except for adding a member require the current parent's name for the member
-
Current Member Name: All actions except for adding a member require the current member's name
-
Parent In Request: Indicate whether the parent for the member is being created within the current request
-
ItemID ( last column): This hidden column is for system use only. Do not populate or paste any values here.
For user security requests types, there are three fixed headers:
- Action: Drop-down list of allowable actions in the request profile
- Current User Name: Specify the user that you would like to take action on
-
ItemID (last column): This hidden column is for system use only. Do not populate or paste any values here.
Properties in the Spreadsheet
Any custom properties assigned in the layout will be generated in the spreadsheet. Combo box type properties will also be created as a drop-down cell with the same pick list.
Some properties that contain secondary pop-up dialog windows, which are available when using the Request Details page, are not available in the spreadsheet. For example:
-
Member or Parent selectors
-
Copy from User feature for security access groups
-
Varying member properties selector
Input Data
The main methods of entering data into a mass update spreadsheet include manual entry, copying and pasting data in the spreadsheet, or importing an outside Excel file.
With a range of Excel functionality available, additional tabs, formulas, formatting conventions, or filters can be used within the spreadsheet to better organize the incoming metadata. However, as a new spreadsheet is populated each time the mass update button is clicked, any additional features or formatting will not be saved. To save any formatting that has been added, use the Save As button to save the spreadsheet onto your local device. This formatted file can be imported for use in future mass updates.
Manual Entry
You can input data directly into the Mass Update spreadsheet by clicking into a cell. Once an action is selected from the Actions column, some cells will change to gray indicating that input is not necessary. For example, if Add is selected, the Current Parent Name and Current Member Name fields are not required.
Copy and Paste Data
Mirroring Excel functionality, you can also edit the mass update spreadsheet by copying and pasting information from an outside Excel file or drag down data from one row to the next.
NOTE: Remember not to copy and paste the ItemID column, which is for system use only.
Import Excel File
Excel files saved from past request spreadsheets, or those generated outside of the OneStream application, can be imported using the Import button within the Mass Update spreadsheet.

Excel files selected for import must feature one sheet titled Line Items. If this tab is not present or if it is not named Line Items, a dialog box will populate informing you that this tab must be present for import to succeed. The headers must also be an exact match to the headers generated by the Mass Update spreadsheet, including the fixed headers.
NOTE: If you attempt to import a file while there are existing rows within your request, a dialog box will prompt you to either Replace or Append the existing records.
Enter Varying Member Properties
When using the Mass Update spreadsheet to enter changes for varying member properties, ensure that each varying item has a row in the spreadsheet. See Import Shared Members and Varying Properties for more information.

Similarly, each security access group for a user should be entered on a separate row in the Mass Update spreadsheet. The image below provides an example.

If varying member properties are included in the layouts, all layouts for each step must have the same properties. For example, if Text1 is in the layout for the Initiate step, then Text1 should also be included in the Process step layout.
-
For non-varying member properties, required fields must be in the first row from the group of rows that combine into one line item when saved to your items grid.
-
For varying member properties, required fields must be in at least one row from the group of rows that combine into one line item when saved to your items grid.
When using Mass Update to make an update to any varying member properties, include all the existing values in the spreadsheet. If any existing varying member property contains data and is excluded or left blank in the spreadsheet, Application Control Manager will assume it is intentional and will remove the existing value.
For example, if Text1 currently contains value "123" in Scenario Type, Actual, and Time Value 2024M1 and you would like to add to it a value "456" in Scenario Type, Actual, and Time Value 2024M2, then both the existing "!23" and the updated value of "456" should be included in the Mass Update spreadsheet.
TIP: To quickly pull all existing varying member properties for a member, first add a line item on the standard input page and then open that line item using Mass Update. You should see all varying members data listed in individual rows on the spreadsheet.
Validations
After data has been entered or imported into the spreadsheet, click the Validate and Close button to prompt the application to process each row and identify any existing errors. After this process is complete, a dialog box will appear to let you know the status of the validation check.
TIP: Several factors may impact the application performance during the validation process such as number of records in the spreadsheet or number of properties in the layout. Reduce the data volumes if the system slows down.
If there are no errors, a dialog will confirm the successful validation of the spreadsheet. If the spreadsheet does not pass the validation check, a list of action items will display what must be corrected.
NOTE: Failed validations will not show in the activity log.
The following are the validations each spreadsheet must pass:
-
Action items must be provided for each row and cannot be left blank. Action items must be listed in all uppercase.
-
Dimension Name must exist in the selected request profile and cannot be left blank.
-
Parent In Request must either be left blank or set to True or False. This property is used to indicate whether the Parent for a particular member is being created within the current request. If there is a pre-existing Parent within the application, and it is not being modified within the request, this column should be set to False.
-
When Parent In Request is set to True, ensure the new parent exists in the ParentName row within the spreadsheet, or that the parent name exists in the line item table on the Request Details page.
-
-
Each row must have a unique combination of data in the properties. Duplicate rows will produce a validation failure.
-
Any validations assigned in the layout used for the selected request must be met within the spreadsheet.
-
All required fields must be filled out.
-
All actions except for Add require that Current Parent Name, New Parent Name, Member Name, or ParentName/SelectParentMember be filled out. If one of these fields is missing and is required to perform a selected action, the spreadsheet will not pass validation.
-
Columns featuring a drop-down list must be left blank or filled with a value acceptable within the parameters of the request. This is particularly important to note for imported data.
Once the validation check has been passed, click OK to return to the Request Details page where your rows will be reflected in the Items table.
Edit Individual Items
Line items added using the Mass Update spreadsheet can still be added, edited, or removed individually, offering users multiple avenues of item entry and management. As the two sync together to maintain line-item changes within the request, any changes made using the item details layout will be reflected in the associated spreadsheet, and any changes made using the spreadsheet will be reflected in the details page.