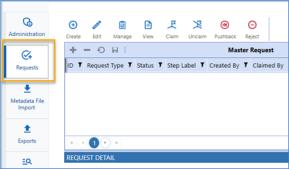
Any user with access to create a request will go to the Requests Home Page to start the process. A user that needs to approve or enrich a request will also go to this page for processing. This page is accessible from the left navigation panel on the left-hand side of the application.
A typical flow for a user-initiate request often follows the steps below:
-
Click on the Create button from the home page.
-
A window with the Request Profile drop-down will appear. Users will only see the profile that they have access to. Select a profile and, if applicable, the Request Profile level properties will appear for the user to enter.
-
Next, the user will be brought to the Request Detail page.
-
Click Add to start adding line items to the request.
-
Select the actions from the drop-down.
-
In the Item Detail section, the properties or layout that are assigned to the action will show up.
-
Users will enter the necessary information and click on Save. If applicable, the validations that are triggered will show an error message at this time.
-
After clicking on Save, the line item grid will be refreshed.
-
Users can continue to add items or click on Submit.
Request Toolbar

-
Create: Create a new request. A window will open for users to select a Request Profile that is enabled and they have access to. Any properties that are assigned to the Request Profile Layout will also appear in this window. After clicking Save, it will bring you to the request detail page.

-
Edit: Update an existing request. Once a request has been submitted to the next step, the requester will not be able to edit the request.
-
Manage: Brings users to the request detail page. A user cannot manage a request that was initiated by them.
-
View: To view an existing request in a read-only state.
-
Claim: Clicking on this icon will update the Claimed By column with the name of the user who claimed it. A user cannot claim a request that was initiated by them.
-
Unclaim: Clicking on this icon will update the Claimed By column with Unclaimed. See the request Filters section below for more information.
-
Pushback: Sends the request back to the previous step.
-
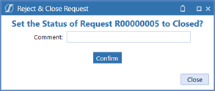
Reject: Reject and close out the request. A comment window will display. A comment is optional to close the request.
-
Commit: This will commit requests that have Ready for Commit check boxes set as True. When there is no available request to be committed, this icon will be hidden.
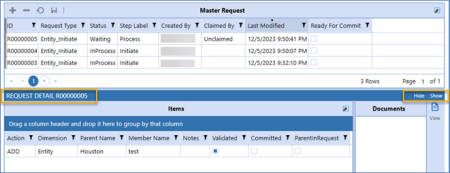
Master Request and Items Grid
The Master Request Grid displays summarized information about the request. It does not show you each line item that is within the request. To view the line item details, you can expand the Request Detail underneath the grid by selecting the Show button on the right-hand side of the window.
Master Request Grid
-
ID: System generated identification number for the request
-
Request Type: Show the Request Profile descriptions
-
Status: The current status of the request. Available statuses are:
-
InProcess: Applies to request that has been initiated or claimed
-
Waiting: Submitted by prior step and is now pending next step action
-
Closed: Closed without being committed. Usually it is either rejected or closed by system
-
Completed: Ran through the commit step
-
FailedCommit: Ran through the commit step but there are line items that failed
-
AwaitingApproval: This status will only appear if additional approvers are added to the request using the Modify Approvers feature. Refer to Use Modify Approvers for more information.
-
-
Step Label: Description of the step as set in the Request Profile
-
Created By: Name of the user who created the request
-
Claimed By: Name of the user who claimed the request. The default value for this is Unclaimed
-
Last Modified Date: Time stamp indicating the last modification date and time
-
Ready for Commit: Indicates if the request is ready to be committed. When a request reaches the Commit step, this column will automatically be set to True. Administrators can un-select the check box in the grid to set it to False.
Items Grid

-
Item Group (only shown if the request contains Grouped Dimensions item): Displays the member name in the request.
-
SubItem (only shown if the request contains Grouped Dimensions item): Either True or False. This indicates if the item is a sub-item of a Grouped Item. Only valid on Grouped Request Types.
-
Action: The metadata action to be performed.
-
Dimension: OneStream dimension to be updated.
-
Parent Name: OneStream parent member name.
-
Member Name: OneStream member name.
-
Notes: An input text field that is specific to the particular item.
-
Validated: True/False, indicates if all item properties are validated.
-
Committed: True/False, indicates if an item has been successfully committed.
-
Parent In Request: True/False, indicates if the Parent is included in the request.
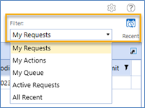
Request Filters
Use the request filters to quickly refresh the Master Request grid and display the relevant requests. There is an option for you to input how many days of requests to show in the grid.
-
My Requests: Shows requests the current user has created.
-
My Actions: Shows requests with pending actions for the current user.
-
My Queue: Shows requests for the current user when their group has the next pending action (for example, Enrich group).
-
Active Requests: Shows requests that are currently active (not in a closed, completed, or committed status).
-
All Recent: Shows all requests in any state from recent days as configured in the next option.
-
 : Shows all requests in any state from recent days as configured in the next option.
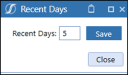
Request Activity
The Request Activity grid is a read-only grid that can be found on the Request Home Page as well as in the Request Details Page.
The same activity entries are also stored in the application Logs table. Users have the option to expand or collapse the activity log grid by preference. Use the Hide/Show options located on the right-hand side of the window.

-
Username: User performing listed task
-
Timestamp: Time that the task was performed
-
Activity Summary: A brief overview of the activity
-
Add Comment: Add a comment to the request (not to individual line-items within the request) for further clarification