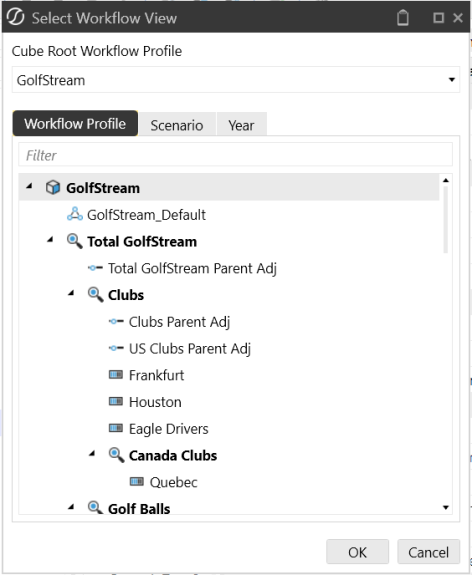
The top of this slider configures the Workflow View for data loading: Workflow Profile, Scenario, and Year. Clicking on any of the three items displays a pop-up window to select Workflow Profile, Scenario, and Year.
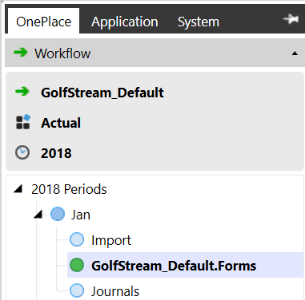
A Workflow Unit is an individual period within the selected year and Scenario combination for a particular Workflow Profile. Twelve Workflow Units or periods are always displayed for selection, but only one can be selected and active at a given time. Each Workflow Origin step available must be completed as well as the collective data confirmation and certification process for a single Workflow process to be finalized.
TIP: The available tabs will be determined by the security level.
Right-Click Options
Right-click a Workflow month, Workflow Input Type, or Dependent Status cell to display the following options. Not all options are available for every object.
Status and Assigned Entities
Displays the Workflow Status of each Origin process (Import, Forms, and Journals). See Dependent Status under Certify for more details on this feature.
Audit Workflow Process
Right-click any Workflow channel. This provides an audit for every Workflow task’s process including the date and time of the process, the user performing the process, how long it took for the process to complete, and any errors that occurred during the process. It also provides audit history through Lock History > Workflow Lock/Unlock.
Lock/Lock Descendants
This will lock a particular Workflow period, or Origin process.
Unlock/Unlock Descendants
This will unlock a particular Workflow period, or Origin process.
Edit Transformation Rules
This will navigate to the Transformation Rules screen and allow a user to fix any Transformation Rule errors that occur during the Workflow process.
Clear All ‘Import’ Data From Cube
This will clear all imported data from the Cube, but the data still remains in the Stage.
Clear All ‘Forms’ Data From Cube
This will clear all Forms data from the Cube.
Corporate Certification Management
This allows a user to unlock and uncertify ancestors, or lock and certify descendants.
Corporate Data Control
This allows a user to preserve data if changes need to be made and restore the preserved data if necessary.
Workflow View Selection
A description can be added to a Workflow Profile during its design. Descriptions can only be added to Workflow Profiles using the Default Scenario Type. Scenario Type specific descriptions cannot be used.
Workflow Tasks
This simplifies the data collection, consolidation, and certification process. Importing data, entering a form, making a journal entry, and signing off on reports is completed through the Workflow process.
Import
This process step gives the end user the ability to import data into the system. This can be through a defined Data Source or a Data Connector. First click on the Import Workflow Origin located under the active month, then click Import in the task bar.

After a user clicks this icon, it will prompt him/her to either search for a file on the drive or initiate the Data Connector. The system will then import the data into the Stage engine. The file will be parsed into a clean tabular format with information on the Amounts, the Source ID, and each Dimension. Once the data is loaded successfully, the Import task will change from blue to green.
Load Method
Upon clicking Load and Transform, a dialog will appear with four Load Options:
Replace
This will clear all data for the previous file that correlates with the specific Source ID and replace it with the new file’s data. This can be done even if the previous data has already been loaded into the Cube. Once the file is re-loaded, the user will need to complete all Workflow Tasks and load the new data into the Cube.
Replace (All Time)
Replaces all Workflow Units in the selected Workflow View (if multi-period). Forces a replace of all time values in a multi-period workflow view
Replace Background (All Time, All Source IDs)
Replaces all Workflow Units in the selected Workflow View and all Source ID’s in a background thread while the new file parse or connector execution is running. The delete is being performed while parse is being performed.
NOTE: This load method always must always be used to delete ALL Source IDs. If the workflow uses multiple Source IDs for partial replacement during a load, this method cannot be used.
Append
This is used when additional rows are added to a source file and need to be loaded into the Stage. This will not change any of the data already loaded for the source file, it will only add rows that were not included in the previous file load.

This is used after data has already been loaded, but some changes have been made and the calculations need to be repeated.

This will clear all loaded data from the Stage.

View Last Source File Processed for Current Workflow Profile

View Last Log File Processed for Current Workflow Profile

When this icon displays, the Global POV is enforced and data loading is limited to the Global POV. The Enforce Global POV setting is controlled under Application|Tools|Application Properties.

When this icon displays, data cannot be imported to time periods prior to the current Workflow year. The Allow Loads Before Workflow View Year setting is controlled under Application|Tools|Application Properties.

When this icon displays, data cannot be imported to time periods after the current Workflow year. The Allow Loads After Workflow View Year setting is controlled under Application|Tools|Application Properties.
Right-Click Options
View Source Document
This will open the source file imported into the application.
View Processing Log
This will open a processing log and provide information on when and how the source file was imported.
View Transformation Rules
This provides all mapping rules for the specific intersection
Drill Back
Using a SQL Connector allows a user to drill back to a source system and show detailed records from a document, PDF, website, within the application This option is only available if data was loaded using a Connector Data Source. For more details on this feature, see Drill Back in Collecting Data.
Export
This will export the data into an Excel XML< CSV, Text, or HTML file
Validate
After the data is loaded, the user will then validate the map and intersections. During the Validate step two specific actions happen. First, OneStream will check to make sure each piece of data has a map. Next, OneStream will check to make sure the combination of Dimensions can be loaded into the Cube based on the constraints defined in the system (e.g. using Intercompany). Click the green Validate task in the taskbar.

Click this icon to validate the data. If there are no errors, the Validate task will change from blue to green. If there are any errors, Validate will turn red and the errors will need to be fixed before proceeding. 
Transformation Errors
The errors will be listed by the Dimension with the error, such as a new account that was added, but not mapped. The user will be able to see the Source Value and the (Unassigned) Target Value. The system will already know the Dimension and pull up the possible targets. On the right, the user will be able to use the search box and click the funnel/filter button to find the correct account. The default will be a One-To-One Transformation Rule. For more information on these rules, see Transformation Rules in Data Collection.

Save any changes made and then click the Retransform icon, this will automatically re-validate the data. If there is an intersection validation error, this will now appear. If there are no intersection errors, the Validate Workflow step will change from blue to green.
Intersection Errors
Intersection Errors mean something is not correct with the entire intersection of data. For example, a Customer Dimension may be mapped to a Salary Grade Account. This does not make sense and the system will identify this prior to the load. To fix this error, click on the bad intersection and drill down to see the GL/ERP Account; (see Drill Down in Using OnePlace Cube Views for more details). Right-click to View Transformation Rules and from there, investigate each rule for each Dimension in order to find which one does not make sense. Each Dimension will be on the left, and each Target Value Column needs to be investigated. To fix a Transformation Rule here, select the Target Value to correct, right-click and select Edit Rule. Choose the appropriate Target Value and fix the intersection error. Click Save and close the next two windows. Click the Validate icon again and if it was fixed correctly, the Validate task will change from blue to green.
See Right-Click Options under the Import Task for details on the right-click functions.
Load
This simply loads the cleansed data from the Stage to the Analytic Engine. Click the Load task in the taskbar.

Next, click the Load Cube icon. This now loads the data into the Consolidation Engine and completes the Import process.
A Task Progress dialog will appear:
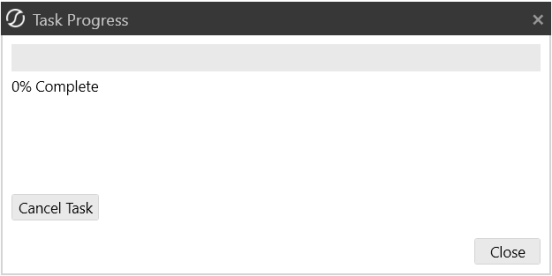
A green check will appear next to the Import Origin Workflow Step.
See Right-Click Options under the Import Task for details on the right-click functions.
Pre-Process
The Pre-Process task is the same as the normal Process task. This can be added as a first step in the Form channel process. Please refer to the Process description further down in this section for more details.
Input Forms
Once in this step, there will be two options under Workflow Forms: Required and Optional. The required Forms will have to be completed before the end user can move on from this step. Click on the specific Form, and manually enter the required data.
 Open Excel Form
A user can export a Form derived from a Cube View to Excel, complete it in Excel, and then submit the data back to the application.
 Attachments
This allows the user to attach supplemental files to specific Forms.
 Import Form Cells Using Excel or Comma Separated Values File
Click this to load Form data via Excel template or CSV template. See Loading Form Data in Collecting Data for more details on using these templates.
 Import Cell Details Using Excel or Comma Separated Values File
Click this to load Cell Details via Excel template or CSV template. See Loading Cell Detail in Collecting Data for more details on using these templates.

Once a Form is completed, click Save and then the Complete Form icon.
NOTE: A drop-down time period menu will display for a form with a defined time filter containing multiple periods. If a Form does not have a time filter defined, this will be a standard button.

This will re-open a Form and clear the data. Once the Form is updated, Complete Form must be clicked again.
NOTE: A drop-down time period menu will display for a form with a defined time filter containing multiple periods. If a Form does not have a time filter defined, this will be a standard button.

Checking this box enables all Forms to be completed/reverted in one step.
When each Form is completed, click Complete Workflow and a green check will appear for the Forms Origin Workflow Step.
This will re-open the Workflow. To make changes to the Form, Revert Form must also be clicked. Make any necessary changes to the Forms and click Complete Form/Workflow again.

This will run a consolidation/translation/calculation for a specific Form.
 Show Report
This shows the Form in a Cube View Report.
 Export to Excel
This exports a copy of the Form into Excel.
Cell Detail
Cell Detail can be entered on a Cube View used for a data entry form, or on a Cube View or Quick View in Excel. Cell Detail is available on any writeable O#Forms or O#BeforeAdj Member.
See Right-Click Options in Using OnePlace Cube Views for details on the right-click options in Forms.
Workflow Icons
-
OneStream logo is white.
-
Workflow Status bar steps have curved edges.
-
Failed task text is white.
-
Up-arrow indicator for selected task.
-
Stop sign has an X in the middle, and a flat design style.
-
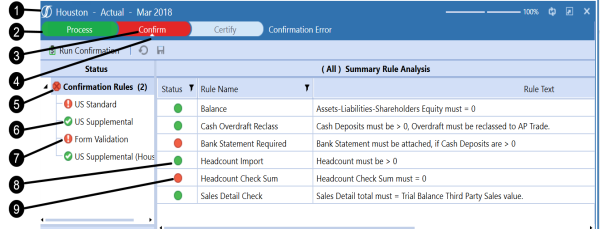
Confirmation Rules; Pass = green circle white checkmark, flat design style.
-
Confirmation Rules; Fail = red circle white exclamation mark, flat design style.
-
Status; last step completed green circle.
-
Status; last step error red circle.


