There are several advanced uses with cube views such as setting them to change by Point of View or Workflow. Using advanced settings let you create and maintain fewer cube views.
With Workflow
Set the POV, rows, and columns in the cube view so it is driven by the Workflow POV and the entities assigned to the workflow profile in use. By doing this, you can make forms, dashboards, cube views, and reports driven dynamically by the workflow profile.
Workflow Entities
Using an expression such as E#Root.WFProfileEntities from within the Rows or Columns Tab shows the entity or entities assigned to that particular Workflow Profile at run time. WFProfileEntities or similar expressions cannot be assigned to the POV because there can be more than one and the POV only requires a single member.
Workflow Scenario
Under the cube view Point of View Slider, select the WF Member for the Scenario dimension, or use WFScenario|, or a similar Substitution Variable in Rows and Columns.
Workflow Time
Under the cube view Point of View Slider, select the WF Member for the Time dimension, or use WFTime|, or a similar Substitution Variable in Rows and Columns.
With Dashboard and Form Parameters
When using dashboards and forms, use parameters to focus the data to what is needed. For example, when a Dashboard is launched, it can prompt for the specific entity or region needed. See Parameter Guides for details.
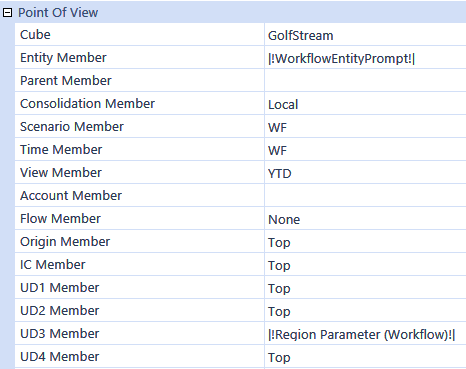
Within the cube view, refer to parameters in the Point of View and Rows and Columns Slider to restrict the query to just the data expected. Surround the parameter name in pipes and exclamation points (for example, |!ParameterName!|).
The following image shows an example of using the entity and region parameters in the cube view’s Point of View:

TIP: Use dashboard parameters as a single repository for parameters that are used in dashboards or forms. If a parameter is referred to within a cube view (for example, |!ParameterName!|) and there is not a parameter by that name associated with the form, it will search through the application’s dashboard parameters for one with that name and use it.
Changing Member Display Name
Change the name returned with a member script in a cube view by adding :Name(“enter name here”) at the end of the member filter. The double quotes around the Name() value are optional.
For example
A#60999:Name(“Net Sales”) or A#60999:Name(Net Sales)


