The following section shows how to create an Okta application. To configure the identity provider in OneStream IdentityServer, you will need to copy and paste information between them. In addition, you must go to the OneStream Identity & Access Management Portal and add the identity provider. See Add a SAML 2.0 Identity Provider.
Create an Okta Application
As you complete the steps in this section, copy these items from Okta and paste them in the Identity & Access Management Portal:
-
App name
-
Metadata URL
NOTE: This example will use a metadata URL. If you do not have a metadata URL (auto-discovery URL) from your identity provider, you can upload an XML metadata file or manually complete the fields in the Identity & Access Management Portal. See Add a SAML 2.0 Identity Provider.
And, copy these items from the Identity & Access Management Portal and paste them in Okta:
-
ACS URL
-
Service provider entity ID URL
See Add a SAML 2.0 Identity Provider.
-
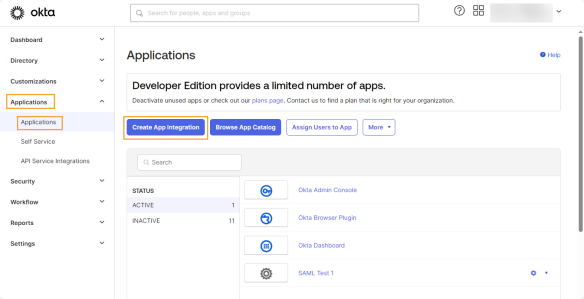
Sign in to Okta and go to Applications > Applications.
-
Click the Create App Integration button.
-
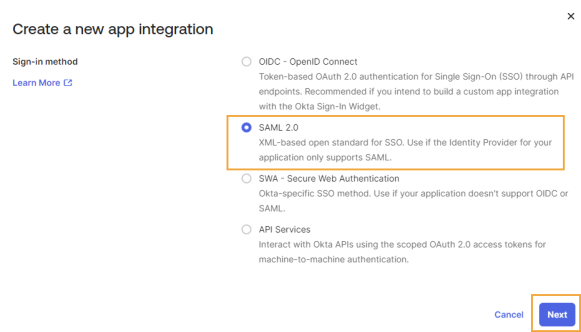
In the Create a new app integration dialog box, complete this field:
-
Sign-in method: Select SAML 2.0.
-
Click the Next button.
-
-
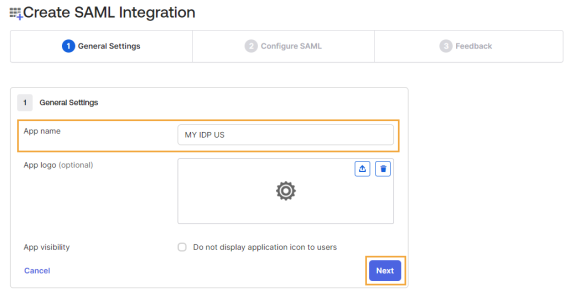
The Create SAML Integration page displays. In the General Settings tab, complete this field:
-
App name: Enter a name. Copy and paste this name in the Identity & Access Management Portal in the Name field.
-
Click the Next button.
-
-
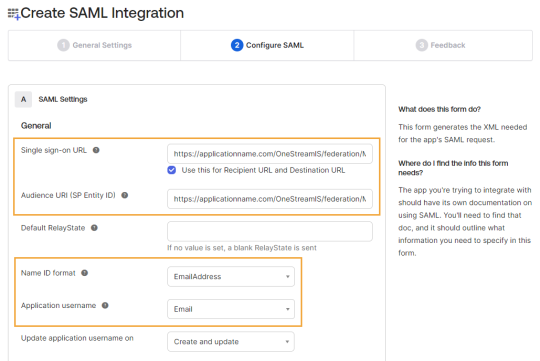
In the Configure SAML tab, complete these fields:
-
Single sign-on URL: Paste the ACS URL from the Identity & Access Management Portal.
-
Audience URI (SP Entity ID): Paste the service provider entity ID URL from the Identity & Access Management Portal.
-
Name ID format: In the drop-down menu, select EmailAddress.
-
Application username: In the drop-down menu, select Email.
-
Click the Next button.
-
-
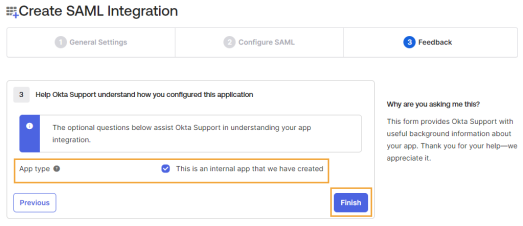
In the Feedback tab, complete this field:
-
App type: Select This is an internal app that we have created.
-
Click the Finish button.
-
-
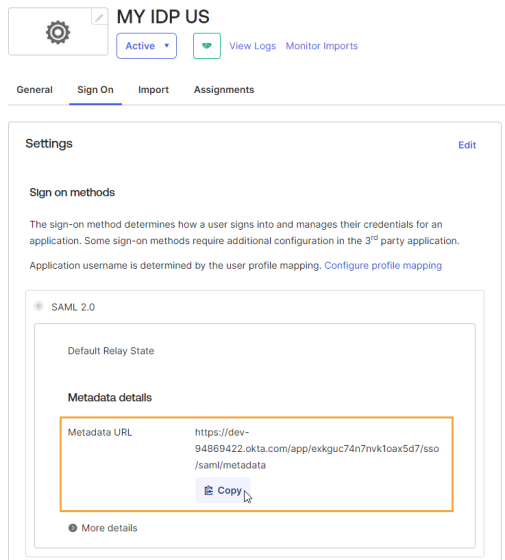
The application opens on a new page. Click Copy to copy the metadata URL. Paste it in the Identity & Access Management Portal in the Metadata URL field.
-
Select the Assignments tab and assign the application to OneStream users.
After you create the Okta application and add the identity provider in OneStream IdentityServer, go to the OneStream Identity & Access Management Portal and test the identity provider. See Test a SAML 2.0 Identity Provider.
Then, configure users for authentication in OneStream. See How Users are Configured for Authentication.


