Journal Entry Manager does not use workflow within the platform. Administrators must use the Accounting Periods page to configure custom time periods within the solution. These periods allow journals to be created for specific periods of time associated with underlying ERPs.
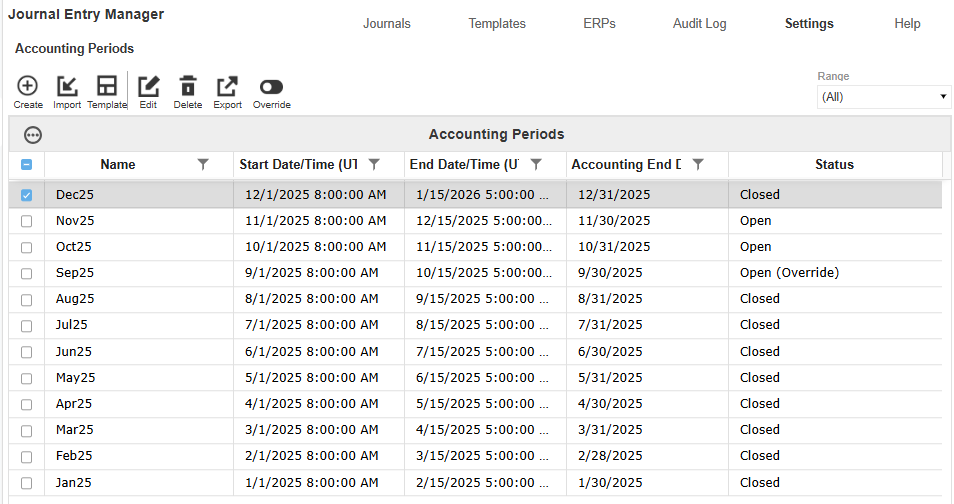
Accounting Periods Grid
Once periods are created, the Accounting Periods grid displays these attributes:
-
Name: The name of the Accounting Period.
-
Start Date/Time (UTC): The beginning date and time of the period. The hour is a drop-down with the options of 0-23.
-
End Date/Time (UTC): The actual end date and time of the period. The hour is a drop-down with the options of 0-23.
-
Accounting End Date: The end date of the period according to accounting principles.
-
Status: A dynamic column that indicates whether the period is currently open, based on current date/time compared to the Start and End Date/Time.
-
WF Time: The platform Workflow Time period associated with the Accounting Period.
The grid includes a Range drop-down menu to filter periods:
-
(All): Displays all periods created.
-
12 Months: Displays the 11 previous periods and the next two upcoming periods.
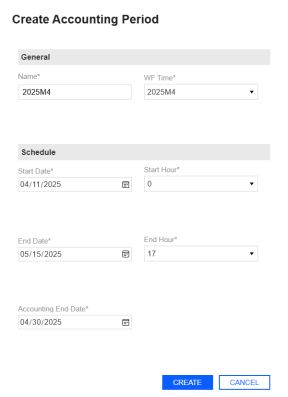
Create Accounting Period
You can create and maintain these periods through the Create Accounting Period slide-out panel, which enables you to set all attributes for periods.
NOTE: Journal Entry Manager uses UTC Time.
IMPORTANT: The Accounting End Date marks the close of the accounting period, though the period may remain open. The Date Picker respects the application’s configured culture code, automatically adjusting date formats to match the user’s locale.
This page has validations that include:
-
[Name] is required and must be unique. It has a max character length of 200 characters.
-
[End Date] must be a date after [Start Date].
-
[Accounting End Date] must be a date after [Start Date] and must be a date before [End Date].
-
[Start Hour] and [End Hour] is required.
Create an Accounting Period
-
Go to Settings > Accounting Periods.
-
Click the Create button.
-
In the Create Accounting Period slide-out panel, enter the following items:
-
Enter a name for the account period.
-
From the WF Time (Workflow Time) drop-down menu, select a workflow time.
-
Select a Start and End Date.
-
Enter an Accounting End Date.
-
Select a Start and End Hour from the drop-down menus.
-
-
Click the Create button to add the account period.
Edit an Accounting Period
-
Select an existing Account Period.
-
Click the Edit button.
-
The Edit Accounting Period slide-out panel displays the current inputs for the Account Period. Make your changes.
-
Click the Save button to save your changes.
Delete an Accounting Period.
-
Select an existing Account Period.
-
Click the Delete button.
CAUTION: You cannot delete an accounting period associated with a journal. The following error message will display: Unable to delete accounting period [Accounting Period]. It is associated with journals.
Import and Export Accounting Periods
Administrators can manage accounting periods by using Excel templates to import and export data, rather than creating periods manually through the UI.
On the Accounting Periods page, click Template to download a preformatted Excel file. This file includes all relevant fields and available values shown in the UI, enabling users to complete it offline. Once filled out, click the Import button to upload and display the new periods directly in the grid.
To review or update existing periods in bulk, select the periods that need editing and click the Export button to download a populated Excel file. All drop-down menu options and validations from the UI are included in both the template and export files.
IMPORTANT: Excel formulas within the template are now honored during import. This prevents errors and supports more flexible spreadsheet use.

Import Accounting Period
-
Go to Settings > Accounting Periods.
-
Click the Import button to import your Accounting Periods.
-
Click the Browse button or drop your file within the File Upload dialog box.
-
Use File Explorer to browse and select the file you want to import.
-
Click the Open button.
-
Click the Upload button.
Template
-
Click the Template button to download a template to import.
-
The JEM_AccountingPeriod_Template file is automatically downloaded to your default downloads location.
IMPORTANT: Ensure that you click the Enable Editing button on the Excel sheet.
-
Fill out the following fields under Accounting Periods:
-
Enter a name.
-
From the WF Time drop-down menu, select a time.
-
Enter a Start Date.
-
From the Start Hour drop-down menu, select an hour.
-
Enter an End Date.
-
From the End Hour drop-down menu, select an hour.
-
Enter an Accounting End Date.
NOTE: Insert new rows between the bars.
-
-
Save your file.
Export
-
Select an existing Accounting Period you want to export.
-
Click the Export button.
-
The JEM_AccountingPeriod_Export file is automatically downloaded to your default downloads location.
Override for Accounting Periods
Administrators can override the auto-state of accounting periods to support last-minute adjustments and corrections through the Override button.
Example: If you select a closed accounting period and override it, the status will update to Open (Override).
If a period is already in the override state Status (Override), the Automatic button displays. Click the Automatic button to turn the period back to its original auto-state. All override and reset actions are tracked in the Audit Log. Journal creation and editing actions respect the overridden status:
-
Open periods allow journal activity.
-
Closed periods prevent journal activity.
Overridden periods follow filter logic based on their current state:
-
Periods overridden to Closed are excluded from the Current and Open filters.
-
If all periods are closed, including overridden ones, the Current and Open filters will return no results.
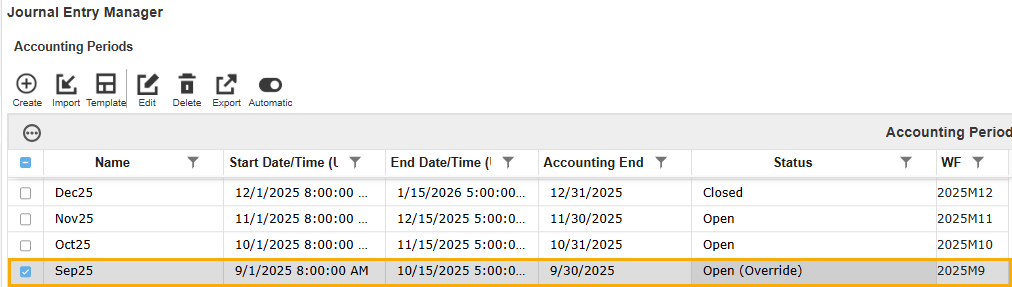
Override
-
Select an accounting period and click the Override button.
-
The status of the selected period updates to Status (Override). Make your edits as needed.
-
To revert the period back its original automatic state, select the same accounting period and click the Automatic button.


