 Watch to see how (4:07).
A Direct Connection is a point-to-point channel to a specific remote network resource such as an sFTP server or Web API (including iPaaS services).
NOTE:
The existence of a gateway connection does not necessarily mean it must be used or configured to a data source if only Direct Connections are desired.
NOTE: For descriptions of the fields in this procedure, see Smart Integration Connector Terms.
To create a direct connection:
-
(Required) A Gateway Connection must be created before the Direct Connection is created. The Gateway Connection is used to monitor the availability of the remote Smart Integration Connector Gateway server. For details, refer to Create a Gateway Connection.
-
Go to System > Administration > Smart Integration Connector.
-
Click
 Create New Connection.
 -
Enter the Name and Description.
NOTE: The Connection name cannot be changed once created and must be deleted and re-created.
-
Select the Gateway Server from the drop-down, or enter a new Gateway Server name in the same field. If this is the first Connection being created, enter the name of the Gateway Server.
NOTE: It is common practice to use the hostname or IP of your Smart Integration Connector Local Gateway Server as the "Gateway Server" name. The Gateway Server name is only used to organize servers when multiple Smart Integration Connector servers are set up.
-
From Connection Type, select Direct Connection / Port Forwarding.
-
Enter the Bound Port at Gateway. This port represents the well-known TCP service to expose from an on-premises host such as SFTP, which would equate to port 22.
NOTE: The remote service port is required to configure the connection and may require consultation with network or IT resources to obtain it. It is also required that any firewalls between the Local Gateway Server and the remote host allow traffic to the destination port specified.
-
Enter the Remote Gateway Host. This represents the remote host name or IP address accessible by the OneStream Smart Integration Connector Local Gateway Server. If the host or IP address is accessible or resolvable from the OneStream Smart Integration Connector Gateway service or using remote resources accessible through on-premises WAN, it can be exposed for use.
-
For Bound Port in OneStream, select (Auto Assigned) (default and recommended setting) or Enter Port Manually. See Smart Integration Connector Terms for additional information.
-
(Auto Assigned) is the default and recommended setting to allow the OneStream application to automatically assign an unused port number. When the Direct Connection is created, the port number is shown in the connection settings.
-
Enter Port Manually: Enter an unused port number. The port number must be greater than 1024 and less than 65535.
-
-
Click OK.
-
Using this direct connection in OneStream is done by accessing
localhost: [Bound Port In OneStream]which will tunnel traffic back to the configured remote Gateway Host to the configured bound port at gateway.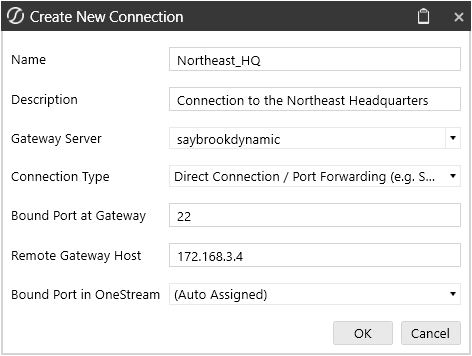
-
Example: Remote SFTP server at 172.168.3.4 listening on port 22.
-
Bound Port in OneStream defaulted to (Auto Assigned).
Note that when (Auto Assigned) is used, the selected port number is available/displayed after saving and also surfaced in the OneStream Error Log. -
In OneStream Business Rules, you can access the remote host by connecting to
localhost:"Bound Port in OneStream" portExample:localhost:45000. -
In a OneStream Business Rule, this port can also be obtained in code allowing this port number to be changed without updating Business Rules:
CopyDim gatewayDetails As GatewayDetails = BRApi.Utilities.GetGatewayConnectionInfo(si, "northamerica_sftp")
Dim remotePort = gatewayDetails.OneStreamPortNumber
-


