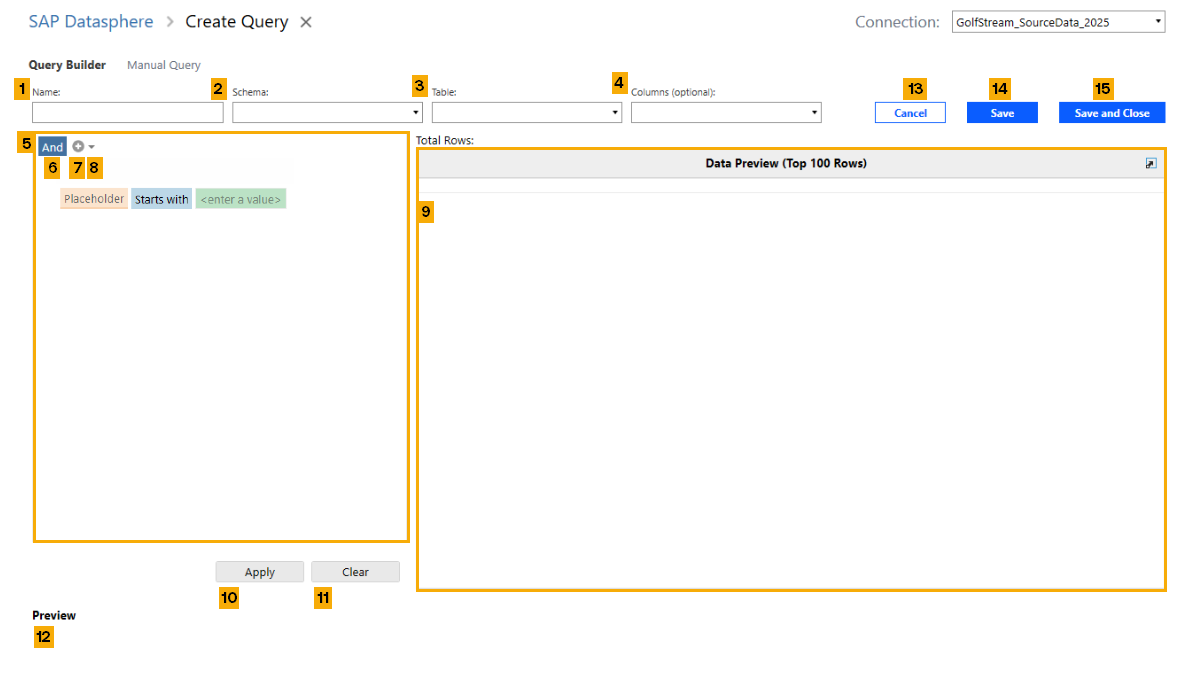
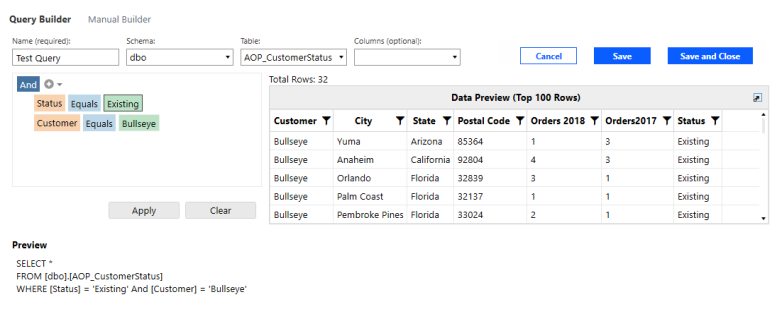
The Query Builder streamlines your SQL query building process, enabling you to write accurate and successful SQL queries. By default, when you click the Create button, the Create Query page opens and the Query Builder displays. It consists of the following components:
-
Name: A text box for you to enter a name for your query.
-
Schema: A drop-down menu displaying available schemas in the connection.
-
Table: A drop-down menu where you can choose a table to pull. Tables displayed are pulled from the selected connection and function as the FROM clause in your SQL query syntax. After you select a table, a preview of the data displays in the query builder. The column names of the table are the values used to dynamically populate various drop-down menus in the builder.
-
Columns (optional): Use this multi-select drop-down menu to choose the columns to include in your query. When left blank, the SQL preview defaults to "*", and all columns in the chosen table are included.
-
Filter Editor: Use this area to build your query using booleans and conditions. When you add a condition, the following drop-downs display:
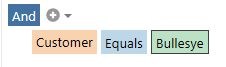
- Column drop-down: Shown in orange, this the first drop-down menu. Use it to select a column header.
-
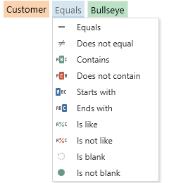
Operator drop-down: Shown in blue, this is the second drop-down menu. Use it to select an operator. The Query Builder uses the following operators, which dynamically change based on your data:
-
Equals
-
Does not equal
-
Is greater than
-
Is greater than or equal to
-
Is less than
-
Is less than or equal to
-
Is null
-
Is not null
-
Is between
-
Is not between
-
Contains
-
Does not contain
-
Starts with
-
Ends with
-
Is like
-
Is not like
-
Is blank
-
Is not blank
-
-
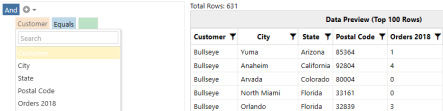
Value drop-down: Shown in green, this is the third drop-down menu. Use it to select an available value. The options displayed dynamically update based on your Column drop-down selection.
-
Booleans or Logical Connectives: Use this drop-down menu of available booleans when writing your SQL query. Options include:
-
And
-
Or
-
Not and
-
Not or
-
-
+ Icon: Click the + button to add a condition to the Filter Editor.
-
Add Conditions/Add Group/Add Custom Expression Drop-Down: Use the drop-down arrow to select from the following options:
-
Add Condition: An alternative to the + icon, select Add Condition to add another filter criteria to your query.
-
Add Group: Select Add Group when you want to use a boolean operator on more than one condition. Adding a group indents the boolean and begins a new group where you can add one or more conditions to the boolean.
-
Add Custom Expression: This is another method of manually entering a query. When you choose this option, the Expression Editor dialog box displays where you can choose columns, constants, and operators. After you make a selection, the values for each are displayed next to it.
IMPORTANT: OneStream does not recommend using Add Custom Expression feature in the SQL Query Builder. Instead, you should use the Manual query page. See Manual Query.
Conditions in the Query Builder represent the WHERE clause in your SQL query. This clause enables you to filter rows by selecting only those containing the values you selected in the specified column.
TIP: Conditions are stacked on top of one another in Platform Version 8.4 rather than below one another. We recommend identifying which booleans to use in advance and building out condition groups first to streamline query creation and accommodate for this type of stacking.
-
-
Data Preview: This area displays the filtered results of your query, in table form, after you hit the Apply button. The preview only displays the top 100 records.
-
Apply: Click this button to apply the query criteria. This enables you to view your query results dynamically in the Data Preview.
-
Clear: Click this button to clear all criteria from the filter builder area and start again.
-
Preview: After you click the Apply button, a preview of your SQL query, in text form, displays.
-
Cancel: Exit the Create Query page. Unsaved changes will be lost.
-
Save: When clicked, your query will be saved and you remain on the Create Query page.
-
Save and Close: When clicked, the query will save and you will return to the Datasphere Queries page.
Use the Query Builder
IMPORTANT: If you write your query using the Query Builder, you can switch to the Manual Query page to continue writing your query manually. Edits made in the Manual Query page do not transfer back to the Query Builder page.
To use the Query Builder, follow these steps:
-
In the Name field, enter a name for your query.
-
Use the Schema drop-down menu to choose an available schema from the selected connection.
-
In the Table drop-down menu, select a table to query.
-
Optionally, use the Columns drop-down to multi-select the columns to include in your query. This narrows the scope of your query to start, but it is not required.
-
To add a condition, click the + button or the down arrow to use the drop-down menu to choose either Add Condition or Add Group.
-
In the Filter Editor, use Column drop-down menu to select the column header name. The options listed are pulled from the column headers of the table you selected. Your selection specifies which column you are looking to retrieve a specified value from.
Example: Options displayed in the Column drop-down are identical to the column headers in the table preview.
-
Use the Operator drop-down menu to select an operator.
-
Use the Value text field to enter the value you want to retrieve from the selected column in the table. The value must match one of the values in the column you selected.
-
Click the Apply button to update the grid preview and your SQL text query.
-
Continue adding booleans and conditions until you are satisfied with your query, using the Apply button as needed.
-
Remove any condition by hovering and clicking the X button next to the condition.

-
When done, perform any of the following actions:
-
Click the Save button to save your query to the Datasphere Queries table.
-
Click the Save and Close button to save your query and return to the Datasphere Queries page.
-
Click the Cancel button to exit the Query Builder page without saving.
-
Click the Clear button to clear your query and start again.
-


