Rules

|
The Rules page displays rules created for the current match set and provides the ability to create new ones. |
Rules contains the logic that data runs through to determine rules-based matches. There is no limit to the number of rules that can be created. The Rules list displays the following information for each Rule:
-
Name: Freeform text field to give rule a short name
-
Description: Optional freeform text field containing additional rule information
-
Rule Type:Drop-down list containing the rule types
-
Match Type: Drop-down list containing the match types
-
Reason Code: Field displaying the information established during reason code setup
-
Active: Indicates if the rule should be run during Rule processing (on/off toggle)
-
Order:The order in which the rules are run
-
Update By: The user who last updated the rule.
-
Update Date (UTC): The time the rule was last updated.

See also:
Create Rule
-
On the Administration page, click Rules.
-
Click Insert Row and then double-click in the following cells to enter information:
-
Name: Enter a display name to identify the rule
-
Rule Type: Select the Rule Type you want to use from the drop-down list. For One Sided match see Create a One-sided Match.
-
Match Type: Select the Match Type from the drop-down list
-
Description: Enter additional information you want to display regarding the rule
-
Reason Code: Select the appropriate reason code from the drop-down list
-
-
Click the Active box to turn it on/off.
-
In the Order cell, enter the number indicating which order you want the rule run.
-
Click Save. The Rules Definition pane will appear upon successful save.
Create a One-sided Match
After you create the rule on the Rules tab, continue with these steps to create a one-sided match.
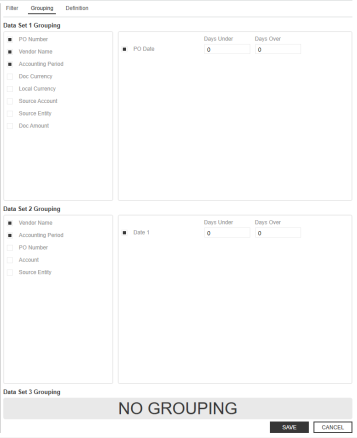
If you selected One Sided – DS1 then on the Grouping tab you will see fields only for Data Set 1, and Data Set 2 and Data Set 3 are blank. If you want to match transactions that cancel or reverse each other out, you can group by common fields such as Source Account, Source Entity and PO Date, as shown below.
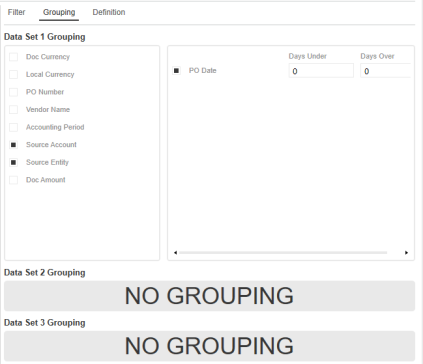
NOTE: Selections will display if a date field is assigned to the data set.
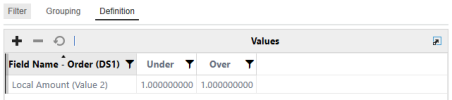
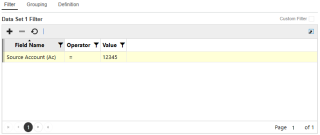
On the Definition tab, you can only set a tolerance amount for value fields (amount). In this example, the tolerance is set between -1 and 1.
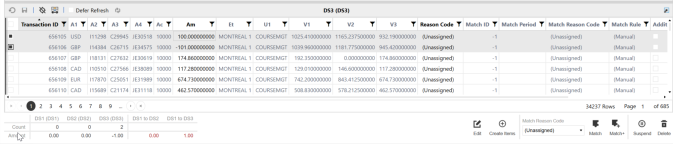
With the criteria in the Grouping and Definition tabs set as above, the match rule creates matches where transactions have the same amount, entity, and cost center and the net of the transactions is less than or equal to 1 and greater than or equal to -1.
In this example, the two highlighted amounts would create a match.
Rule Types
The following Rule Types are available for two data set matches:
-
One to One (1:1): An exact match in which a transaction in one data set is compared to a single transaction in the other
-
One to Many (1:M): A single transaction in one data set can be matched with one or more transactions (a grouping) in another
-
Many to One (M:1): One or more transactions (a grouping) in one data set are condensed into one transaction and then compared to a single transaction in another
-
Many to Many (M:M): One or more transactions (a grouping) in one data set are collapsed into a single amount and then compared to the same in another
-
One Sided - DS1, One Sided - DS2, One Sided - DS3: Match transactions within the same data set
Additionally, the following Rule Types are available for three data set matches:
-
One to One to One (1:1:1)
-
One to One to Many (1:1:M)
-
One to Many to One (1:M:1)
-
Many to One to One (M:1:1)
-
One to Many to Many (1:M:M)
-
Many to Many to One (M:M:1)
-
Many to One to Many (M:1:M)
-
Many to Many to Many (M:M:M)
Match Types
-
Automatic matches do not require acceptance or approval.
-
Suggested matches require acceptance and may also require approval.
Standard Rule Filters
| Filters define the criteria for returning unmatched transactions. |
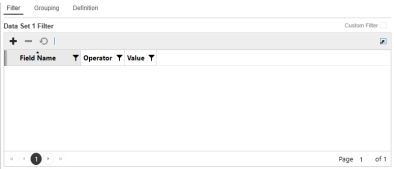
You can create or edit filters for any rule by clicking Filters and applying them to any data set. Only the unmatched transactions returned by the filter are used during rule processing.
-
Field Name: Drop-down list containing all fields in the data set. Select the field to which you want the filter to be applied.
-
Operator: Function used to combine items or determine the parameters in order to create a filter
-
Value: Information used by the operator
|
Operator |
Definition |
|---|---|
|
= |
Is equal to the value specified (exact match). To return fields that are blank, leave Value blank. |
|
> |
Is greater than the value specified. |
|
> = |
Is greater than or equal to the value specified. |
|
< |
Is less than the value specified. |
|
< = |
Is less than or equal to the value specified. |
|
< > |
Is not equal to the value specified. To return fields that are not blank, leave Value blank. |
|
In 1;2;3 or 'A'; 'B'; 'C' |
Displays values that are the same as what is specified. |
|
Between 1;2 or 'A'; 'Z' |
Displays values that fall between the first and second values (including the listed values). |
|
Starts With |
Displays results where the data in the column starts with the value in the filter. |
|
Does Not Start With |
Displays results where the data in the column starts with anything except the value in the filter. |
|
Ends With |
Displays results where the data in the column ends with the value in the filter. |
|
Does Not End With |
Displays results where the data in the column ends with anything except the value in the filter. |
|
Contains |
Displays only records where the data in the column contains all the values in the filter. |
|
Does Not Contain |
Displays only records where the data in the column does not contain any of the values in the filter. |
NOTE: Syntax of the filter is validated when you click Save.
Custom Rule Filters
In addition to the standard rule filters, administrators can create custom rule filters that use complex expressions.
CAUTION: Only advanced users should create custom rule filters.
Use custom rule filters to create filters more quickly and efficiently and reduce the need to duplicate filters with slight variations within the standard filter, which can be time consuming and also prone to error.
Administrators can set up standard and custom rule types for a data set. Whichever filter is selected is the one that is applied.
-
Select Custom Filter.
-
Enter a custom rule and then click Save. The rule syntax is validated when you save.
Rule Grouping

|
Grouping displays in the Rule Definition pane when you select a Many rule type. |
When you select a Many rule type, the Grouping tab displays, providing the ability to specify how to aggregate (group) the data. Once the grouping is defined, the items in the group become the only items available in the Definition Field Name list for selection, in addition to the Summary fields.
For each data set, you can group data by attributes and apply date tolerances. Applying date tolerances in the Grouping tab creates a match rule that applies the date tolerances before grouping as opposed to after grouping. You can set up date tolerances to be applied after grouping in the Definition tab.
For a detailed example of how to use date tolerances, see Appendix A: Date Grouping Tolerances .
Add Rule Grouping for Attributes
-
On the Administration page, click Rules and then select a Many : One or Many to Many rule type.
-
Click Grouping.
-
In the Attributes pane, click attributes to group by.
-
Click Save.
Add Date Grouping Tolerances
For a detailed example of how to use date tolerances, see Appendix A: Date Grouping Tolerances.
-
On the Administration page, click Rules and then select any rule type that uses Many or One Sided for one of the data sets.
-
Click Grouping.
-
In the Dates pane, click a dates box to group by.
-
When a date field is selected, set the date tolerances. Date tolerances applied in the Grouping tab are applied pre-aggregation. Date tolerances applied post-aggregation are done in the Definition tab. For example, if set to 1 day before and 1 day after, before summing up the total amount based on the common attributes, there would be a date tolerance of 1 day before and after applied.
-
Click Save.
Rule Definition

|
Definition displays detailed information about a selected rule. |
The Rule Definition contains the data set field names, conditions, and tolerances for each rule.
If no matches exist, lines can be added or deleted to the Attributes, Dates and Values table editors.
NOTE: When a field is added under Definition, the field is automatically added to Grouping.
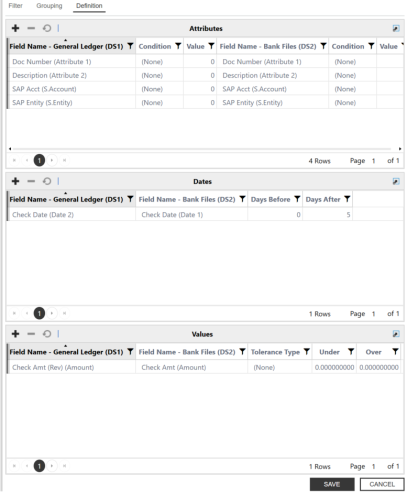
Attributes
-
Field Name (DS1): Drop-down list containing all fields in the first data set (DS1). Select the field on which to perform the match. Each selected field must have a corresponding field in all other data sets.
-
Condition: Indicates the placement (None, Left, Right) set for DS1; this is particularly useful if there will be leading or trailing zeroes in one data set that may not exist in the other data sets. Rule conditions help guide the position the rule should be applied to for a certain data element. The position can start at the beginning of a string (left) or the end of a string (right). The Rule definitions have Conditions and Value fields for each data set.
-
Value: Integer field
-
-
Field Name (DS2): Drop-down list containing all fields in the second data set (DS2). Select the field on which to perform the match. Each selected field must have a corresponding field in all other data sets.
-
Condition: Indicates the placement (None, Left, Right) set for DS2
-
Value: Integer field
Values
-
-
Tolerance Type: Tolerances can be set on amount (Numeric dollar amount or Percentage) or date fields (Numeric only)
-
Under: Default minimum is 0 (Example: 5.00)
-
Over: Default maximum is 0(Example: 5.00)
Rule Tolerances
Tolerances can be set on amount (numeric dollar amount or percentage) or date fields (numeric only) to allow some variation when creating a match.
Date variations provide allowances for circumstances such as transit times when a transaction may arrive at a customer’s ERP system and a bank/3rd party source on different dates.
Tolerance Example
If the amount tolerance equals plus or minus $5 and the data in DS1 = 100, the rule will search for an amount in the corresponding DS2 for a range of $95-105.

Copy Rules
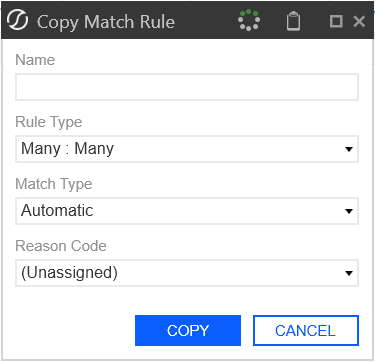
Administrators can copy match rules on the Rules sub-page by selecting a rule and clicking the Copy button. In the Copy Match Rule dialog box, the Rule Type field is editable for all rule types except One-Sided. This enables you to change the rule type during the copy process.
When changing rule types, the system automatically handles grouping fields as needed. For instance, if a rule is copied from a One-to-One to a One-to-Many configuration, grouping fields will be added based on the attributes used in the original rule.
If copying from a Many-type rule to a One-type rule, grouping fields will be removed. For One-Sided rules, the Rule Type field remains locked and cannot be changed during copy.
-
Select a Rule.
-
Click the Copy button.
-
In the Copy Match Rule dialog box:
-
Enter a Name.
-
From the Rule-Type drop-down menu, select a rule type.
-
From the Match Type drop-down menu, select a match type.
-
From the Reason Code drop-down menu, select a code.
-
-
Click the Copy button.
Rule Instancing
Administrators can edit match rules on the Rules page even after those rules have been used in a match. When a rule is edited post-use, it is created using a new instance of the rule and preserves the original version for audit and reporting purposes. This enables you to maintain and refine your matching logic without impacting historical match results.
All validations applied during rule creation are enforced during editing. If a validation fails, an error message displays and the rule is not saved until resolved. All rule logic and conditions are managed under the Definition tab.
The system ensures that the DateTime when a rule is retrieved for processing aligns with the DateTime stored on the match, supporting accurate audit trails.
NOTE: Delete is still invalid if the rule has been used to create matches. Only edits are allowed. Editing a rule after it has been used in a match does not affect historical matches. The new rule instance applies only to matches processed after the edit.
To edit a rule after it has been used in a match:
-
On the Rules page, select a rule.
-
Make your updates in the Filter, Grouping, or Definition tabs as needed.
-
Click the Save button.
Rules Tab
When viewing a match in Transaction Matching, you can access a dedicated Rule tab. This tab displays the exact version of the rule that was used to create the selected match, providing transparency into the logic and configuration applied at the time the match was made.
The Rules tab presents the Rules table and associated tabs, such as Filter, Grouping, and Criteria, populated with the values and configurations that were in effect when the match occurred. You can review the specific rule logic, filters, and grouping fields that determined the match outcome, exactly as they were at the time of matching. This design helps users and auditors understand the reasoning behind each match by showing the rule version and its configuration at the time of matching. This ensures that any investigation or review can always reference the correct logic, regardless of later changes.
This view is read-only and reflects the historical state of the rule for that match. Any edits to the rule are versioned and do not change the information shown for existing matches. This supports auditability, troubleshooting, and user understanding by making it clear which rule logic was applied to each match, even as rules evolve over time.
Extract and Load
Administrators can extract and import rules across applications to streamline testing in development environments and simplify deployment to production.
Within the Rules tab, you can use the Load and Extract buttons. Multi-select functionality enables you to choose one or more rules for extraction. When selected, the Extract option downloads a .json file containing the selected rules in a structured format. This file can then be loaded using the Load button, which recreates the rules in Transaction Matching. During load, validations ensure rule integrity: rules with duplicate names cannot be loaded, fields must exist in the target Data Set, and all dates and numbers must conform to invariant culture formatting.
IMPORTANT: Extract and Load is intended solely for migrating rules between environments and should not be used for editing, since extracted files are not editable or meant for load after modification.
Extract
-
On the Administration page, click the Rules tab.
-
From the Match RulesGrid, select the rule want to extract.
-
Click the Extract button.
-
Open and view the file.
Load
-
On the Administration page, click the Rules tab.
-
Click the Load button.
-
View the newly loaded rules on the Match Rules grid.


