Before populating the allocation register, you’ll want to have your allocations well-defined on paper to simplify the process. Even with well-defined allocations, you can expect trial and error when creating allocation definitions.
Factors Definition
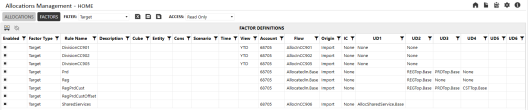
The first step is to define the factors that make up the allocation.
Source factor definition
Make sure you are on the home screen of the Allocation Manager solution, click the FACTORS tab, and choose “Source” from the drop-down filter.

You must provide a Rule Name for the factor definition, like row, you create.
You must also provide a valid member filter definition for each of the dimensions from View through UD8. You can utilize a member filter expression that resolves a valid member list.. This would include member expansions, “WHERE” clauses, substitution variables, custom member lists, or XFBR expressions.
You can also include multiple member filters in a single record by separating them with a pipe ( | ). So, a field value like “AR.base|AP.base” would be valid. This allows you to identify multiple sets of members that might otherwise be difficult or impossible to define in a single member filter without using a member list or alternate hierarchy.
You do not need to define any values in the data unit dimensions (Cube, Entity, Cons, Scenario, and Time) because those dimensions will be defined by the Data Unit definition in the Data Management Step itself.However, you have the ability to pull source data, numerator or denominatior from a data unit outside of the data unit you are calculating. In those cases, you would want to define the alternative data unit in the factor definition. Some examples might be:
-
Drivers (Numerator/Denominator) that are stored in another Cube or in a single entity.
-
Source data that lives in another scenario.
-
Drivers that come from another scenario, like Actual data being allocated based on a Plan spread.
Numerator and Denominator factor definition
Populating the Numerator and Denominator factors is identical to populating the source factor with one small variation – you do not have to define a member filter for every dimension. As an option, you can define each dimension individually. However, if you choose not to, the allocation rule will automatically use the value specified in the source factor definition. This flexibility allows you to define a numerator definition that could be used in multiple allocation definitions paired with multiple source factors.

Example: Consider driver factors (numerator and denominator) based on departmental headcount. These drivers can be utilized in one allocation to distribute actual medical insurance fees and in a separate allocation to allocate forecasted occupancy fees.
Target factor definition
Populating the Target factor is identical to populating the source factor with one small variation; you cannot override the data unit definitions in the target factor definition. The reason for this is because the data unit you are writing to is defined by the data unit definition on the data management step. There is no way to write data to a data unit other than the one being processed, so defining an overridden data unit on your target factor definition makes no sense.
Parent Target factor definition
Populating the ParentTarget factor is identical to populating the target factor. The ParentTarget is an optional field that helps link the two allocation steps together when the result of one allocation step does not precisely match the source definition of a subsequent allocation step.

Offset factor definition
In many cases, an allocation will result in the creation of new data intersections that will double-up the data for a particular item. The new allocated data exists, but the original unallocated data also exists. In these cases, it’s typical to reverse or offset the original unallocated data so that the data isn’t doubled. The optional offset factor allows you to define the target intersection where the offset will be written. The allocation engine automatically flips the sign for all offset calculations. If the direct offset factor approach doesn’t produce the desired results due to the complexity of your offset calculations, consider defining your offset as an additional, standard allocation step.

Sweep Factor definition
A Sweep Factor is used in coordination with Allocation Definition Thresholds. By default, balances that fall below a threshold amount are ignored. However, if a Sweep Factor exists those same balances will instead get accumulated and written to the designated Sweep location.
Allocations Definition
Once your factors are defined, you can think of them as a library of data buffer definitions that can then be pulled into an allocation definition. Click on the ALLOCATIONS tab to define your allocations.
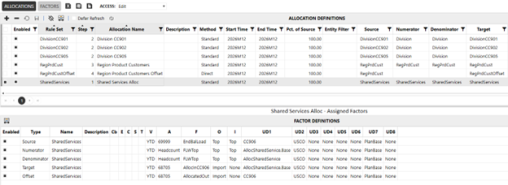
You define an allocation by grouping together a Target, Source, Numerator, and Denominator factor and giving that set of factors a name and description. In addition, you can set the value of several other fields:
-
The Parent Target and Offset factors (which are optional)
-
The Rule Set allows you to group many allocation definitions into a single set that can be run as a unit. This allows the solution to support multiple unrelated allocations, such as Product Profitability allocations and Planning Overhead allocations, can co-exist in the same allocation register by simply putting them in different rule sets.
-
The allocation Method field indicates what type of allocation logic will be run:
-
Standard will allocate source data to the target base on the driver ratios, such as Target = Source X (Numerator/Denominator)
-
Direct will simply move data from one intersection to another. You can think of this as an allocation where everything is allocated at 100%, like Target = Source.
NOTE: Direct method allocations should not use numerator or denominator factors.
-
-
You can choose which allocation definitions you want to run or not run with the Enabled flag.
-
The StartTime and EndTime fields allow you to set a range of dates that are valid for a specific allocation definition. This will allow you to do things like change a driver for a specific allocation at the beginning of a new year without having to create entirely new Allocation Rule Sets. The allocation rules will only run allocation definitions that are valid for the time period of the data unit being processed.
-
The default value for Pct. of Source is 100%. This value determines how much of the Source value will be allocated and can be changed to any value between 0 and 100.
-
The Entity field is similar to the StartTime/EndTime as it allows you to set an entity or entities that are valid for a specific allocation definition.
-
It’s extremely important to understand that the Start Time, End Time, and Entity Filter fields are simply filters that can limit where the Data Management calculation runs.
-
If you have allocation steps that rely on the results of a previous allocation step, you can group the various allocation definitions into Steps that will run in sequence. Think of these as the allocation equivalent of a formula pass. Because data is written back to the Cube at the end of each allocation definition calculation, the results of anything in Step 1 will always be available when step 2 is run.
NOTE: This only refers to data that is dynamically aggregated within a data unit. There is no consolidation performed between allocation steps. If your design requires a consolidation between steps, this can be accomplished by creating a 3-step Data Management Sequence where the first step runs a specific Allocation Rule Set, then the second step runs the appropriate consolidation, and then the third step runs a subsequent Allocation Rule Set.
-
The Switch Sign flag tells the allocation engine to multiply the allocation result by -1 before posting the results. This can be useful when writing a step that offsets a previous allocation step.
NOTE: Allocations do not automatically book any type of offset or reversal of the allocation. To book an offset or a reversal you must either provide an offset factor or create a separate step using the Switch Sign flag.
-
There are two optional properties for Threshold amounts.
-
Source Threshold applies to the individual source value that is being allocated.
-
Target Threshold applies to the individual target (allocated) value that has been calculated.
-
If you set these thresholds to something other than zero, then any value that falls under the threshold will not be part of the allocation results. For example, let’s assume you have the source threshold set to $250 and you are allocating these three cost centers out to products:
-
HR = $800
-
IT = $1,200
-
Legal = $200
HR and IT costs would be allocated, but Legal would not be. Note: This functionality can be very useful to prevent “tiny numbers” from exploding the size of your data unit and negatively impacting performance. However, if you choose to implement this functionality, you need to understand that your data will not be fully allocated. There will be left-over, unallocated balances. So, you need to think carefully about where, when, and how to leverage this functionality, and what to do with the left-over, unallocated balances.
-
The ClearAlloc setting allows you to create an allocation record that simply clears previously calculated data (using the Clear Type Anchor dimension configured on the settings page) without re-running the allocations.


