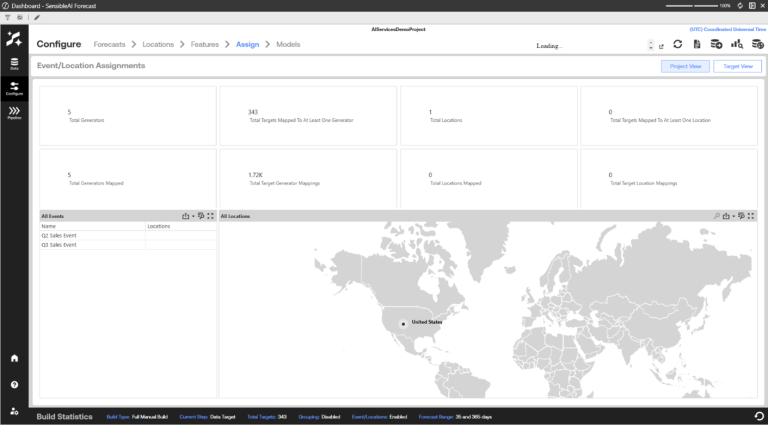
Use the Assign page to map events and locations to targets. This page has a Project view and Target view.
Any location dimension specified on the Targets are automatically assigned locations to your targets. Use the Assign page to map events and locations to targets for use during Pipeline, where these events and locations can generate predictive features or serve as predictive features themselves.
NOTE: There is a limited number of locations and events that can be assigned to any individual target.
You can map locations and events to targets in these ways:
Auto Assign: All events are assigned to targets based on their locations. If any of the target's locations are geographically within any of the event's locations, the event is assigned to the target. A target without a location, whether removed on the Target view or not present, cannot have events assigned to it through a shared location. Click Auto Assign to assign events based on the currently applied locations for all targets. See Auto-Assign Generators and Locations.
NOTE: You must have at least one location in the Target view mapped (selected and applied) to use Auto Assign. The Auto Assign job uses the selected locations in order to automatically map Generators which contain the selected location(s).
Manual Assignments: In the Target view, you can assign events and locations to a target using arrow buttons and clicking Apply. Selecting Apply to All applies whatever mappings are present for the currently selected target to all other targets in the data set. See Assign Generators and Locations to a Specific Target.
Event Target Mapper File Upload: Upload a file that maps events to target names. See Upload an Event File.
Event Target Dimension Mapper File Upload: Upload a file that maps events to targets based on dimensionality. See Upload an Event File.
View Project Location and Generator Information
Use the Project view to see the number of:
-
Generators and locations currently being used by your model.
-
Generators/Locations mapped to at least one target.
-
Total Generators/Locations Mapped
-
Total Target-Generators/Location Mappings
-
-
Locations mapped to at least one target.
-
A list of all events defined in your project. See Configure Library - Features.
-
The interactive map showing all locations defined in your project. This is the same interactive map on the Locations page.
View Generator and Location Assignments by Target
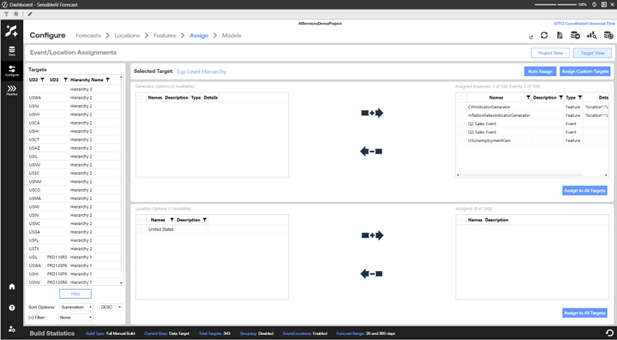
For the target selected in a list on the left, you can add all the events and locations added in the previous pages to be associated with the target. To do this, click the plus arrow to add them. Click the minus arrow to remove them.
In Target view, you can see the events and locations assigned to each target.
TIP: When a location dimension is selected for the target data set, the respective location for each target displays in the selected locations pane.
Assign Generators and Locations to a Specific Target
Assigning events and locations to a target allows you to use inputted information in the modeling process. Generators and locations can be assigned to a single target or to all targets in the model build.
-
If in Project view, click Target View to switch to the Assign page Target view.
-
In the Targets pane, select a target to which you want to assign events and locations. The Selected Target pane shows the target name and all available events and locations that can be assigned.
-
In the Generator Options table, select check boxes next to the generators you want to assign to the target, or select the check box in the table header row to select all available events.
-
Click the Select the Checked Generators
 button to move the selected generators from the Event Options table to the Selected table.
 -
In the Location Options table, select check boxes next to the locations you want to assign to the target, or select the check box in the table header row to select all available locations.
-
Click the Select the Checked Locations
button to move the selected locations from the Location Options table to the Selected table. -
The add and remove buttons will only apply the events and locations to the currently selected target. To apply these changes to all targets:
-
Click Apply to All to apply the current event and location assignments to the selected target.
-
-
Select another target in the Targets and repeat steps 3 through 7 to make assignments for that target. Repeat until you have assigned generators and locations for all targets in the project.
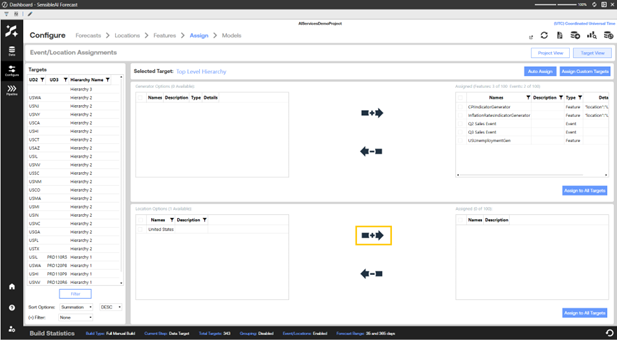
TIP: To deselect events or locations, select them from the respective Selected table and click Remove to remove the selected events or locations from the selected lists.
Append and Override Assignments
After highlighting the items in the grid, choose how to apply the assignment to your targets:
-
Override: replaces the target’s existing assignments with the highlighted items from the grid. Use Override when you want the selected targets to have only these generators (or locations). This is a clean slate.
-
Append: adds the highlighted items to the target’s existing assignments without removing what is already there. Items already assigned to a target are skipped, so Append never creates duplicates. Use Append when targets already have assignments you want to keep and you are simply adding more.
Override and Append are both available for generators (Features) and for Locations.
Assign Custom Targets
Select Assign Custom Targets to apply assignments to a specific group of targets at once. In the Custom Target Assign dialog box, set the Assignment Scope (which assignments to apply) and the Assign Type. Choose Override to replace existing assignments or Append to add to them. Append is the default.
NOTE: With Override selected, applying the dialog box without choosing any generators will unassign all generators from the selected targets. Override first clears each target’s existing assignments and then has nothing to re-add. Use Append or include the generators you want to keep if you do not intend to clear them.
Auto-Assign Generators and Locations to Targets
Select Auto Assign to have SensibleAI assign generators to your targets automatically. A confirmation displays stating that this will assign Features to Targets based on their respective Locations and that Auto Assign will not remove previously assigned Features or Locations; select Run to proceed. Auto Assign only adds relationships, so it never removes assignments you already have.
How a generator is matched to a target depends on the generator type:
-
Event and library generators: matched by location a generator is assigned to a target when the target’s location falls within the locations applied to that generator.
-
Source Generators: matched by shared dimensions rather than by location. A Source Generator is assigned to a target when their intersection dimensions overlap and the overlapping dimension values agree. If a Source Generator shares no dimensions with a target, it is broadcast to that target. Location and feature-identifier columns are not used in this match. With hierarchy groupings, Auto Assign will only assign a Source Generator's features to targets whose hierarchy matches the feature's selected hierarchy groupings, rather than assigning broadly and relying on pipeline-time filtering to drop mismatched features afterward. Hierarchy groupings configured on a Source Generator's features have no effect on this matching either. Auto Assign only evaluates dimension-name overlap, not hierarchy_groupings. A Source Generator can therefore be auto-assigned to a target even when the target's hierarchy doesn't match any of the feature's selected hierarchy groupings. That mismatch is enforced later, at pipeline-processing time, where the feature is dropped from the target's pipeline instead.
Complete the following steps:
-
Click Target View to assign one or more locations from the Locations Options list to the Selected list.
NOTE: To run Auto Assign, you must have at least one location under Selected Locations (both selected and applied) on the Target View page.
-
Click Auto Assign. A message box asks you to confirm that you want to run Auto Assign to assign events to targets based on their locations.
-
Click Run. The auto assign job posts to the job queue.
-
Click OK to close the jobs message box. The Job Progress dialog box displays.
-
Click Close at any time to close the Job Progress dialog box. The number of total mapped events and locations updates in the Assign page Project view.
After auto-assigning events and locations or assigning events and locations to specific targets, you can move to the Forecast page to set forecast ranges.

