Create Detail Items
Both methods create detail items using Transaction Matching and detail items are defined as X item types.
From Transaction Matching
From the Transactions page, you can create detail items from matched, unmatched, or unmatched (as of period end) transactions and send them directly into Account Reconciliations to both individual reconciliations and reconciliations within account groups. Detail items can be created by data set for selected transactions or all available transactions. Available transactions are those transactions that have not already been used to create a detail item in the current workflow period. Transactions can only be used once per workflow period to create a detail item and cannot be deleted if used to create a detail item in any workflow period. You can also create detail items for multiple reconciliations at once.
Aggregation can be done by:
-
Total (single sum amount)
-
Transaction Date (recommended)
-
Item Name
NOTE: The user creating the detail items must have access and entitlements to both Transaction Matching and Account Reconciliations.
These actions are not allowed while detail items are being created:
-
Processing in Account Reconciliations
-
Completing Workflow in Account Reconciliations
-
Running Process in Transaction Matching for the match set
-
Manual matching and unmatching in Transaction Matching for the match set
To create detail items:
-
From Transaction Status, select Matched , Unmatched, or Unmatched (As of Period End).
-
From the Reconciliation Link drop down, select an option to filter the list of transactions:
-
(All): Displays all transactions.
-
No Detail Item: Displays transactions that have not been used to create a detail item in the current workflow period. Use this option to ensure that you do not select a transaction that has already been used to create a detail item.
-
Detail Item Exists: Displays transactions that have been used to create a detail item in the current workflow period.
-
-
If you selected Unmatched or Unmatched (As of Period End), go to the next step. If you selected Matched, make selections from these filters to update the displayed transactions:
-
Match Reason Code: Select one or more reason codes or All.
-
Match Period: Select All, Current Period, or Future Periods
-
Import Period: Select one or more import periods or All.
-
-
Select the check box next to one or more transactions for which you want to create a detail item.
NOTE: The selected transactions must all be of the same currency level to create one detail item. Transactions are first aggregated by currency level.
-
Click Create Items.
-
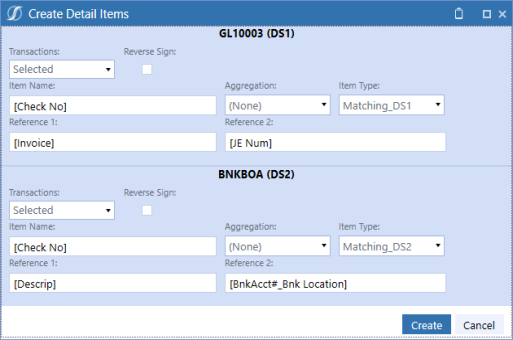
For each data set, make selections from these options:
-
Transactions: Options are: Selected, All, or None.
CAUTION: All creates detail items for all transactions in the data set, not just the transactions displayed on the first page.
-
Reverse Sign: Reverses the sign from positive to negative or vice versa.
-
Item Name: Defaults to the mapped Item Name field and can be changed. If left blank, it defaults to "Transaction Matching Item" as the item name.
-
Aggregation: Select from these options:
-
None: Creates a detail item for each transaction.
-
Total: Creates one detail item for all transactions in the data set.
-
Item Name: Creates a detail item for each unique item name.
-
Transaction Date: Creates a detail item for each transaction date.
-
-
NOTE: Regardless of the aggregation selected, transactions of different currencies will not aggregate into a single line item. For example, if you have 10 CAD and 10 USD transactions and selected total there would be two detail line items created, one for USD total and one for CAD total.
-
Item Type: Defaults to Matching_DS1, Matching_DS2, or Matching_DS3 depending on the associated data set. You can change this to be any item type in the control list.
-
Reference 1: Defaults to the mapped Reference 1 fields. If you make any changes in this field, the value that you input becomes Reference 1.
-
Reference 2: Defaults to the mapped Reference 2 fields. If you make any changes in this field, the value that you input becomes Reference 2.
-
-
Click Create.
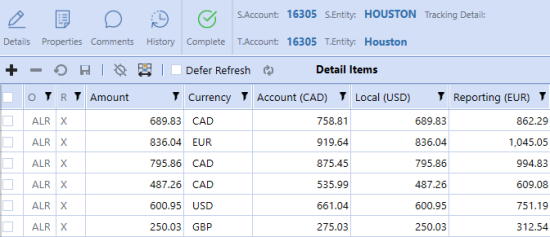
In Account Reconciliations, the detail items display as X item types.
From Account Reconciliations
From the Reconciliations page, you can pull transactions directly into Account Reconciliations to both individual reconciliations and reconciliations within account groups. To be able to pull transactions into Account Reconciliations, the Tracking Level Dimensions must be added to the Transaction Matching Data Set Definition. See Detail Item Integration Addendum.
From the Reconciliations Workspace, you can create detail items by matching transactions and pulling them into Account Reconciliations. Transactions are filtered to show only those that relate to the individual reconciliation or reconciliations within the account group and that are available for the current period. Detail items created this way are defined as X item types and can be auto-reconciled. See AutoRec.
NOTE: X item types created with overrides do not require supporting documentation. The ability to drill back to Transaction Matching provides the required support.
To create detail items:
-
Select a reconciliation or account group and then click Match Item.

-
Make selections in the Create Detail Item dialog box. These selections filter the transactions within the match set to only those that relate to the selected reconciliation or account group. In other words, where the tracking level in Account Reconciliations is the same as the tracking level in Transaction Matching.
-
Select the Match Set to use.
-
Select the Transaction Status: Matched, Unmatched, or Unmatched (As of Period End)

-
-
For each data set, make selections from these options:
- Transactions: Options are: Selected, All, or None.
CAUTION: All creates detail items for all transactions in the data set, not just the transactions displayed on the first page.
-
Reverse Sign: Reverses the sign from positive to negative or vice versa.
-
Item Name: Defaults to the mapped Item Name field and can be changed. If left blank, it defaults to "Transaction Matching Item" as the item name.
-
Aggregation: Select from these options:
NOTE: Regardless of the aggregation selected, transactions of different currencies will not aggregate into a single line item. For example, if you have 10 CAD and 10 USD transactions and selected total there would be two detail line items created, one for USD total and one for CAD total.
-
None: Creates a detail item for each transaction.
-
Total: Creates one detail item for all transactions in the data set.
-
Item Name: Creates a detail item for each unique item name.
-
Transaction Date: Creates a detail item for each transaction date.
-
-
Item Type: Defaults to Matching_DS1, Matching_DS2, or Matching_DS3 depending on the associated data set. You can change this to be any item type in the control list.
-
Reference 1: Defaults to the mapped Reference 1 fields. If you make any changes in this field, the value that you input becomes Reference 1.
-
Reference 2: Defaults to the mapped Reference 2 fields. If you make any changes in this field, the value that you input becomes Reference 2.
- Transactions: Options are: Selected, All, or None.
-
Select the transactions to include in the detail item and then click Create Items

The transaction is added as a detail item to the reconciliation.

Drilling Back to Transactions
From the Account Reconciliation workspace, you can select an X item type and drill back to the transaction detail.
NOTE: You can delete detail items (X item types) that have been pulled from Transaction Matching into Account Reconciliations. Doing so will allow the transaction to be used again in the current period, as it is no longer associated to a reconciliation. Select the item, click the minus sign, and then click Save. The transaction is removed and can be used to create a new detail item in the current workflow period.
To drill back:
-
Select an X item type detail item and then click Drill Back.
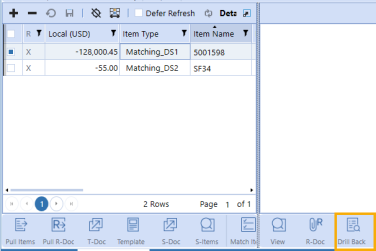
The transactional detail from Transaction Matching displays.

Navigating to Match Sets
From the Reconciliation Workspace, you can navigate to match sets in Transaction Matching.
-
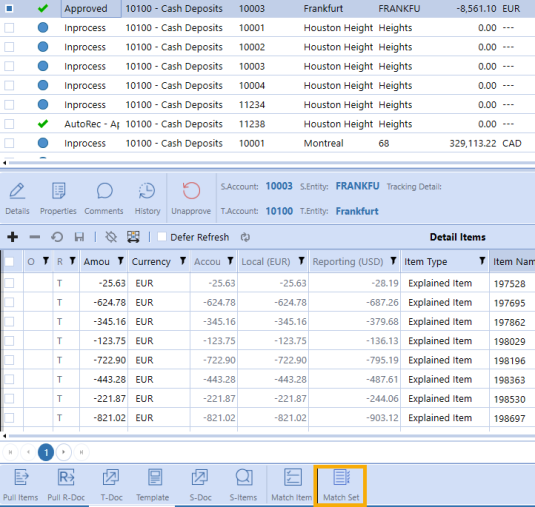
Select a reconciliation that has associated match sets.
-
Click Match Set.
-
If prompted, select the match set in Transaction Matching that you want to navigate to. If only one match set is applicable, the Transactions page opens.