Settings
|
|
The Settings page contains the Global Options tab in which key properties that guide administration are set as well as Categories, User Preferences, and Uninstall options. |

After updating the settings, click Save to save your changes.
Global Options
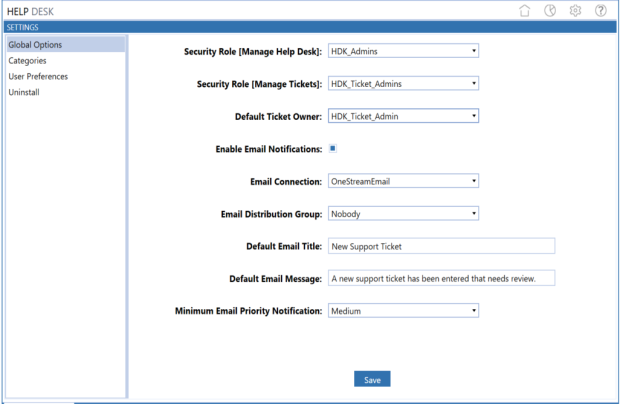
The Global Options tab allows Administrators to set security roles based on Managing Help Desk or Managing Tickets groupings. The Administrator can also enable email notifications, distribution groups, and a minimum ticket priority to trigger an email notification when support tickets are submitted or updated.
Security Role [Manage Help Desk]
The security group that can access all the Settings pages. The default value is Administrators.
Security Role [Manage Tickets]
The security group that can access the Manage Tickets pages. The default value is Administrators.
See the System Administration and System Security Roles sections of the Design and Reference Guide for more information on assigning security to different roles.
Default Ticket Owner
Upon install, this field is blank. The Default Ticket Owner is assigned when submitting a new ticket. The list of available users is determined by the security groups assigned in the Manage Help Desk and Manage Ticket settings.
Enable Email Notification
If activated, email notifications are sent to the defined Distribution Group when tickets are created, ticket owner has been reassigned, or if the status is updated.
Email Connection
Select an email connection from the dropdown list. The Email Connections are configured in the OneStream Application Server configuration and contain all of the necessary setup information for the local email provider including the sending email address, server credentials, host, port, and other information. The email connections list comes from the Database Server Connections list in the Application Server configuration.
For more details on email database connections, see the Installation and Configuration Guide.
Email Distribution Group
The user group that contains the users who receive the email notifications. Each user in the user group that has a valid email address is included in the distribution.
Default Email Title
The email title displayed in the new ticket email notifications.
Default Email Message
The email message included in the new ticket email notifications.
Minimum Email Priority Notification
Ticket priority level required to send email notifications for new tickets.
If set to High, then email notification is sent only for tickets that have a priority of High. If set to Medium, then email notification is sent for tickets that have a priority set to Medium and High. If set to Low, then email notifications are sent for Low, Medium, and High priority tickets.
Categories
Administrators can customize ticket categories for enhanced support ticket grouping and analysis.
There are three categories available and will default to titles of Category 1, Category 2, and Category 3. Within each Category, the administrator can create and define an unlimited number of sub-categories. The three categories can also be customized by changing the default names to fit your ticket grouping needs. Category titles can be customized or renamed at any time.
Categories for each support ticket display upon creating a new ticket, on the Ticket Request page, the Ticket Detail pane for each ticket, and in the Ticket Analysis page. See Filter by Category and Add or Edit Support Ticket Details to see where Categories display on those pages.
The use of Category 2 and Category 3 is dynamic. For example, you can rename Category 1 to Software Requests and Category 3 to Issues without having to create a user-defined name for Category 2. Once the lines are populated under Ticket Categories, the main Category is dynamically added to all areas similar to Category 1.
When migrating to 6.4, Category 1 does not have to be reset.
Customize a Category
Categories provide an easy way to group and analyze similar tickets.
-
In the Help Desk Settings, click Categories to display the Ticket Categories page. The three categories display at the top of the page.
-
Select the radio button of the category you want to customize, then click Edit on the far right. The Edit Category dialog displays the current display name for the selected category.
-
Type a descriptive name for the selected category and click Save.
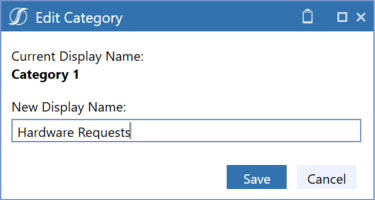
The new name for the selected category displays at the top of the Categories page.

-
Create sub-categories for the customized category as needed. See Define Sub-categories for a Category.
-
Repeat the above steps for other categories you want to define.
Define Sub-categories for a Category
-
At the top of the Categories page, select the category for which you want to define a sub-category.
-
In the Ticket Categories grid, click the Insert Row button. A new row displays.
-
Click in the Name column of the new row and type a descriptive name for the sub-category.
-
Click in the Description column of the new row and type a descriptive name for the sub-category. The Description displays in the category dropdown list upon creation or modification of the ticket category.
-
Click Save.
After clicking Save a sequentially assigned number displays for the sub-category in the row's Order column.
-
Select the order in which you want the sub-category to display by assigning a sequential number order to the Display column.
-
Repeat the above steps for other sub-categories you want to define for the category.
To delete a sub-category, select it and click Delete Row(s), then click Save.
NOTE: You can edit the description for an existing sub-category, but you cannot edit a sub-category name. If you need to change a sub-category name, you can only delete it if it is not assigned to a ticket (regardless of status). If it is not attached to a ticket, you can delete and re-define it. To do this, select the sub-category and click Delete Row(s) and then click Save, then follow the steps above to define a new sub-category.
User Preferences
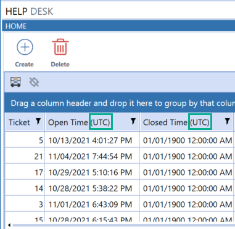
User Preferences settings control how times display to individual users on tickets they have permission to view. Once the User Preferences are set, the Open Time and Closed Time columns in the Support Ticket grid, the Time Stamp column for ticket attachments, and comments in the Ticket Details pane are updated.
User Time
The time zone you want to use when viewing ticket Open Time and Closed Time. There is no default user time shown in the User Preferences tab, however, if not set, UTC time is used for the Open Time when a ticket is created.
The following shows the default time stamp (UTC) in the Open Time and Closed Time columns in the Support Tickets grid.
If you change the User Time setting, the Open Time and Closed Time column reflects the change. The following shows the change to the column names when the user time is set to US-EST.

Daylight Savings
Select this check box to adjust Open Time and Closed Time information in Help Desk to Daylight Savings time. If not selected, then times do not adjust for daylight savings.
Uninstall
The Uninstall feature allows the Standard Application Reports user interface or the entire solution to be uninstalled. If done as part of an upgrade, any modifications performed on Standard Application Reports objects are removed. There are two uninstall options:
-
Uninstall UI removes Help Desk, including related dashboards and business rules but leaves the database and related tables in place. For some releases, this step should be performed before accepting any new version of Standard Application Reports since some of the dashboards or other objects may have been modified.
-
Choose this option if you want to accept a Help Desk update without removing the data tables.
-
The Help Desk Release Notes indicate if an over-install is supported.
-
-
Uninstall Full removes all the related data tables, all data, Standard Application Reports dashboards, and business rules.
-
Choose this option to completely remove Help Desk or to perform an upgrade that is so significant in its changes to the data tables that this method is required.
-
CAUTION: Uninstall procedures are irreversible.