Administrators can configure integration settings between Journal Entry Manager, various ERPs, and their accounting ecosystem. This page enables administrators to create ERP instances, and define the required or available fields for each ERP.
This page contains the following attributes:
-
ERP Name and Description: Assign a user friendly name for the ERP, along with any additional information needed. Each ERP can be inactivated through the Active field. If this field is set to No, no new templates can be created related to that ERP.
-
Connection Type: Displays a list of connectors created on the Connections page to be applied to each ERP. This connection serves as the destination for journal extracts during flat file transfers. Also, this connection is used to import journal templates, confirmation responses, and field value list templates. A Direct Download option is always available, even if no connectors are configured. See Field Value List and Journal Create and Edit.
-
Enable Auto Confirmation: When enabled, this setting pulls in a response file that automatically updates the posted status of a journal.
-
Confirmation Response Format: Specifies the format used for confirmation responses. Supported formats include JSON, CSV, and Tab Delimited.
-
Active: Indicates whether ERP is enabled.
-
Enable Auto Journal Import: Set to Yes to enable the automated workflow for importing journal entries. See Journal Create and Edit.
-
Enable Auto Field Value List Import: Set to Yes to enable the automated workflow for importing Field Value Lists through an import process. See Field Value List.
This page includes the following validations:
-
ERP Name must be unique and less than, or equal to 200 characters.
-
Description must be less than or equal to 250 characters.
IMPORTANT: If you include special characters, no error message will display. However, when saving, the special characters will be removed.

Details Tab
Once an administrator has created an ERPs, they can define the necessary fields for creating journal entries. This process involves documenting each field's name, header/line type, data types, such as Integer, Decimal, Date, or Text, character limit (based on the specifications of the destination ERP), and mapping to the journal grid. Multiple fields from different ERPs can be mapped and displayed in a single column when viewing journal entries across ERPs and templates within the journals grid.
General
Each ERP includes a list of General Fields, which are not specific to any individual ERP but apply broadly to all ERPs. See ERPs.
At the ERP level, you can choose the auto confirmation process. When enabled, users can select a preferred data structure for responses, including JSON, CSV, and Tab Delimited formats. If using this process, a text file formatted according to the assigned data structure must be placed in the PostingResponse folder, which is a child folder within the designated location for extracts, such as the OneStreamFile Folder or an SFTP site. For all structure types, headers are not required. However, fields must follow a specific order.
Each response in the document should appear in the following sequence:
-
Posting Status: Indicates whether the post was successful (True) or unsuccessful (False).
-
OS ID: Refers to the journal ID number assigned within Journal Entry Manager. Administrators can choose to enclose this value in quotation marks if a comma is required for CSV formatting or exclude the data when using a tab delimited format.
-
ERP ID: Represents the journal ID number designated in the destination ERP system.
-
Details: Captures any supplementary information for Journal Entry Manager. If the Posting Status is False, these details are recorded in the Details column of the State History table under the History tab for the respective journal. If the Posting Status is True, details are disregarded. For CSV structures, administrators can encapsulate this value as needed or exclude it in tab delimited formats. Administrators may choose to enclose this value in quotation marks if a comma is required for CSV formatting or exclude the data when using a tab delimited format.
The table below presents templates that indicate the required formatting for each data structure.
|
Data Format |
Example |
|---|---|
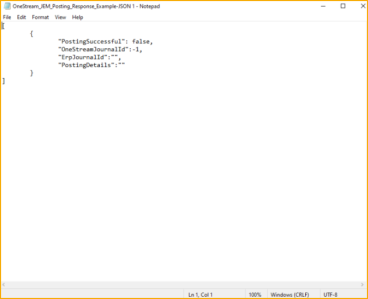
| JSON |
|
|
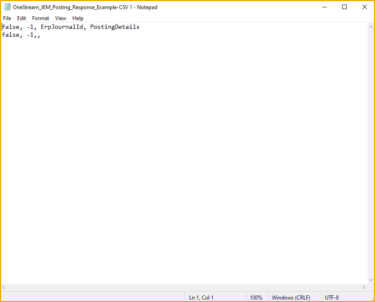
CSV |
|
|
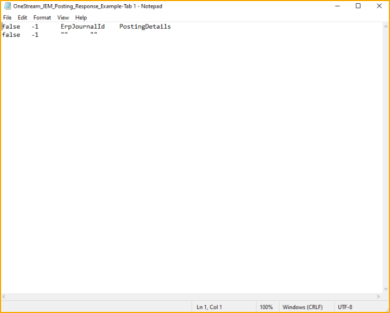
Tab Delimited |
|
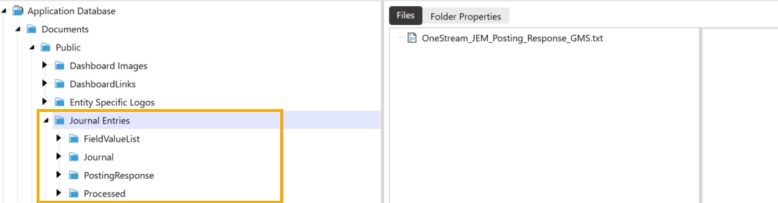
Folder Hierarchy Example:
-
Journal Entries: This folder is selected on the Connections page and applied to the ERP.
-
PostingResponse: This folder contains all confirmation responses that are imported to update the posting status for each journal entry.
IMPORTANT: All these sub-folders must be created manually. They are not automatically created during the installation of Journal Entry Manager.
After the response file is placed in the designated folder, you must run the GetJournalPostingResponses data management job. This job retrieves the response file and processes it to update the relevant journal entries. Each journal's Posting State is updated based on the posting confirmation response, such as Failed to Post or Posted.
If the response files contain any specific details, these are displayed in the details section of the State History table within the relevant journal's History tab, provided the Posting Status is Failed to Post.
CAUTION: Only one data management job can run at a time. If two are active, you’ll see this error: Unable to perform action at this time. A Get Journal Entry Responses job is currently running.
Fields
This page includes the following validations:
-
Field Name: Must be unique within each ERP system and must be less than or equal to 200 characters. You can have the same field name across multiple ERPs.
-
Header/Line Field: This field is required and cannot be modified once saved. If the field needs to change, this must be removed and added again.
-
Data Type: This field cannot be altered after the field is saved. If the field needs to change, this must be removed and added again.
-
Character Limit: Text fields are between 1 and 4,000, and integer fields are between 1 and 19. The value cannot be zero or contain special characters.
-
Format: Only applies to decimal data types. If a format is set for a non-decimal field, it will revert to None upon saving.
-
Journal Grid Mapping: Enables administrators to align fields across multiple ERPs so they appear consistently in the Journal Grid columns. You can select from custom columns to include values in the journal grid column. This is not a required field.
Format Tab
Format
After all fields are added for a given ERP, they can be configured to match the required format for extraction and sending to the destination ERP. Various options are available to support flexible configuration, enabling you to tailor settings as needed for your ERP. The following fields can be selected and adjusted:
-
File Extension (Required): Allows specification of a file extension such as .txt or .csv.
-
Delimiter: This is an open field for any desired delimiter. If left blank, no delimiters will separate fields upon extraction.
NOTE: Including /t in the delimiter field will produce a tab-delimited extract.
-
File Name (Required): Enables a consistent file name for extracts. The system appends this file name with the journal name and OneStream ID. Anything entered after this field is appended.
-
Header Format (Required): Determines whether header fields appear on a single line or are combined with each line field.
-
Date Format (Required): Enables you to set a specific date format different from OneStream’s default, displaying dates to end users in their local format while meeting ERP-specific formatting needs.
-
Exclude Sign: If set to Yes, this will remove the sign from any negative amount fields during extraction.
-
Decimal Separator: Enables you to specify any character as the decimal separator. If left blank, no separator is included unless the ERP adds one automatically.
-
Decimal Number Group Separator: Enables you to input any character for separating number groups in decimals. Leaving this blank results in no group separator for decimals.
NOTE: Integers never use a group separator.
From the Details and Standards fields, in the Header and Line Field Order tables, you can select which fields are required in the extract and their specific order.
Field Order
You can customize your formatting options by Field Order fields options.
-
ERP Field: Specifies the ERP field. You can create custom fields such as Journal ID, Cost Center, or other.
-
Extract Order: Determines the sequence in which fields are extracted and displayed.
-
Padding Text: Adds custom padding, such as spaces, words, or other characters, to either side of the field, based on the specified alignment.
-
Padding Alignment: Determines where the padding is applied relative to the value. This option is only applicable to fields with a character limit, such as Text and Integer types.
-
Default Value : Specifies values for non-required fields left blank in journals.
-
Pad to Fill: Adds spaces (for text) or '0's (for integers) to meet the character limit during extraction.
-
Decimal Format option enables a different decimal format in the extract than in Journal Entry Manager, which is useful if the ERP requires more decimal places than typically displayed.

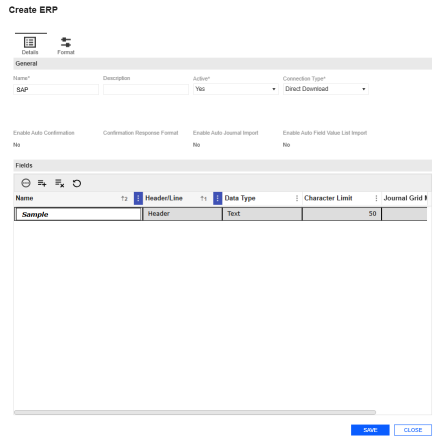
Create ERP
-
Go to ERPs > ERPs.
-
Click the Create button.
-
Complete the following General fields:
-
Name the ERP.
-
Enter a Description (optional).
-
From the Active drop-down menu, select Yes or No.
-
From the Connection Type drop-down menu, select a connection.
-
From the Enable Auto Confirmation drop-down menu, select whether to enable this option.
-
From the Confirmation Response Format drop-down menu, select your response format.
-
From the Enable Auto Journal Import, select whether to enable this option.
-
From the Enable Auto Field Value List Import, select whether to enable this option.
-
-
Create the Create button
-
Under Fields, click the Insert Row button.
-
Enter a name. Select Header/Line, Data Type, Character Limit, Format, and Journal Grid Mapping.
-
-
Click the Save button
-
Click the Format tab.
-
Complete the following Format fields:
-
From the File Extension type drop-down menu, select a type.
-
From the Header Format drop-down menu, select a Header Format.
-
Enter a Decimal Separator.
-
Enter a Delimiter.
-
From the Data Format drop-down menu, select a format.
-
Enter a Decimal Number Group Separator.
-
Enter a File Name.
-
From the Exclude the Sign drop-down menu, select whether to exclude this option.
-
-
Under Field Order, click the Insert Row button.
-
Select an ERP Field. Specify Extract Order, Padding Text, and Padding Alignment from the drop-down menus.
-
Enter a Default Value and check Pad to Fill if applicable.
-
-
Click the Save button.
Edit ERP
-
Select an existing ERP.
-
Click the Edit button.
-
The Edit ERP slide-out panel displays the current inputs of the ERP selected in the Detail and Format tabs. Make your changes.
-
Click the Save button to save your changes.
Delete an ERP
-
Select an existing ERP.
-
Click the Delete Row button.


