The Journals grid is the primary workspace for most users (Preparers and Approvers). This page provides access to all journals according to selected filter criteria, allowing journals to be viewed, edited, prepared, and approved.

The Journal Grid Column Settings page can be configured, see Journal Grid Column Settings.
The KPIs indicate the quantity of journals within the selected filter criteria. By clicking the label or number, you can further filter the Journals grid to show only journals in the chosen category.
Example: If you click the Prepared tile, only Prepared journal entries display.

The Posting Period and Posting State filters enable you to refine which journals are shown in the Journals Grid. The current period options include:
-
Current Period: The open period if only one exists, or the oldest open period if multiple periods are open.
-
Open Periods: All periods with an Open status.
-
Future Periods: Displays journals assigned to a period later than the current period.
-
Last 6 Periods: Shows the previous six periods.
-
Last 12 Periods: Shows the previous twelve periods.
-
Specific Closed Periods: Displays past closed accounting periods that match the selected filter criteria.
Example: If you select January 2025, you can view and filter within that specific closed period.
Journal Create and Edit
Use the Journals grid to create journals. The page updates dynamically based on the selected template. After selecting a template and completing all General Required fields, clicking the Create button, populates both the header and line field sections with the fields specified within that template. Information entered on this page is displayed and verified based on the Field Attributes configured in the Administration section.
Example: If a field is categorized as a date field, the input area will be a date picker.
If a field has an associated Field Value List, the input area is a drop-down menu displaying the values associated with that Field Value List.
This page provides two actions that do not advance the journal's approval or posting status:
-
Validate: Runs validations against the journal and informs the user of any validation errors.
-
Save: Retains and saves all information within the slide-out panel.
NOTE: All changes must be saved before validating.
IMPORTANT: The visibility of Auto Reversal fields and the Manual Posting Confirmation fields are determined by the Journal Template’s Controls settings. When Enable Auto Reversals or Enable Manual Posting Confirmation is set to No, the related fields do not display for Approver‑and‑below roles. Administrators may continue to see some options. These settings are configured in the Journal Templates. See Journal Template.
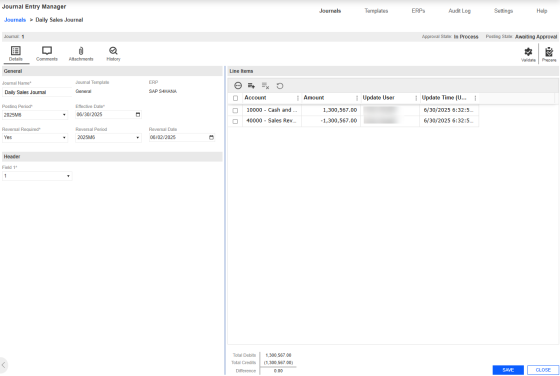
Create a Journal
-
Go to Journals > Journals.
-
Click the Create button.
-
Complete the following General fields:
-
Enter a Journal Name.
-
From the Posting Period drop-down menu, select a period.
-
From the Reversal Required drop-down menu, select whether to enable this option.
-
If Reversal Required is Yes, from the Reversal Period drop-down menu, select a period.
-
If Reversal Required is Yes, select a Reversal Date.
-
From the Journal Template drop-down menu, select a template.
-
Select a Effective Date for the journal.
-
-
Click the Create button
-
Under Header, select your Field.
-
Under Line Items, click the Insert Row button.
-
Enter values for all fields marked as required. Fields that are not required can be left blank.
-
Enter the amount.
NOTE: The available fields are dynamic and vary depending on your ERP setup.
-
-
Click the Save button.
Delete a Journal
-
Select an existing Journal.
-
Click the Delete button.
IMPORTANT: Once a journal is confirmed posted, it cannot be deleted.
Reversing Journals
In the Journal Create slide-out panel, you can set a journal to require a reversing entry. When this option is enabled, you are required to select a Reversing Period and a Reversal Date. The selected reversal date is used as the Effective Date for the new reversing journal.
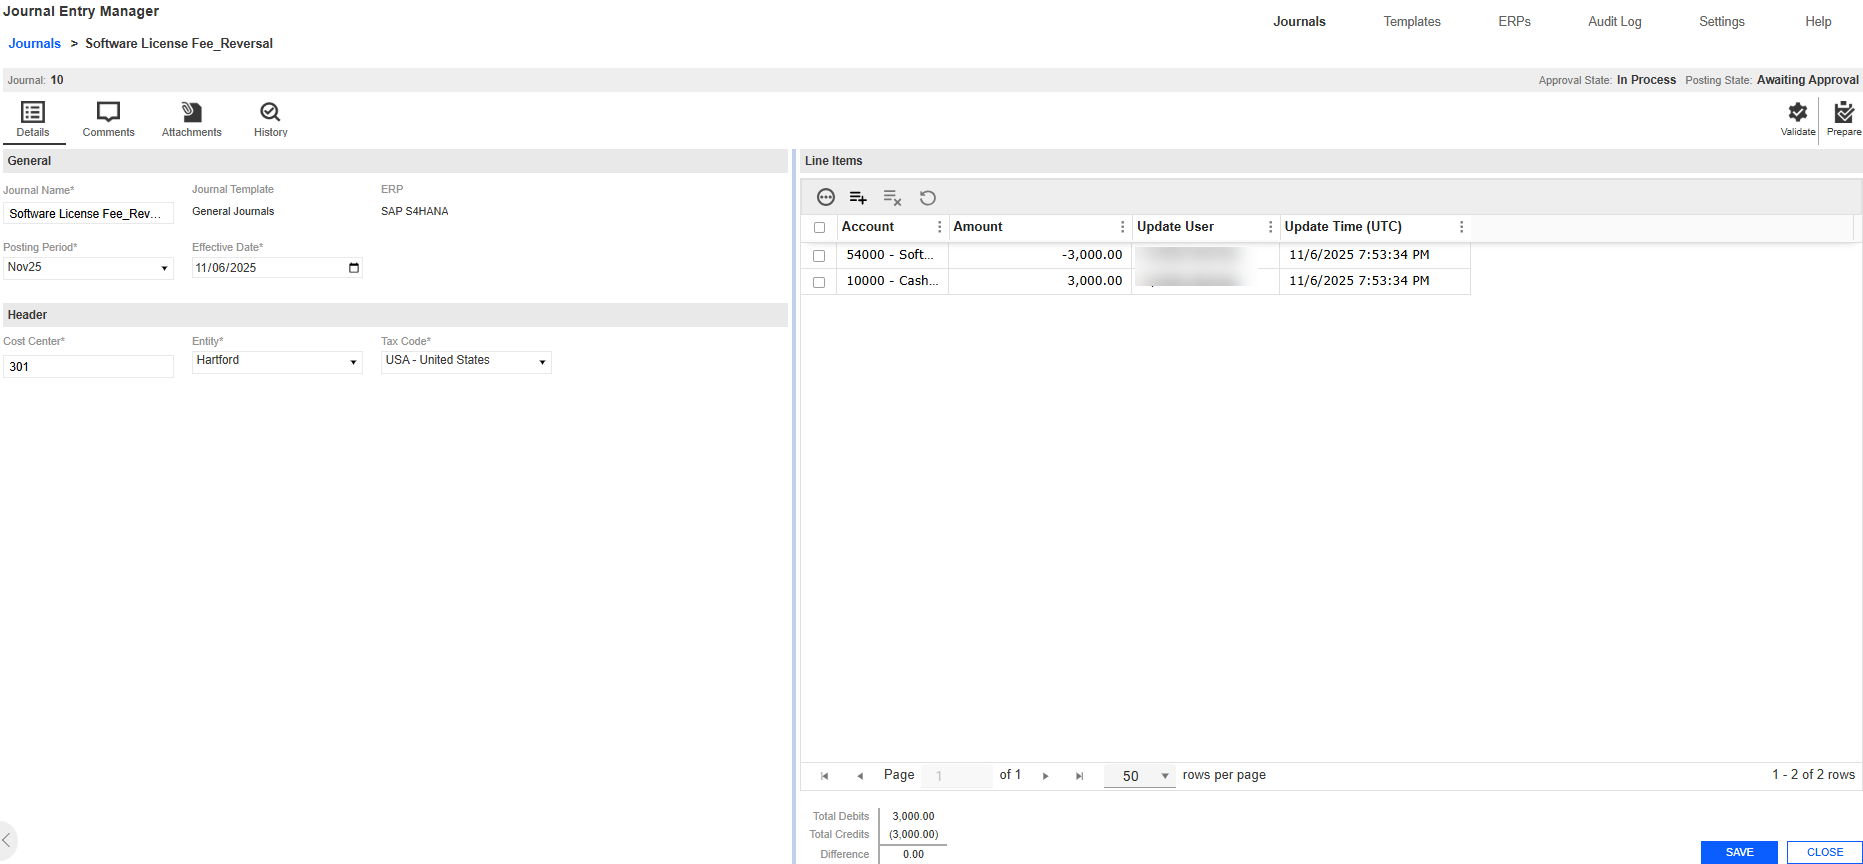
After the originating journal is confirmed and posted, a reversing journal is automatically created and placed in the specified period with an approved status. The name of the reversing journal will correspond to the originating journal name, with _Reversal appended added to identify the connection. When setting up the reversing journal, the following validations apply:
-
The Reversal Period must be the current or a future period. Previous periods are not available in the drop-down menu.
-
The Reversal Date must be a valid date within the selected reversal period.

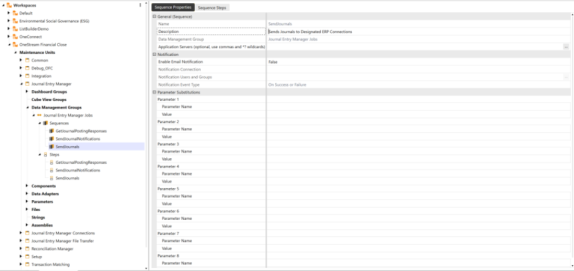
When you run the SendJournals Data Management job, all reversing journals with an Effective Date that is the same as or prior to the current date are sent.
Manual Reversals
Preparers, approvers, or administrators can manually create a reversing journal from an existing journal entry. This enables corrections or adjustments that were not anticipated during the original journal creation.
To initiate a manual reversal, select a journal that is in In Process status or higher. When eligible, a Reverse button will display.
When the Reverse button is selected, a new journal dialog box opens with all header and general fields pre-populated based on the original journal. The following exceptions apply:
-
The Journal Name is duplicated with _Reversal appended to identify the connection.
-
All details such as comments, attachments, and line items carry over, except for the History tab, as the reversal acts as a standalone journal.
For line-level details, debit and credit amounts are flipped based on the Global Option for Amount Fields:
-
Debit amounts become credits.
-
Positive values become negative.
Once created, the reversal journal enters the In Process state and follows the standard approval workflow.
Unlike scheduled reversals, manual reversals are not automatically sent by the SendJournals Data Management job. They must be manually sent the same as a standard journal. They provide flexibility for users to reverse journals at any time, offering a solution for non-standard or late-discovered adjustments.
Reverse
-
Select an existing Journal.
-
Click the Reverse button.
-
From the Posting Period drop-down menu, select the appropriate period.
-
In the Journals > Reverse page, the reverse journal contains the fields from the original journal. Modify these fields as needed.
-
Click the Reverse button.
-
In the Header section, review and update any existing or copied fields as necessary.
-
In the Line Items section, review and adjust existing or copied fields as necessary.
-
Click the Save button to apply your changes.
Copy Journal
The Journal Copy slide-out panel enables you to duplicate an existing Journal and create a copy. Upon initialization, the Journal Copy slide-out panel assigns the new template a name by appending _Copy to the original Journal name, indicating that it is a duplicate. The name is not subject to a unique name validation until the Copy action is confirmed. All other fields are transferred and remain editable, except for the ERP field and Journal Template, as these fields are associated with a specific ERP system.
When you select a Journal and click the Copy button, a slide-out panel displays with Copy and Cancel options. The new journal is only created in the database once the Copy button is selected. If Cancel is selected, the slide-out panel closes without generating an additional journal in the database.
This slide-out panel has validations that include:
-
The Copy slide-out panel uses the same validations as the Journal Create slide-out panel. See Journal Create and Edit.

Copy a Journal
-
Select an existing Journal.
-
Click the Copy button.
-
From the Posting Period drop-down menu, select the appropriate period.
-
In the Copy Journal slide-out panel, the duplicate journal contains the fields from the original journal. Modify these fields as needed.
-
Click the Copy button.
-
In the Header section, review and update any existing or copied fields as necessary.
-
In the Line section, review and adjust existing or copied fields as necessary.
-
Click the Save button to apply your changes.


