Journal entries can be created manually using Journal Entry Manager UI. For situations involving large volumes of data, you can use the import process for creating or editing journal entries.
When the Template icon is selected, an Excel file containing a blank Journal template is downloaded. This file contains the same fields and available values as those shown in the UI, enabling users to complete it offline. The security settings used in the solution for template selection also apply here, preventing users from posting a journal using a template they do not have permission to access. A user can select a journal and then use the Export button to export an existing journal if they choose to edit it in Excel. All Field Value List options and other drop-down menu options available within the Journal Entry Manager are included in the Excel file template or export, along with the same validations.
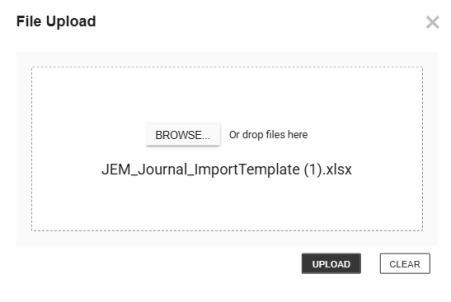
After creating or editing a journal, users can click Import and upload the Excel file.
NOTE: A user can only upload one file at a time.
IMPORTANT: Excel formulas within the template are now honored during import. This prevents errors and supports more flexible spreadsheet use.
IMPORTANT: The visibility of Auto Reversal fields is determined by the Journal Template’s Controls settings. When Enable Auto Reversals is set to No, the related fields do not display for Approver and below roles. Administrators may continue to see some options. Manual Posting Confirmation field visibility is not impacted by Journal Template Controls settings. These settings are configured in the Journal Templates. See Journal Template.
Import
-
Go to Journals > Journals.
-
Click the Import button to import your Journal Entries.
-
Click the Browse button or drop your file within the File Upload dialog box.
-
Use File Explorer to browse and select the file you want to import.
-
Click the Open button.
-
Click the Upload button.
Template
-
Click the Template button to download a template to import.
-
In the Journal Import Template slide-out panel, select a Journal Template from the drop-down menu and click the Create button.
-
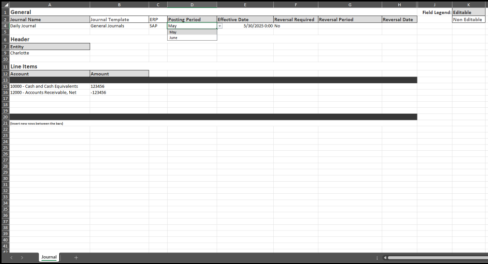
The JEM_Journal_Template.xlsxfile is automatically downloaded to your default downloads location.
IMPORTANT: Ensure that you click the Enable Editing button on the Excel Sheet.
-
Fill out the following fields under General:
-
Enter a Journal Name.
-
From the Posting Period drop-down, select a period.
-
Enter a Effective Date for the journal.
-
From the Reversal Required drop-down, select whether to enable this option.
-
If Reversal Required is Yes, from the Reversal Period drop-down, select a period.
-
If Reversal Required is Yes, select a Reversal Date.
NOTE: The Journal Template and ERP fields should not be edited.
-
-
Under Header, fill out the following fields:
-
If a Field Value is associated to the field, select from the drop-down. If no field value list is associated, input the desired value.
-
-
Under Line Items, fill out the following fields under Line Items:
-
If a Field Value is associated to the field, select from the drop-down. If no field value list is associated, input the desired value.
-
Enter an amount for each line.
NOTE: Inset new rows between the bars.
-
-
Save your file.
Export
-
Select an existing Journal you want to export.
-
Click the Export button.
-
The JEM_Journal_Export.xlsx file is automatically downloaded to your default downloads location.
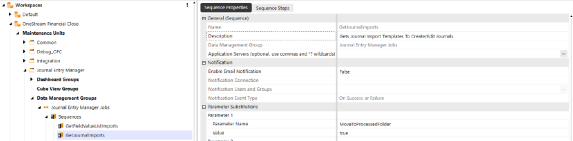
Automated Journal Import
Administrators can use the folder structure and a data management job to automatically import journal entries into JEM using Task Scheduler. This setting is managed at the ERP level. On each ERP, set the Enable Auto Journal Import option to Yes. The GetJournallmports data management job searches for the specified parent folder for each individual ERP's Connection Type. See Connections. You are required to set up sub-folders with the following folder names:
-
Journal
-
Processed
After the folder hierarchy is set up, you can choose how OneStream manages already imported journals. In Parameter 1 of the data management job, you can set MoveToProcessedFolder to either True or False.
-
When set to True, all imported journals are moved from the Journals folder to the Processed folder.
-
If set to False, the system automatically deletes the imported journals.
If journals are moved to the Processed folder, it is necessary for the organization to manually clear that folder to prevent accumulation of files.
When journals are ready for import, they must be placed in the Journals folder and use the following file name format: OneStream_JEM_Journal_. Additional text may be appended to the end of the file name as needed.
IMPORTANT: You must add OneStream_ to the export file to import through the data management.
Folder Hierarchy Example:
-
Journal Entries: This folder is selected within the Connections page and applied to the ERP.
-
Journal: This folder contains all journals that will be imported.
-
Field Value List: This folder contains all Field Value Lists that will be imported.
IMPORTANT: All these sub-folders must be created manually. They are not automatically created during the installation of Journal Entry Manager.

Import as Attachment
You can automatically attach import files to journals using a template field calledInclude Import as Attachment. When you download a journal template from theJournalspage and fill it out, the Excel file you import will be automatically attached to the journal entry, if the template has Include Import as Attachment set to Yes. If the field is set to No, no attachment will be added or updated. This also works when using the Journal Import Data Management job. SeeImportandTemplates.


